skoda Workshop Repair Guides

Skoda Workshop Service and Repair Manuals

Replacing the flange shaft gasket rings (gearbox assembled) > < Disassembling and assembling the output shaft
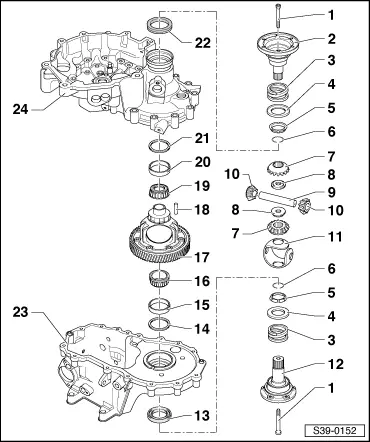
Disassembling and assembling differential gear
Special tools and workshop equipment required
t  Pressure plate -MP3-406 (VW 401)-
t  Pressure plate -MP3-407 (VW 402)-
t  Pressure spindle -MP3-408 (VW 412)-
t  Pipe section -MP3-409 (VW 418 A)-
t  Thrust piece -MP3-411 (VW 454)-
t  Press-on sleeve -MP3-412 (VW 455)-
t  Distance sleeve -MP3-458/2-
t  Press-on sleeve -MP3-413 (VW 510)-
t  Pressure pipe -MP6-408 (30-14)-
t  Thrust piece -MP3-431 (3002)-
t  Counterholder -MP1-223 (3067)-
t  Pipe -MP6-419 (3259)-
t  Pipe for the wheel bearing -T30019 (3345)-
t  Tapered-roller bearing extractor -V.A.G 1582-
t  Gripper -V.A.G 1582/4-
t  Interior extractor -Kukko 21/7-
t  Countersupport -Kukko 22/2-
t  Drive bushing -MP3-427 (40-21)-
t  Gripper -V.A.G 1582/3-
t  Hot-air blower -V.A.G 1416-
   
  Note
t  Before installing, heat the inner ring/tapered-roller bearing with the hot-air blower -V.A.G 1416- to 100°C.
t  Replace both tapered-roller bearings together.
t  When replacing the tapered-roller bearing of the differential gear housing, gearbox housing and clutch housing adjust the differential gear → Chapter.
1 - Conical screw, 25 Nm
q   screw into threaded piece -Pos. 8-
2 - Right flange shaft
q   do not interchange, the left and right flange shafts are different
3 - Pressure spring for flange shaft
q   fitted behind flange shaft
4 - Thrust washer
q   Fitting position: Collar towards pressure spring
5 - Conical ring
q   Fitting position: Cone towards differential gear housing
6 - Circlip
q   holds the conical ring, stop disc and pressure spring in position when the flange shaft is removed
7 - Large differential bevel gear
q   installing → Fig.
8 - Threaded part
q   installing → Fig.
9 - Differential bevel gear shaft
q   when removing, the tensioning sleeve -Pos. 18- is cut out → Fig.
q   installing → Fig.
10 - Small differential bevel gear
q   installing → Fig.
11 - Stop disc compound
q   when installing moisten with gearbox oil
q   on certain gearboxes the stop disc compound was provided with a land → Fig.
12 - Flange shaft left
q   with dust guard
q   do not interchange, the left and right flange shafts are different
13 - Sealing ring
q   for left flange shaft
q   diameter of left and right differ
q   replace with installed gearbox → Chapter
14 - Adjusting washer S1
q   for differential gear
q   always 1 mm thick
q   on gearboxes made out of aluminium as of production date 12.06 the adjusting washer S1 for outer ring/tapered-roller bearing is not fitted → Chapter
q   Bearing pedestal for outer ring/tapered-roller bearing is adapted
q   Assignment → Electronic Catalogue of Original Parts
15 - Outer ring/tapered-roller bearing
q   removing → Fig.
q   installing → Fig.
16 - Inner ring/tapered-roller bearing
q   remove → Fig.
q   pressing on → Fig.
17 - Differential gear housing
q   with riveted pinion for final drive
q   is paired with the output shaft, replace together
18 - Tensioning sleeve
q   to secure the differential bevel gear shaft
q   is cut when removing → Fig.
q   installing → Fig.
19 - Inner ring/tapered-roller bearing
q   remove → Fig.
q   pressing on → Fig.
20 - Outer ring/tapered-roller bearing
q   pressing out → Fig.
q   installing → Fig.
21 - Adjusting washer S2
q   for differential gear
q   Determine thickness → Chapter
22 - Sealing ring
q   for right flange shaft
q   diameter of left and right differ
q   replace with installed gearbox → Chapter
23 - Gearbox housing
q   is made out of aluminium or magnesium → Chapter
q   on gearboxes made out of aluminium as of production date 12.06 the adjusting washer S1-Pos. 14- for outer ring/tapered-roller bearing is not fitted → Chapter
q   Bearing pedestal for outer ring/tapered-roller bearing is adapted
q   Assignment → Electronic Catalogue of Original Parts
q   repairing → Chapter
24 - Clutch housing
q   is made out of aluminium or magnesium → Chapter
q   Assignment → Electronic Catalogue of Original Parts
q   repairing → Chapter

   
Remove outer ring/tapered-roller bearing from gearbox housing
A - Countersupport, e.g. -Kukko 22/2-
B - Interior extractor 46 up to 58 mm, e.g. -Kukko 21/7-
  S39-0146
Press in outer ring/tapered-roller bearing in the gearbox housing
–  If necessary, position adjusting washer S1 always 1 mm thick, under outer ring.
  Note
On gearboxes made out of aluminium as of production date 12.06 the adjusting washer S1 for outer ring/tapered-roller bearing is not fitted The bearing pedestal for outer ring/tapered-roller bearing in the gearbox housing is adapted. Difference between the housings → Anchor.
–  Support the gearbox housing with pipe -MP6-419 (3259)- and pressure pipe -MP6-408 (30-14)- directly below the bearing support.
  N39-1104
Remove inner ring/tapered-roller bearing on the side of the differential cage
–  Before fitting the extractor, position distance sleeve -MP3-458/2- and thrust piece -MP3-431 (3002)- on the differential gear housing.
  S39-0148
Press on inner ring/tapered-roller bearing on the side of the differential cage
  WARNING
Wear protective gloves!
–  Before pressing on, heat the inner ring/tapered-roller bearing with the hot-air blower -V.A.G 1416- to approx. 100°C.
–  Support the opposite side of the inner ring with an insertion bushing -MP3-412 (VW 455)-.
  S39-0149
Remove inner ring/tapered-roller bearing on the side of the gear pinion
–  Before fitting the extractor, position distance sleeve -MP3-458/2- and thrust piece -MP3-431 (3002)- on the differential gear housing.
  N39-1107
Press on inner ring/tapered-roller bearing on the side of the gear pinion
–  Support the opposite side of the inner ring with an insertion bushing -MP3-412 (VW 455)-.
  N39-1106
Press the outer ring/tapered-roller bearing -A- out off the clutch housing
B - Interior extractor 46 up to 58 mm, e.g. -Kukko 21/7-
–  While doing so tighten the interior extractor behind the outer ring/tapered-roller bearing.
  S39-0153
Press outer ring/tapered-roller bearing into the clutch housing
–  Support the clutch housing with a pipe for wheel bearing -T30019 (3345)- directly below the bearing support.
  S39-0151
Press out differential bevel gear shaft
The tensioning sleeve is cut during pressing out.
–  Remove the remaining parts of the tensioning sleeve out of the differential gear housing and the differential bevel gear shaft.
  S39-0150
On certain gearboxes the stop disc compound was provided with lands -A- in the area of the openings.
Therefore the differential gear housing was provided with a round slot -B-.
–  Install stop disc compound with gearbox oil.
–  Insert the stop disc compound in such a way that it locks into the slot -B- in the differential gear housing.
  S39-0351
Install differential bevel gears
–  Install stop disc compound with gearbox oil.
–  Insert both large differential bevel gears and secure (e.g. with flange shafts).
–  Insert both small differential bevel gears with a 180° offset.
–  Push in the differential bevel gear shaft -arrow A- up to the first small differential bevel gear.
–  Insert the threaded parts -arrows B- in the large differential bevel gears.
   Fitting position: Shoulder towards differential bevel gear.
–  Insert the differential bevel gear shaft up to stop and secure with new -Spannhülse-.
  N39-0050

Replacing the flange shaft gasket rings (gearbox assembled) > < Disassembling and assembling the output shaft