
Superb
| Summary of components of front wing |
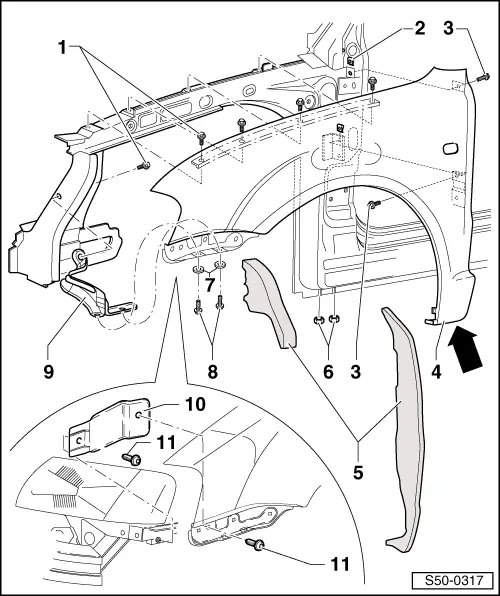
| 1 - | 8 Nm |
| 2 - | Nut |
| 3 - | 8 Nm |
| 4 - | Front wing |
| q | Removing: |
 WARNING
|
| – | Remove front bumper and guide section → Chapter. |
| – | Remove front wheelhouse liner → Chapter. |
| – | Remove damper parts Pos. 5 (only for vehicles with TDI engines). |
| – | Remove side turn signal lamp → Electrical System → Rep. Gr.94. |
| – | Remove separator panel → Chapter. |
| – | Remove seals for engine bonnet and Bowden cable coupling from front wing Pos. 4. |
| – | Unscrew nuts Pos. 6. |
| – | Unscrew screws Pos. 1 and Pos. 3. |
| – | Heat the wing with a hot air blower in the joint with the pillar A -arrow- and remove. |
 Note
Note| Heat the wing only for a short period to max. 100°C, in order to avoid damage to paintwork. |
| q | Installing: |
| Installation is carried out in the reverse order; pay attention to the following points: |
| – | Adjust front wing → Body Repairs → Rep. Gr.00. |
Note| t | When assembling the wing -4-, the screws -8- must generally be fitted with the washers -7- even if no washers were present when disassembling the wing. |
| t | Additional operations should be carried out after the battery earth strap has been connected → Electrical System → Rep. Gr.27. |
| 5 - | Damper parts |
| q | for vehicles with TDI engines |
| 6 - | 8 Nm |
| 7 - | Washer |
| 8 - | 8 Nm |
| 9 - | Strut |
| 10 - | Bracket |
| 11 - | 8 Nm |