|
Drive Shaft Assembly with Multi-Plate Clutch C1
and C2, Remove and Install (AF20)
 Remove Remove
Remove transmission – see operation "Transmission, Remove
and Install (AF 20)". Secure converter against falling out.
|
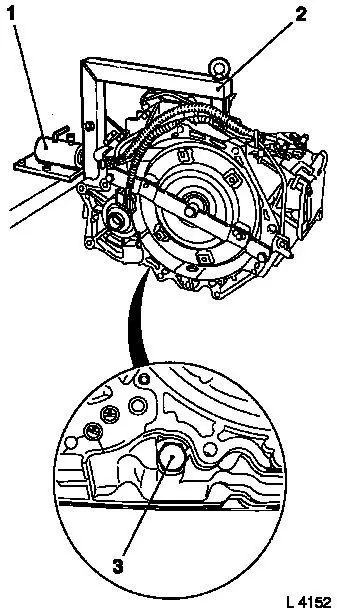
Attach transmission to KM-694-A (2). Attach assembly to KM-113-2
(1).
Remove fluid drain bolt (3), drain transmission fluid and
collect for damage diagnosis – see operation "Transmission
Fluid Condition, Check (AF 13-II/AF 17/AF 20/AF 22)".
Remove converter – see operation "Converter and/or Fluid
Pump Seal Ring (AF 13-II/AF 17/AF 20/AF 22)".
|
|
Remove rear cover with piston C1 – see operation "Rear
Cover with Piston C1, Remove and Install (AF 20)".
|
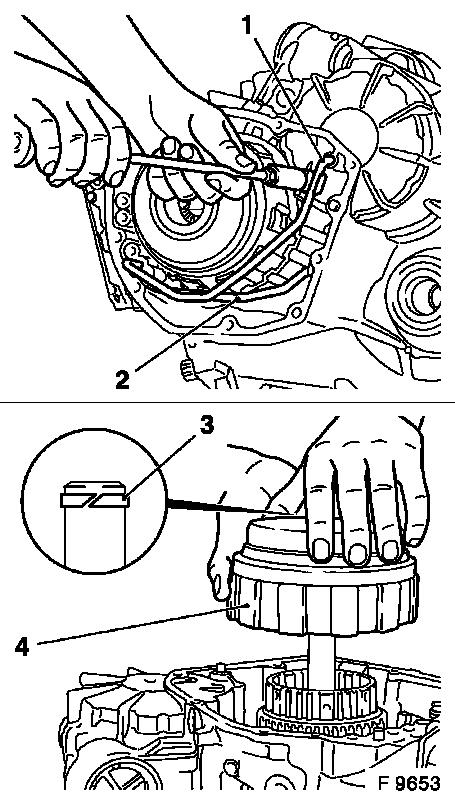
Remove pipes (1) and (2) for actuation – for this, remove
pipe clamp. Release pipe ends with large screwdriver – do not
bend pipes. If necessary, remove pipes with KM-J-7004 and
KM-586.
Remove drive shaft assembly (4) with multi-plate clutch C1 and
C2 – note condition and installation position of thrust
bearing and race.
 Install
Attach new cut seal ring (3) to drive shaft – do not
expand more than necessary.
|
|
|
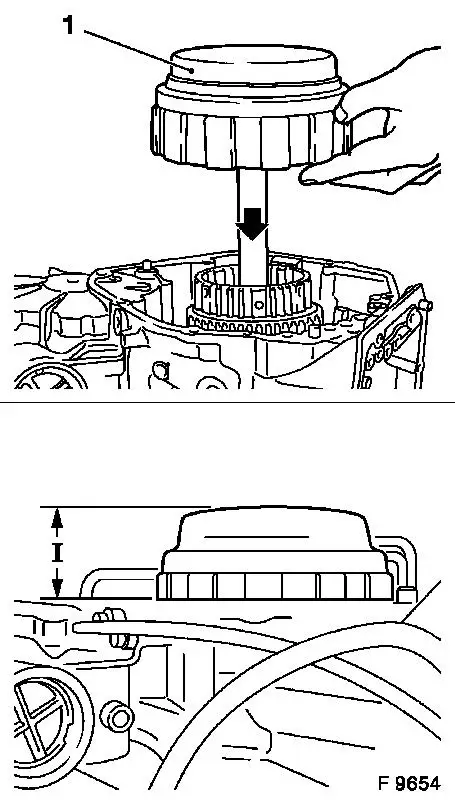
Insert drive shaft assembly (1) with multi-plate clutch C1 and
C2 into transmission. Align lining plates C1 and C2 with
screwdriver and thread in sun gear and rear internal gear.
 Inspect
When installed correctly, dimension (I) from drive shaft to main
housing upper edge amounts to 51.3 to 52.3 mm / 2 to 2.1 in.
Install
Carefully drive actuation pipes into relevant bores in
transmission using plastic hammer – avoid deformation.
Install pipe clamp at transmission – Tightening torque 7
Nm / 5 lbf. ft.
Install rear cover with piston C1 – see operation "Rear
Cover with Piston C1, Remove and Install (AF 20)".
|
|
Install converter – see operation "Converter and/or Fluid
Pump Seal Ring, Replace (AF 13-II/AF 17/AF 20/AF 22)". Secure
converter against falling out.
|
Attach fluid drain bolt (3) with new seal ring to transmission
– tightening torque 40 Nm / 29.5 lbf. ft.
Remove transmission assembly from KM-113-2 (1) with KM-694-A.
Remove transmission from KM-694-A (2).
Install transmission – see operation "Transmission, Remove
and Install (AF 20)". Fill up transmission fluid
Inspect
Check and correct level of transmission fluid – see
operation "Transmission Fluid Level, Check and Correct (AF 13-II/AF
17/AF 20/AF 22)".
|
|
|
