|
Freewheel F1, Disassemble and Assemble (AF 20)
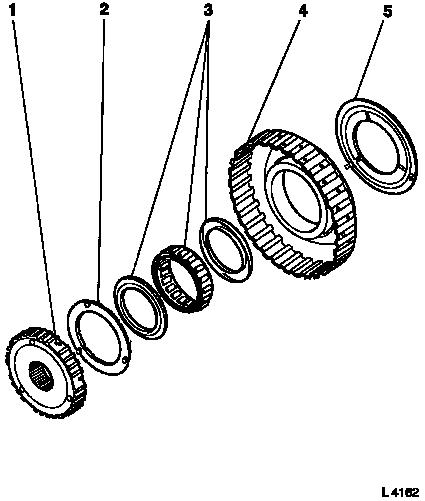
Survey
|
1
|
Inner race (overrunning clutch brake hub)
|
|
2
|
Thrust washer
|
|
3
|
Freewheel F1
|
|
4
|
Outer race (2nd gear brake)
|
|
5
|
Thrust washer
|
|
|
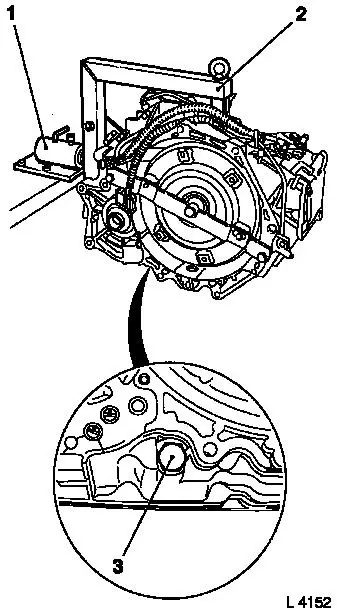
 Remove Remove
Remove transmission – see operation "Transmission, Remove
and Install (AF 20)". Secure converter against falling out.
|
Attach transmission to KM-694-A (2). Attach assembly to KM-113-2
(1).
Remove fluid drain bolt (3), drain transmission fluid and
collect for damage diagnosis – see operation "Transmission
Fluid Condition, Check (AF 13-II/AF 17/AF 20/AF 22)".
Remove converter and fluid pump seal ring – see operation
"Converter and/or Fluid Pump Seal Ring, Replace (AF 13-II/AF 17/AF
20/AF 22)".
|
|
Remove fluid pump assembly with multi-disc brakes B1 and B2
– see operation "Fluid Pump Assembly with Multi-disc Brakes
B1 and B2, Remove and Install (AF 20)".
Remove freewheel F1 – see operation "Freewheel F1, Remove
and Install (AF 20)".
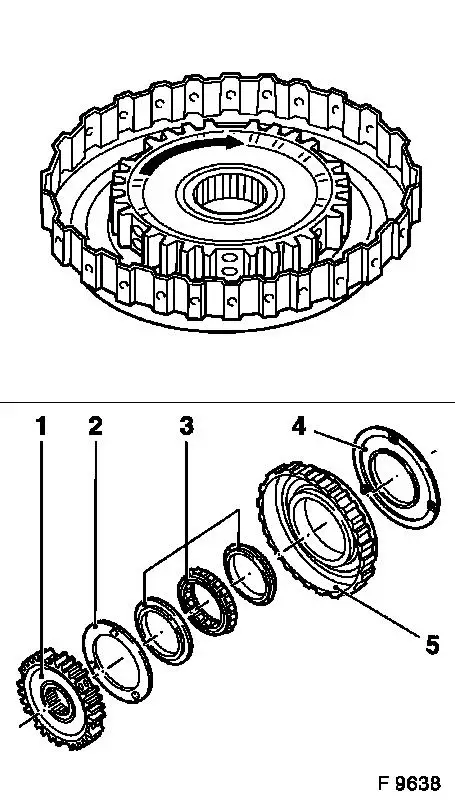
 Inspect
|
Check operation of overrunning clutch. Hold outer race tightly,
inner race must be able to turn clockwise (arrow) and block
anticlockwise.
 Disassemble
Remove thrust washer (4) from outer race (5). Detach inner race
(1) from outer race. Remove thrust washer (2) from inner race.
Detach freewheel F1 (3) with covers from outer race – note
installation position.
|
|
 Assemble
|
Insert freewheel F1 (3) with covers into outer race (5) –
note installation position.
Attach thrust washer (2) to inner race (1) – pay attention
to lug and recess. Insert inner race (1) into outer race (5).
Attach thrust washer (4) to outer race – pay attention to lug
and recess.
Inspect
Check operation of overrunning clutch. Hold outer race tightly,
inner race must be able to turn clockwise (arrow) and block
anticlockwise.
 Install
Install freewheel F1 – see operation "Freewheel F1, Remove
and Install (AF 20)".
Install fluid pump assembly (4) with multi-disc brakes B1 and B2
– see operation "Fluid Pump Assembly with Multi-disc Brakes
B1 and B2, Remove and Install (AF 20)".
|

|
Install fluid pump seal ring and converter – see operation
"Converter and/or Fluid Pump Seal Ring, Replace (AF 13-II/AF 17/AF
20/AF 22)". Secure converter against falling out.
|
Attach fluid drain bolt (3) with new seal ring to transmission
– tightening torque 40 Nm / 29.5 lbf. ft.
Remove transmission assembly from KM-113-2 (1) with KM-694-A
(2). Remove transmission from KM-694-A.
Install transmission – see operation "Transmission, Remove
and Install (AF 20)". Fill up transmission fluid
Inspect
Check and correct level of transmission fluid – see
operation "Transmission Fluid Level, Check and Correct (AF 13-II/AF
17/AF 20/AF 22)".
|
|
|
