|
Rear Valve Body, Disassemble and Assemble (AF
13-II)
Survey
|
I
|
1
|
Modulator valve solenoid valve
|
|
|
2
|
B-1 Modulator Control Valve
|
|
|
3
|
Secondary control valve
|
|
|
4
|
Lower modulator valve
|
|
|
5
|
C-2 Accumulator
|
|
|
6
|
B-1 Accumulator
|
|
II
|
7
|
C-3 modulator valve
|
|
|
8
|
2/3-gear timing valve
|
|
|
9
|
C-1 control valve
|
|
|
10
|
C-0 Accumulator
|
|
|
11
|
C-1 Accumulator
|
|
|
12
|
Control valve converter clutch
|
|
|
Note: Individual
parts for the valve body are not available from suppliers; the
complete valve body must be replace in the event of loss or
damage.
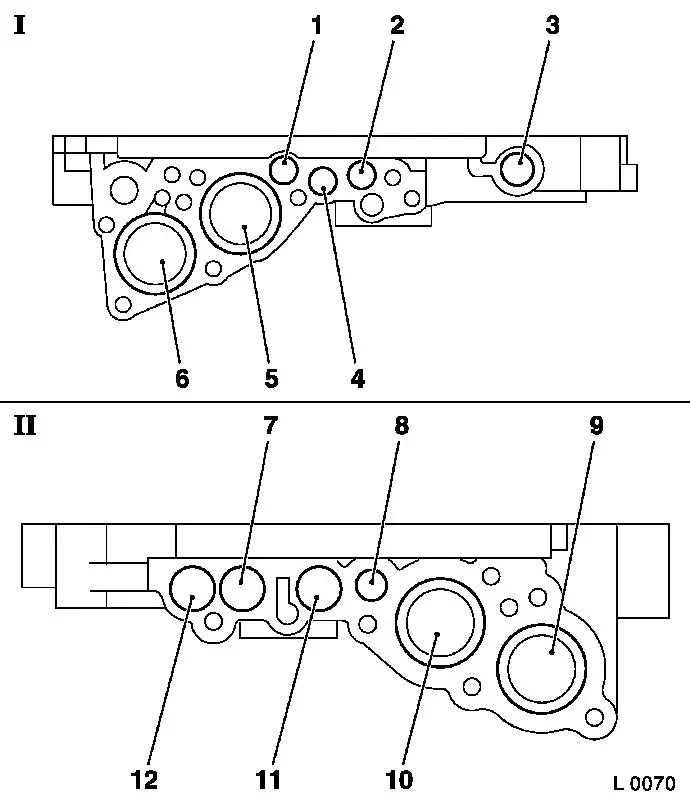
Location of Components Rear Valve Body
| 1. |
Secondary control valve |
| 2. |
B-1 Modulator Control Valve |
| 3. |
Lower modulator control valve |
| 4. |
Modulator valve solenoid valve |
| 5. |
C-2 Accumulator |
| 6. |
B-1 Accumulator |
| 7. |
C-1 control valve |
| 8. |
C-0 Accumulator |
| 9. |
2/3-gear timing valve |
| 10. |
C-1 Accumulator |
| 11. |
C-3 modulator valve |
| 12. |
Control valve converter clutch |
| 13. |
Converter clutch control valve |
|
|
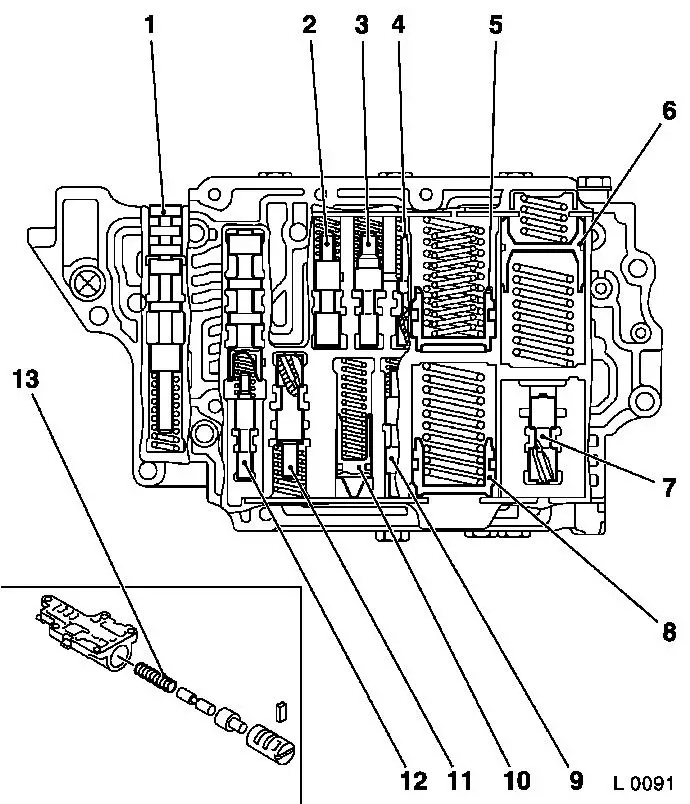
| 1. |
C-3 modulator valve sleeve |
| 2. |
C-3 modulator valve piston |
| 3. |
C-3 modulator valve |
| 4. |
Converter clutch control valve housing |
| 5. |
Control valve converter clutch |
| 6. |
Converter clutch control valve piston |
| 7. |
Converter clutch control valve plug |
| 8. |
Secondary control valve |
| 9. |
Secondary control valve plug |
| 10. |
B-1 Modulator Control Valve |
| 11. |
Lower modulator valve |
| 12. |
Modulator valve solenoid valve |
| 13. |
C-2 Accumulator O-ring |
| 14. |
C-2 Accumulator |
| 15. |
B-1 Accumulator |
| 16. |
Cover No. 1 |
|
|
|
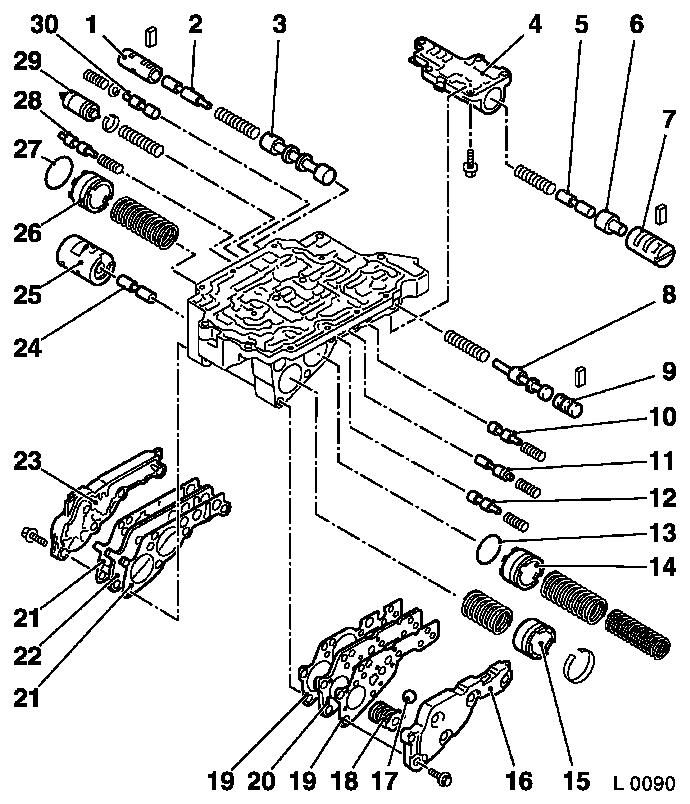
17
|
Lock ball
|
|
18
|
B-1 accumulator retaining spring
|
|
19
|
Gasket cover No. 1
|
|
20
|
Cover plate cover No. 1
|
|
21
|
Gasket cover No. 2
|
|
22
|
Cover plate cover No. 2
|
|
23
|
Cover No. 2
|
|
24
|
C-1 control valve piston
|
|
25
|
C-1 control valve
|
|
26
|
C-2 Accumulator
|
|
27
|
C-2 Accumulator O-ring
|
|
28
|
2/3-gear timing valve
|
|
29
|
C-1 Accumulator
|
|
30
|
C-3 modulator valve
|
|
|
 Remove Remove
Remove valve body – see operation "Valve body, Remove and
Install (Transmission Removed) (AF 13-II)".
Remove rear valve body – see operation "Valve body,
Disassemble and Assemble (AF 13-II)".
Caution
Carefully remove covers No. 1 and 2 with gasket – springs
behind them could fall out.
To prevent confusion lay aside all parts in order to ensure
perfect functioning after assembled is completed.
 Disassemble
Remove all of the parts from the valve body that are shown or
indicated in the survey.
 Clean Clean
Clean and dry all parts and then lightly lubricate. Remove seal
rings for accumulator piston B2 and C2 – to clean. O-rings
are not available as individual parts.
Remove
Check all removed parts for damage, wear, rust and deformation
– replace complete valve body if necessary. All pistons and
valves must fit in valve body free of play – replace entire
valve body if necessary.
 Assemble
Attach B2 and C2 accumulator piston O-rings to pistons. Insert
all of the parts into the valve body that are shown or indicated in
the survey.
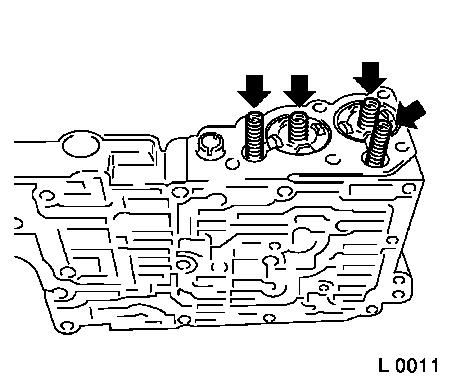
Caution
|
When installing cover No. 1 and No. 2 on rear valve body, ensure
that the protruding springs (arrows) fit properly and are not
pinched or deformed.
Torque
Cover No. 1 to rear valve body – tightening torque 7 Nm /5
lbf. ft.
Cover No. 2 to rear valve body – tightening torque 7 Nm /5
lbf. ft.
|
|
 Install
Insert rear valve body – see operation "Valve body,
Disassemble and Assemble (AF 13-II)".
Install valve body – see operation "Valve body, Remove and
Install (Transmission Removed) (AF 13-II)".
|
