|
MTA Manual Transmission from/to Engine Detach and
Attach (Engine Removed)
 Remove Remove
| 1. |
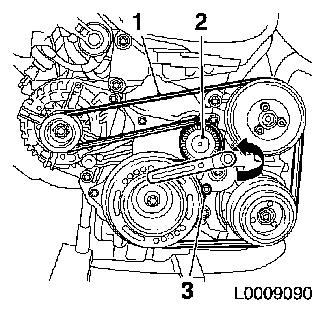
Detach ribbed V-belt (1)
| • |
Mark direction of rotation
|
| • |
Apply tension to ribbed V-belt tensioner (2) in the direction
of the arrow and fix with KM-6130 (3)
|
|
|
|
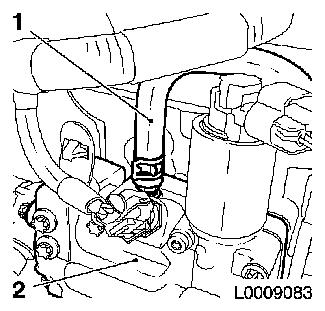
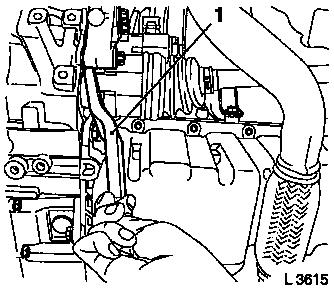
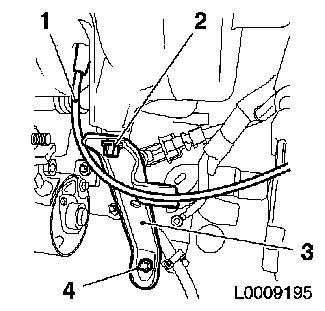
| 3. |
Detach coolant hose (1) from thermostat housing (2)
|
|
|
| 4. |
Remove coolant hose from coolant pump
|
| 5. |
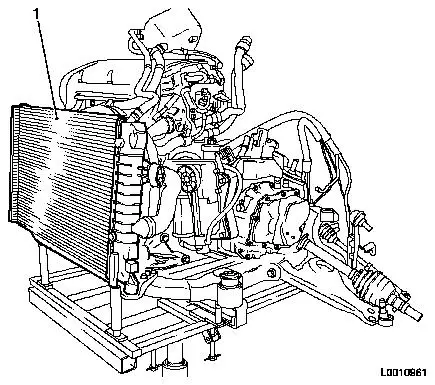
Detach cooling module (1)
| • |
Remove from lower radiator brackets
|
|
|
|
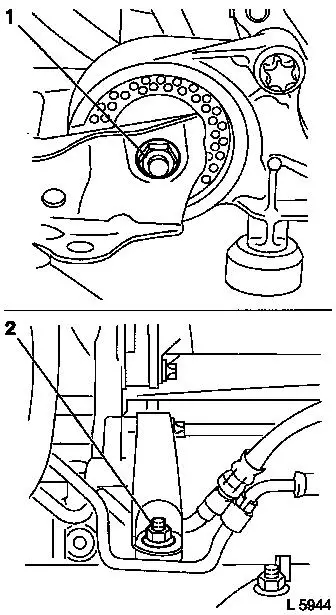
| 6. |
Remove right-hand axle body
| • |
Remove axle body with KM-460-B (1)
from differential gear
|
| • |
Seal opening in differential with sealing plug
|
|
|
|
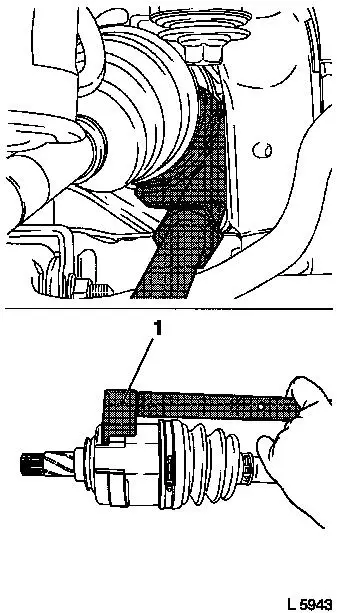
| 7. |
Remove left-hand axle body
| • |
Remove axle body with KM-313 and
KM-6003-1 (1) from differential gear
|
| • |
Seal opening in differential with sealing plug
|
|
|
|
| 8. |
Remove front engine damping block
|
| 9. |
Remove rear engine damping block
|
|
|
| 10. |
Remove engine from front axle body
| • |
Attach holding ropes to engine transport shackles
|
| • |
Hitch engine up to workshop crane.
|
|
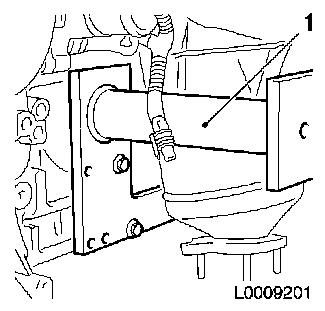
| 11. |
Remove intake manifold support (3)
|
|
|
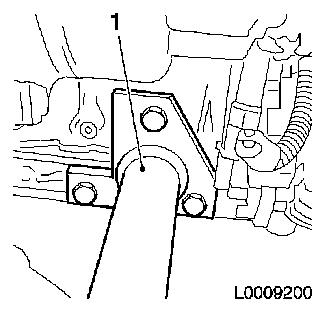
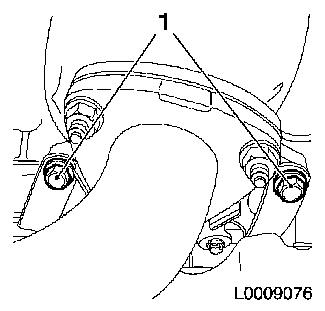
| 13. |
Remove catalytic converter support
| • |
2 bolts (1) from catalytic converter
|
| • |
2 bolts from cylinder block
|
|
|
|
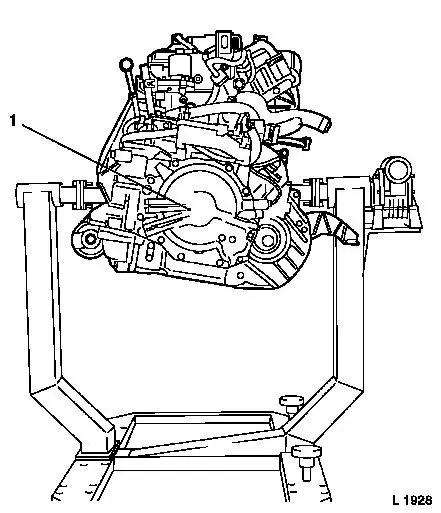
| 15. |
Install engine on engine overhaul stand KM-412
Note: 2 people
| • |
Remove holding ropes from engine transport shackles
|
|
| 17. |
Remove gearbox
| • |
Hitch gearbox up to workshop crane
|
| • |
Remove gearbox (1) from engine flange
Note: Ensure that
attached parts and wiring harnesses are undamaged
|
|
|
|
 Install
| 18. |
Install gearbox
| • |
Hitch gearbox up to workshop crane
|
| • |
Attach gearbox to engine flange
|
|
| 19. |
Bolt gearbox tightly
| • |
Transmission to cylinder block
| – |
Tightening torque 60 Nm
|
|
| • |
Gearbox on oil pan
| – |
Tightening torque 40 Nm
|
|
|
| 20. |
Hitch engine up to workshop crane.
| • |
Attach holding ropes to engine transport shackles
|
|
| 21. |
Detach engine from engine overhaul stand KM-412
Note: 2 people
|
| 23. |
Install intake manifold support
|
| 24. |
Attach catalytic converter support
| • |
to catalytic converter
| – |
Tightening torque 15 Nm
|
|
| • |
On cylinder block
| – |
Tightening torque 20 Nm
|
|
|
| 25. |
Fit engine to front axle body
Note: 2 people
| • |
Lift engine
| – |
Carefully lower onto front axle body
|
|
| • |
Unhitch engine from workshop crane.
|
| • |
Remove holding ropes from engine transport shackles
|
|
| 26. |
Fit rear engine damping block
| • |
Tightening torque 55 Nm
|
|
| 27. |
Fit front engine damping block
| • |
Tightening torque 55 Nm
|
|
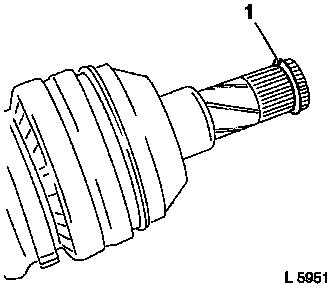
| 28. |
Install left-hand axle body
| • |
Attach new circlip (1) to axle body
|
| • |
Lubricate teeth and bearing points with engine oil
|
| • |
Push axle body into gearbox until circlip engages
|
|
|
|
| 29. |
Fit right-hand axle body
| • |
Attach new circlip to axle body
|
| • |
Lubricate teeth and bearing points with engine oil
|
| • |
Push axle body into gearbox until circlip engages
|
|
| 30. |
Attach cooling module
| • |
Insert into lower radiator bracket
|
|
| 32. |
Install compressor
| • |
3 bolts
| – |
Tightening torque 20 Nm
|
|
|
| 33. |
Insert ribbed V-belt
Note: Observe direction
of rotation
| • |
Apply tension to ribbed V-belt tensioner (2) in the direction
of the arrow (anti-clockwise) and place ribbed V-belt in position
(1)
|
|
|
|
|