|
Seal valve body cover (AF40)
 Remove Remove
| 2. |
Remove air filter housing
|
| 3. |
Detach radiator grille
|
| 4. |
Drain air conditioning system 
Note: Only for vehicles
with air conditioning.
|
| 5. |
Detach front panelling
|
| 6. |
Remove lower engine compartment cover
|
| 7. |
Place collecting pan underneath.
|
| 8. |
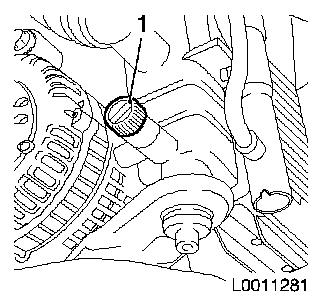
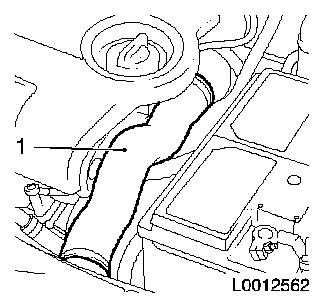
Drain coolant.
| • |
Open radiator drain bolt (1)
|
|
|
|
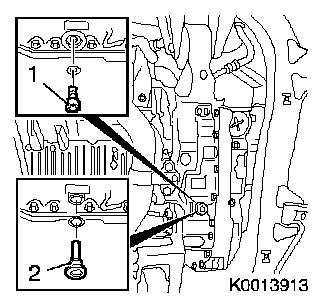
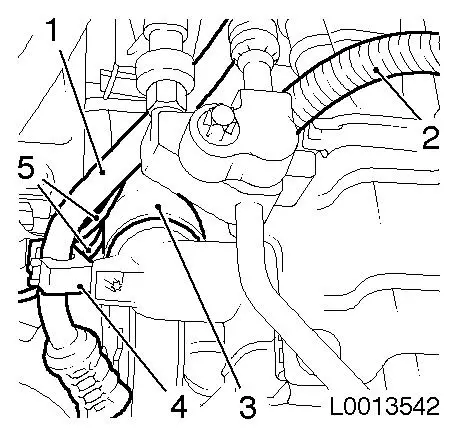
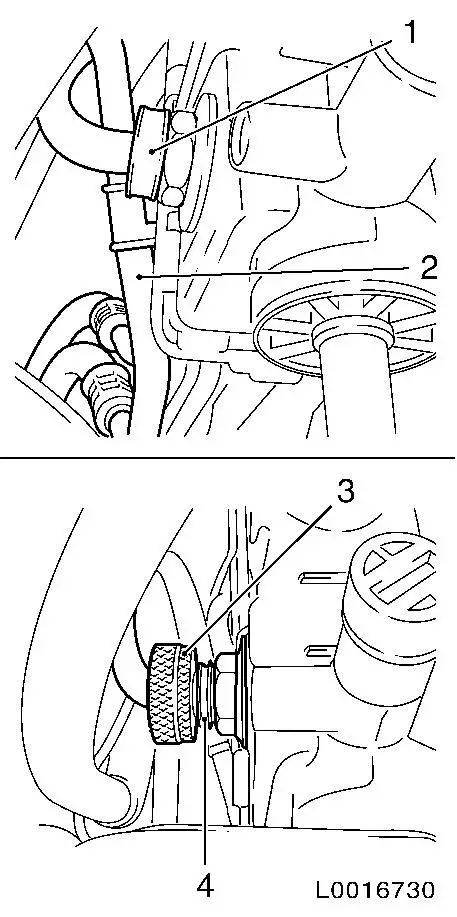
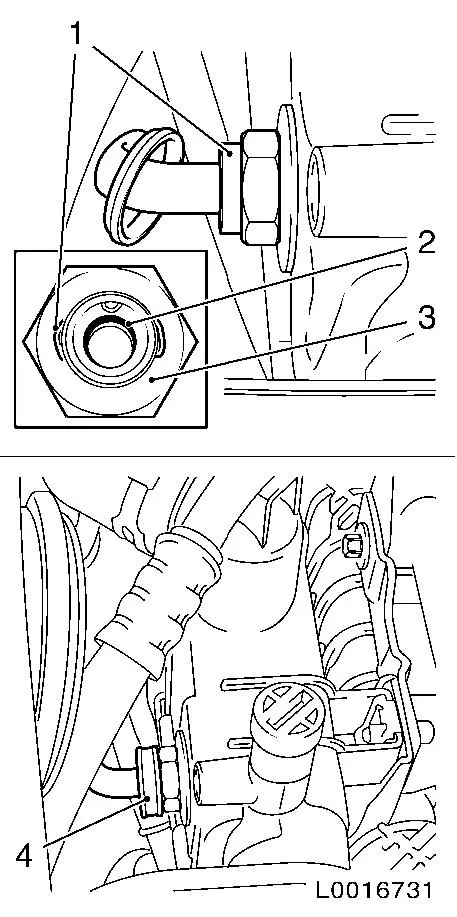
| 9. |
Drain off transmission fluid
Note: Place collecting
pan underneath.
| • |
Unscrew fluid checking bolt (1)
|
| • |
Unscrew rising tube (2)
|
| • |
Tighten rising pipe 50 Nm
|
| • |
Tighten fluid checking bolt (1) 8
Nm
|
|
|
|
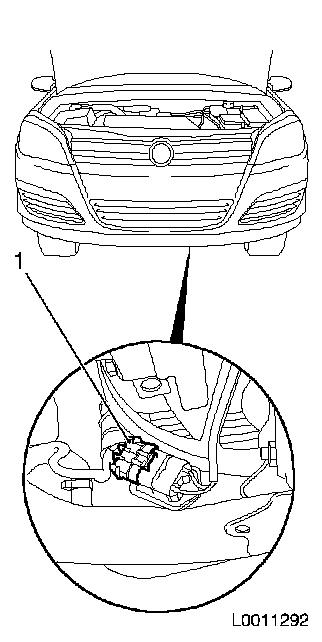
| 10. |
Detach wiring harness from radiator
| • |
Disconnect wiring harness plug (1) of fan motor
|
|
|
|
|
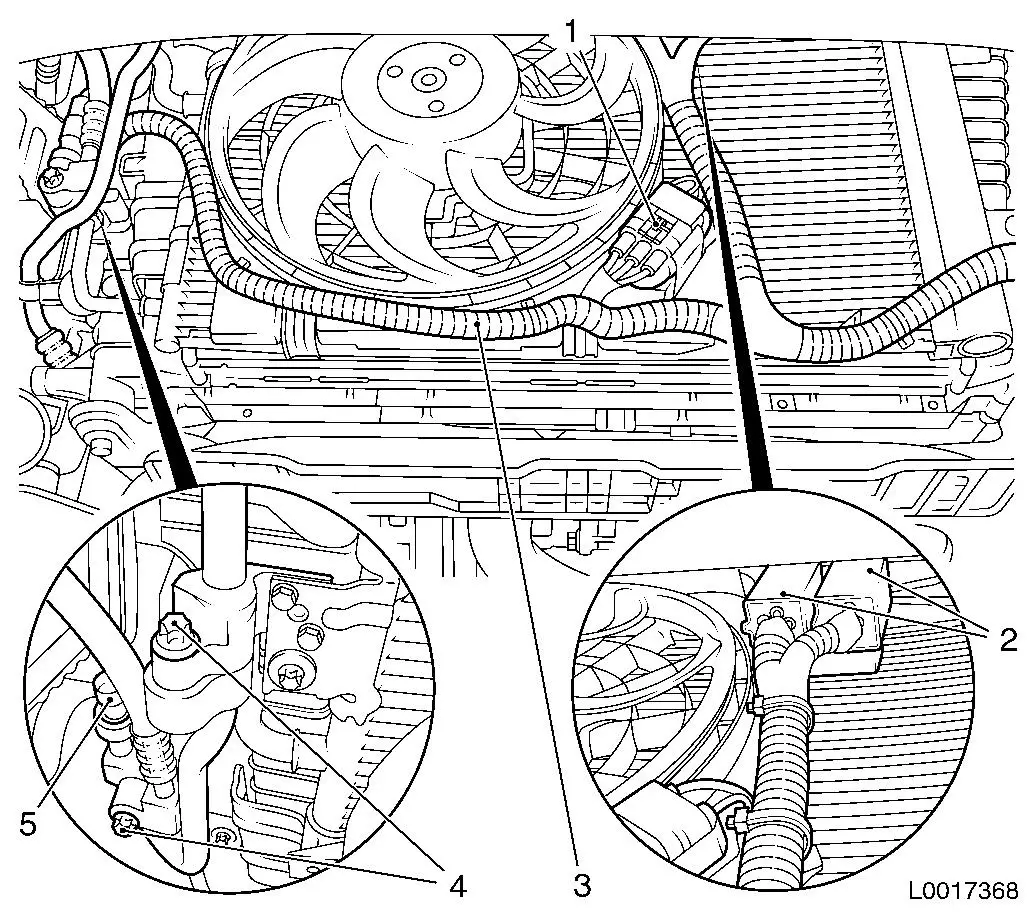
| 11. |
Detach wiring harness of auxiliary fan motor (3)
Note: Only for vehicles
with air conditioning.
| • |
Release and disconnect wiring harness plug of auxiliary fan
(1)
|
| • |
Release and disconnect wiring harness plug of pressure sensor
(5)
|
| • |
Release AC compressor wiring harness plug and disconnect
|
|
Important: Seal lines and
connections after removal.
|
| 12. |
Detach 2 refrigerant lines
Note: Only for vehicles
with air conditioning.
|
|
| 13. |
Detach refrigerant line (1) from radiator
Note: Only for vehicles
with air conditioning.
| • |
Open clip (4) and remove
|
|
| 14. |
Detach compressor wiring harness (2) from radiator
Note: Only for vehicles
with air conditioning.
|
| 15. |
Detach right coolant hose (3) from radiator
|
| 16. |
Detach 2 vacuum lines (5) from radiator
|
|
|
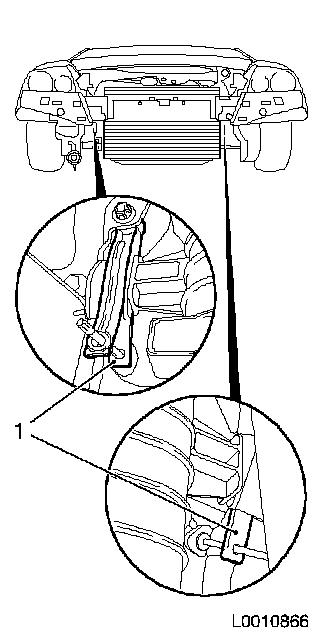
| 17. |
Secure radiator at upper radiator bracket (1)
| • |
2x insert from rear using suitable tool
|
|
|
|
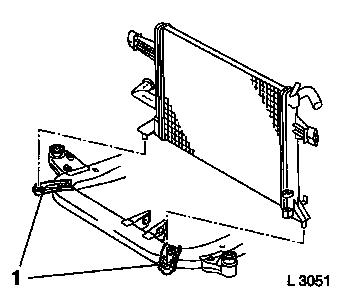
| 18. |
Remove lower radiator bracket (1)
Note: Note differing
brackets.
|
|
|
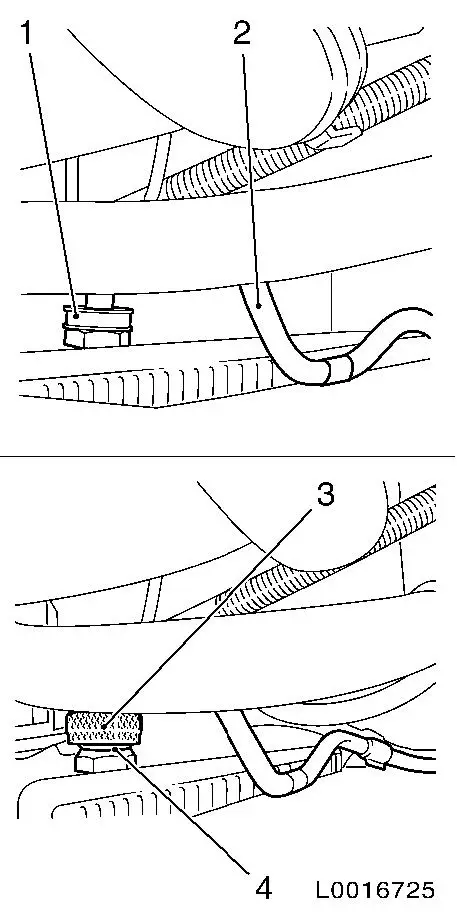
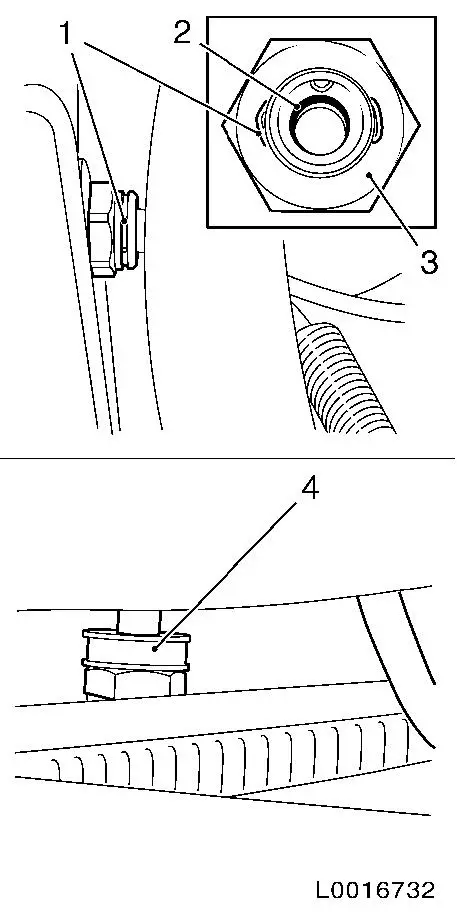
| 19. |
Detach upper fluid cooler line (2) from radiator
| • |
Pull off protective ring (1)
|
| • |
Release retaining clamp (4) with KM-J-41623-B (3)
Note: Fit KM-J-41623-B on fluid cooler line, slide into
connection through simultaneous turning and pressing, turn KM-J-41623-B until the retaining clamp
opens.
|
| • |
Pull off fluid cooler line when retaining clamp is open
|
|
|
|
| 20. |
Detach lower fluid cooler line (2) from radiator
Note: Fluid escapes.
Place pan underneath.
| • |
Pull off protective ring (1)
|
| • |
Release retaining clamp (4) with KM-J-41623-B (3)
Note: Fit KM-J-41623-B on fluid cooler line, slide into
connection through simultaneous turning and pressing, turn KM-J-41623-B until the retaining clamp
opens.
|
| • |
Pull off fluid cooler line when retaining clamp is open
|
|
|
|
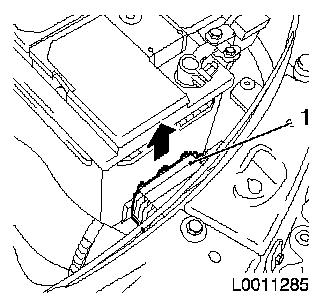
| 21. |
Remove preheating control unit (1)
| • |
Pull preheating control unit from bracket in direction of
arrow
|
| • |
Disconnect wiring harness plug
|
|
|
|
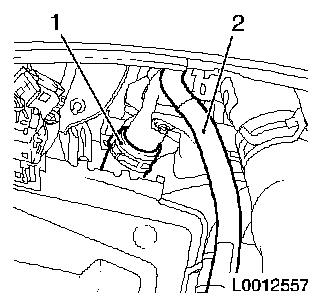
| 22. |
Detach compensation tank coolant hose (2) from radiator
|
| 23. |
Detach left coolant hose (1) from radiator
|
|
|
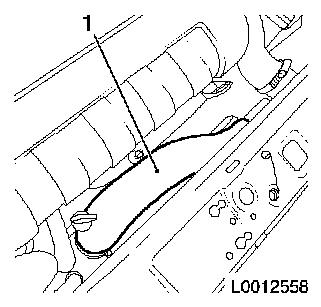
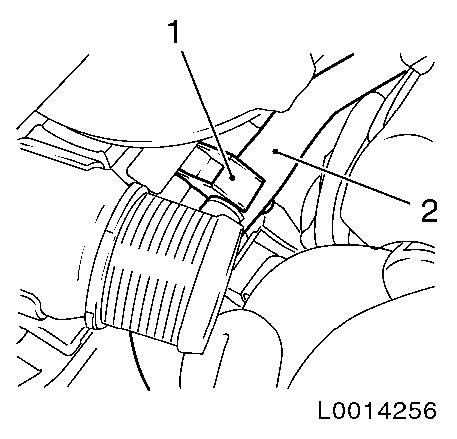
| 24. |
Detach charge air hose (1) from charge air pipe
|
|
|
| 25. |
Detach charge air hose (1) from intercooler
|
|
|
| 26. |
Detach coolant hose (2) from fan housing
|
|
|
| 27. |
Remove cooling module
Note: 2nd mechanic
required.
| • |
Remove 2 retainers from bracket
|
|
|
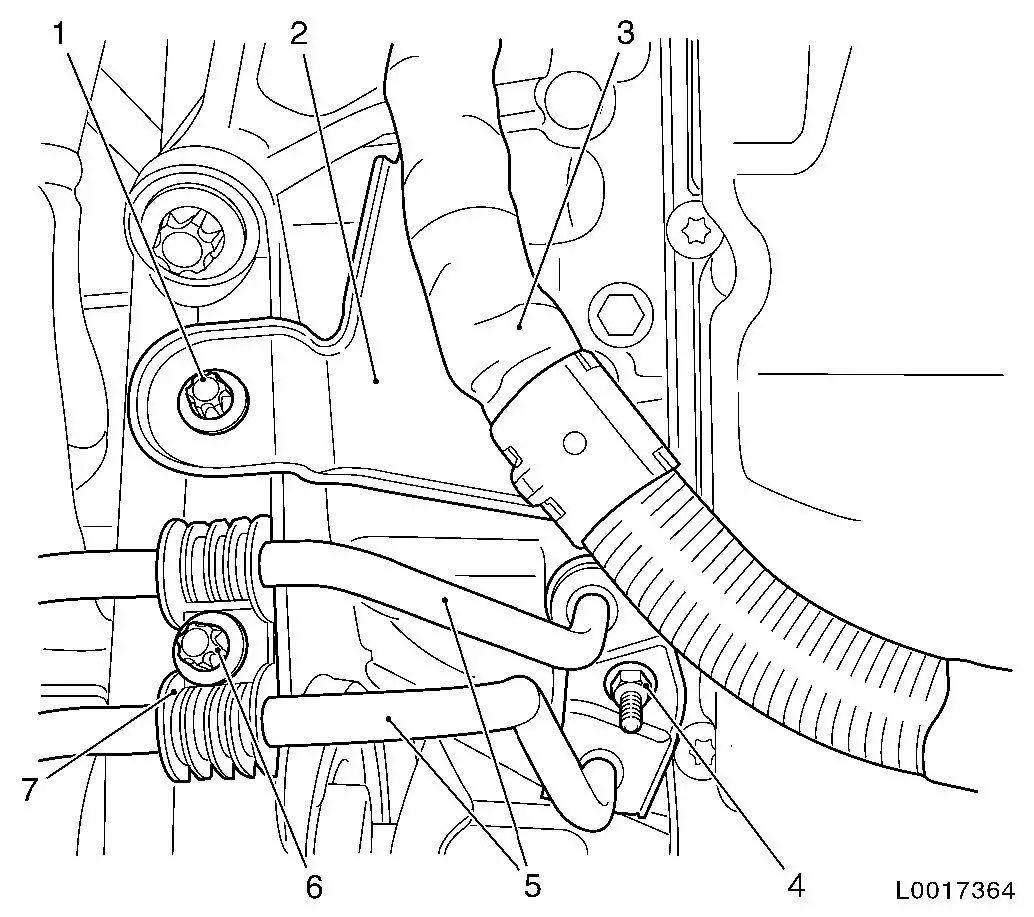
| 28. |
Detach wiring harness bracket of engine control unit (2)
|
| 29. |
Move engine control unit harness (3) up and secure.
|
| 30. |
Remove fluid cooler line (5)
| • |
Remove bracket (7) at front engine damping block
|
|
|
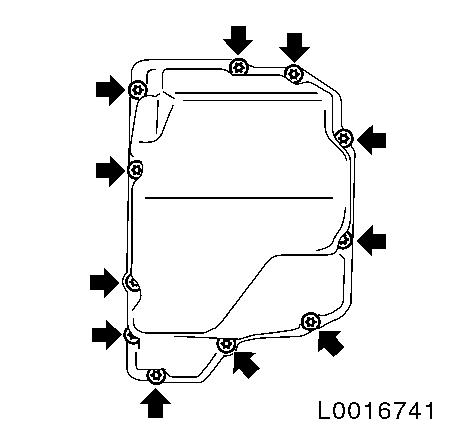
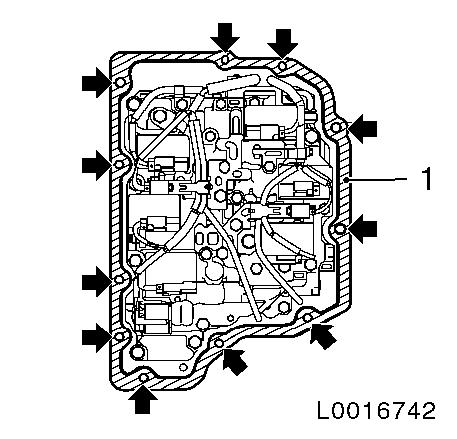
| 31. |
Undo valve body cover
| • |
Unscrew 11 bolts (arrows)
|
|
| 32. |
Detach valve body cover
Note: Release valve
body cover by gently tapping with a plastic hammer. Be careful not
to damage the housing.
|
|
|
Important: The valve body must be
removed in order to prevent contamination when cleaning the sealing
surfaces.
|
| 33. |
Remove valve body
|
 Install
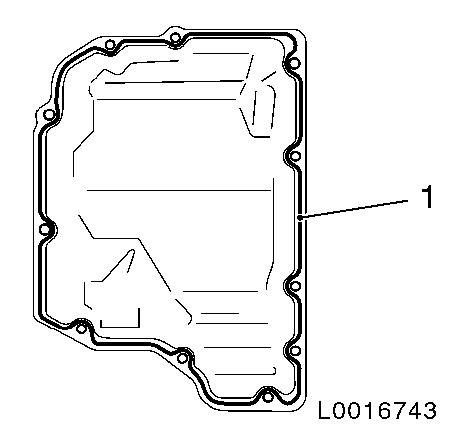
| 34. |
Clean sealing surface (1)
Note: Completely remove
sealing compound and oil residue. Do not damage the sealing
surface.
|
| 35. |
Clean 11 threads (arrows)
|
|
|
| 37. |
Attach valve body cover
Note: Use a new valve
body cover. Completely remove oil residue from the sealing
surfaces.
| • |
Apply sealing compound (1) to a new valve body cover
|
|
|
|
| 38. |
Fasten valve body cover
Note: Do not damage the
solenoid valve wiring harness.
| • |
Tighten 11x new bolts (arrows) 13
Nm
|
|
|
|
|
| 39. |
Attach fluid cooler line (5)
| • |
Attach bracket (7) at front engine damping block
|
|
| 40. |
Position engine control unit wiring harness (3) in its
installation position
|
| 41. |
Attach wiring harness bracket of engine control unit (2)
|
|
| 42. |
Install cooling module
Note: 2nd mechanic
required.
| • |
2x insert retainer in bracket
|
|
| 43. |
Attach coolant hose (2) to fan housing
|
|
|
| 44. |
Attach charge air hose (1) to intercooler
|
|
|
| 45. |
Attach charge air hose (1) to charge air pipe
|
|
|
| 46. |
Attach compensation tank coolant hose (2) to radiator
|
| 47. |
Attach left coolant hose (1) to radiator
|
|
|
| 48. |
Install preheating control unit
| • |
Insert preheating control unit in bracket
|
| • |
Connect wiring harness plug
|
|
| 49. |
Attach lower fluid cooler line to radiator
Important: The retaining clamp
(1) must audibly engage. Note seal ring (2) in connection (3).
|
| • |
Insert fluid cooler line in connection
|
| • |
Fit protective ring (4)
|
|
|
|
| 50. |
Attach upper fluid cooler line to radiator
Important: The retaining clamp
(1) must audibly engage. Note seal ring (2) in connection (3).
|
| • |
Insert fluid cooler line in connection
|
| • |
Fit protective ring (4)
|
|
|
|
| 51. |
Install lower radiator bracket (1)
Note: Note differing
brackets.
|
|
|
| 52. |
Remove radiator retainer at upper radiator bracket (1)
|
|
|
| 53. |
Attach right coolant hose (3) to radiator
|
| 54. |
Attach 2 vacuum lines (5) to radiator
|
| 55. |
Attach refrigerant line (1) to radiator
Note: Only for vehicles
with air conditioning.
| • |
Install and engage clip (4)
|
|
| 56. |
Connect compressor wiring harness (2) to radiator
Note: Only for vehicles
with air conditioning.
|
|
|
|
| 57. |
Attach 2 refrigerant lines
Note: Only for vehicles
with air conditioning.
|
| 58. |
Attach wiring harness of auxiliary fan motor (3)
Note: Only for vehicles
with air conditioning.
| • |
Connect and lock wiring harness plug of auxiliary fan (1)
|
| • |
Connect and lock wiring harness plug of pressure sensor (5)
|
| • |
Connect and lock AC compressor wiring harness plug
|
|
|
| 59. |
Connect wiring harness to radiator
| • |
Connect wiring harness plug (1) to fan motor
|
|
|
|
| 60. |
Attach front panelling
|
| 61. |
Fill air conditioning system
Note: Only for vehicles
with air conditioning.
|
| 62. |
Attach radiator grille
|
| 63. |
Install air filter housing
|
| 64. |
Fill coolant. Adjust level if necessary.
|
| 66. |
Fill up with transmission fluid
|
| 67. |
Check and correct transmission fluid level
|
| 68. |
Install lower engine compartment cover
|
| 69. |
Program volatile memories
|
|
