Front Wheel Drive Shaft Outer Joint and Boot Replacement
Special Tools
| • |
GE-396 Snap
Ring Pliers |
For equivalent regional tools, refer to
Special Tools .
Removal Procedure
| 2. |
Remove the large seal
retaining clamp from the CV joint with a side cutter. Discard the
seal retaining clamp. |
|
Warning:
Use of eye goggles is necessary to prevent
personal injury. |
| 3. |
If equipped with a small swage
ring, use a hand grinder to cut through the swage ring, taking care
not to damage the halfshaft bar, in order to remove the swage
ring. Otherwise, remove the small seal retaining clamp with a side
cutter. DISCARD the retaining clamp. |
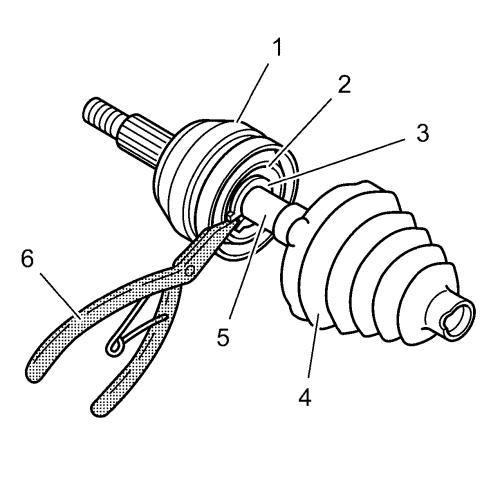
| 4. |
Separate the halfshaft
outboard seal from CV joint outer race (1) at large
diameter. |
| 5. |
Slide the seal (4) away from
joint along halfshaft bar (5). |
| 6. |
Wipe the grease from the face
of the CV joint inner race (2). |
| 7. |
Spread the ears on the race
retaining ring (3) with GE-396 pliers (6).
|
| 8. |
Remove the CV joint assembly
(1) from the halfshaft bar (5). |
| 9. |
Remove the halfshaft outboard
seal (4) from the halfshaft bar (5). |
| 10. |
DISCARD the old outboard
seal. |
| 11. |
Clean the following items
thoroughly with cleaning solvent. Remove all traces of old grease
and any contaminates. |
| |
• |
The inner and outer race
assemblies |
| 13. |
Check the CV joint assembly
for the following items: |
| 14. |
Clean the halfshaft bar.
Use a wire brush to remove any rust in the seal mounting area
(grooves). |
Installation Procedure
|
Note: Place a towel
in the vise before inserting the halfshaft.
|
| 1. |
Mount the halfshaft into a
vise. |
| 2. |
Install the NEW small eared
clamp (2) on the neck of the outboard seal (1). Do not
crimp. |
| 3. |
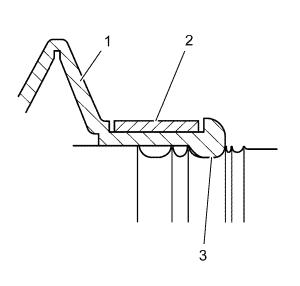
Slide the outboard seal (1)
onto the halfshaft bar and position the neck of the outboard
seal (1) in the seal groove on the halfshaft bar. The largest
groove below the sight groove on the halfshaft bar is the seal
groove (3). |
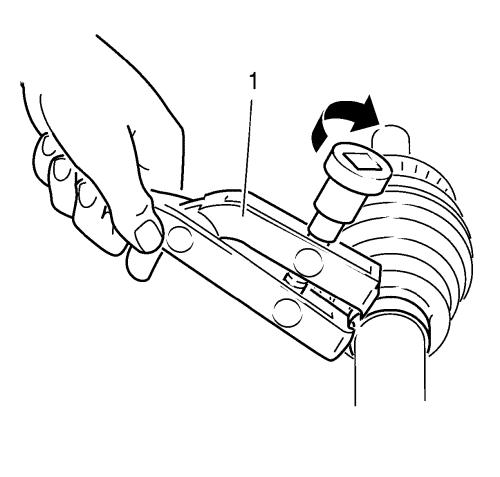
| 4. |
Crimp the eared clamp, using
the CH-804 tensioner (1), and a torque wrench.
Tighten the eared clamp to 25 N·m (19 lb
ft) . |
| 5. |
Place approximately half the
grease from the service kit inside the outboard seal and pack the
CV joint with the remaining grease. |

| 6. |
Push the CV joint (2) onto the
halfshaft bar (1) until the retaining ring is seated in the
groove on the halfshaft bar. |

|
Note: The outboard
seal (1) must not be dimpled, stretched or out of shape in any way.
If the outboard seal (1) is not shaped correctly, equalize the
pressure in the outboard seal (1) and shape the seal properly by
hand.
|
| 7. |
Slide large diameter of the
outboard seal (1) with the large seal retaining clamp (2) in place
over the outside of the CV joint outer race (3) and locate the seal
lip in the groove on the CV joint outer race. |
| 8. |
Crimp the seal retaining clamp
(1) using CH-804 tensioner to 25 N·m
(19 lb ft) . |
|
