
Astra J
Starter Replacement (LSF with Start/Stop System)Removal Procedure
|
| 1. | Open the hood. |
| 2. | Disconnect the battery negative cable. Refer to Battery Negative Cable Disconnection and Connection . |
| 3. | Remove the engine control module. Refer to Engine Control Module Replacement . |
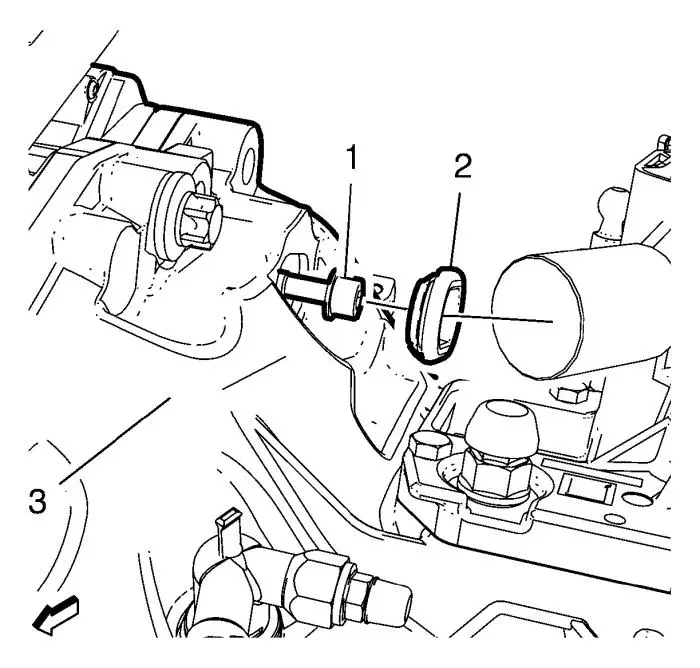
| 4. | Remove the starter bolt access hole cover (2) from the transmission (3). |
| 5. | Remove the starter bolt (1) from the starter. |
| 6. | Raise and support the vehicle. Refer to Lifting and Jacking the Vehicle . |
| 7. | If equipped remove the engine shield. Refer to Engine Shield Replacement . |
| 8. | If equipped remove the front compartment splash shield. Refer to Front Compartment Splash Shield Replacement . |
| 9. | If equipped remove the front compartment insulator. Refer to Front Compartment Insulator Replacement . |
| 10. | Remove the exhaust gas recirculation valve vacuum tank. Refer to Exhaust Gas Recirculation Valve Vacuum Tank Replacement . |
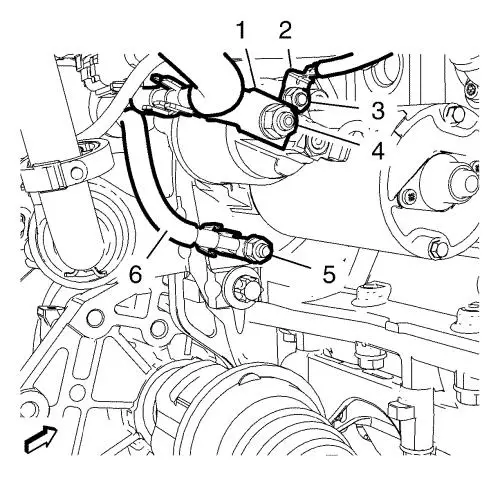
| 11. | Remove the starter and generator positive cable nut (4). |
| 12. | Remove the starter and generator positive cable (1). |
| 13. | Remove the starter positive cable nut (3). |
| 14. | Remove the starter positive cable (2) from the starter. |
| 15. | Remove the ground cable nut (5). |
| 16. | Remove the ground cable (6). |
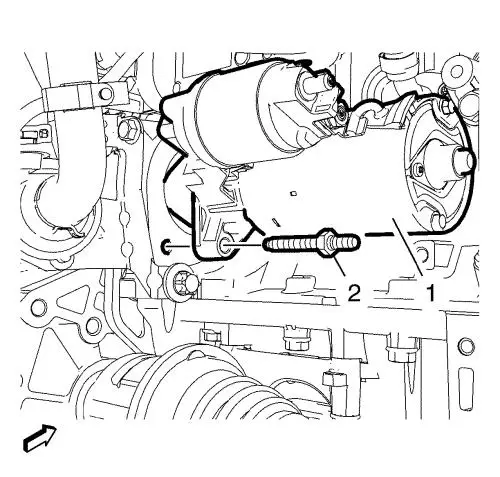
| 17. | Remove the starter stud (2). |
| 18. | Remove the starter (1). |
Installation Procedure
| 1. | Install the starter (1). |
Caution: Refer to Fastener Caution . |
| 2. | Install the starter stud (2) and tighten to 25 N·m (18 lb ft) . |
| 3. | Install the ground cable (6). |
| 4. | Install the ground cable nut (5) and tighten to 12.5 N·m (111 lb in) . |
| 5. | Install the starter positive cable (2) to starter. |
| 6. | Install the starter positive cable nut (3) and tighten to 5 N·m (44 lb in) . |
| 7. | Install the starter and generator positive cable (1). |
| 8. | Install the starter and generator positive cable nut (4) and tighten to 12.5 N·m (111 lb in) . |
| 9. | Install the exhaust gas recirculation valve vacuum tank. Refer to Exhaust Gas Recirculation Valve Vacuum Tank Replacement . |
| 10. | If equipped install the front compartment insulator. Refer to Front Compartment Insulator Replacement . |
| 11. | If equipped install the front compartment splash shield. Refer to Front Compartment Splash Shield Replacement . |
| 12. | If equipped install the engine shield. Refer to Engine Shield Replacement . |
| 13. | Lower the vehicle. |
| 14. | Install the starter bolt (1) to the starter and tighten to 25 N·m (18 lb ft) . |
| 15. | Install the starter bolt access hole cover (2) to the transmission (3). |
| 16. | Install the engine control module. Refer to Engine Control Module Replacement . |
| 17. | Connect the battery negative cable. Refer to Battery Negative Cable Disconnection and Connection . |
| 18. | Close the hood. |