Intake Manifold Replacement (1.6L LLU)
Special Tools
For equivalent regional tools, refer to
Special Tools .
Removal Procedure
Warning: Refer to
Gasoline/Gasoline Vapors Warning .
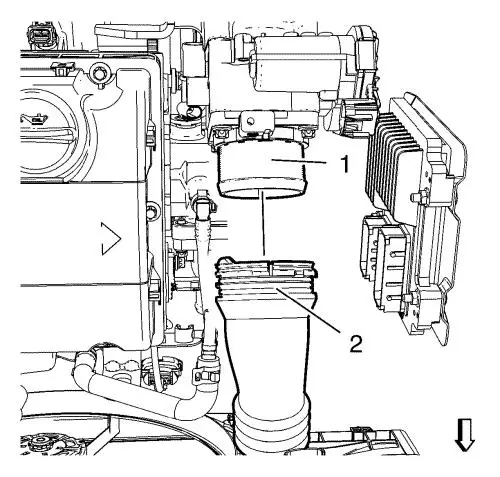
| 4. |
Remove the charger air cooler
outlet air hose (2) from the throttle body (1). |
| 5. |
Disconnect the booster vacuum
pipe from the intake manifold. |
| 6. |
Unclip the engine wiring
harness conduit. |
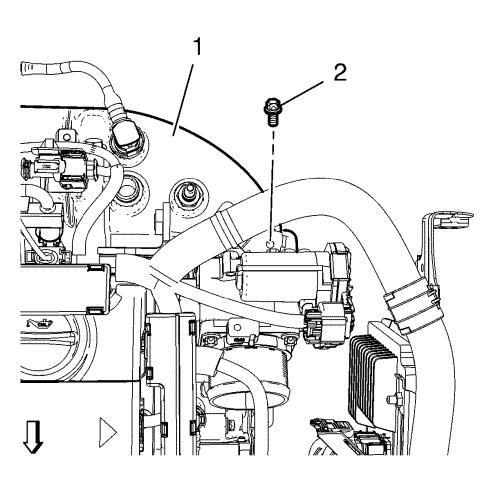
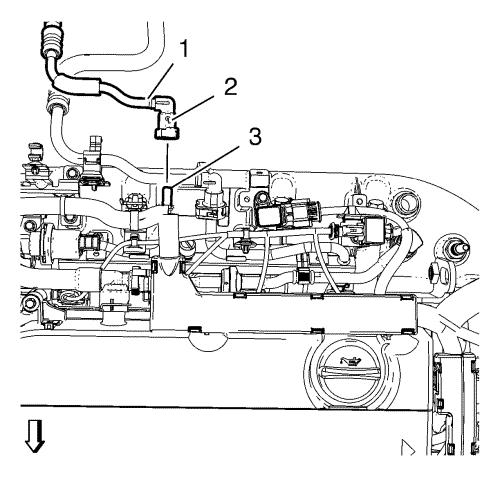
| 9. |
Remove the ECM wiring harness
bracket bolt (2) from the intake manifold (1). |
| 10. |
Disconnect the 4 fuel
injection wiring harness plugs. |
| 11. |
Disconnect the throttle body
wiring harness |
| 12. |
Unclip the fuel injection
wiring harness. |
| 13. |
Put the fuel injection wiring
harness aside. |
| 14. |
Place a collecting basin
underneath. |
|
Warning:
Gasoline or gasoline vapors are highly flammable.
A fire could occur if an ignition source is present. Never drain or
store gasoline or diesel fuel in an open container, due to the
possibility of fire or explosion. Have a dry chemical (Class B)
fire extinguisher nearby. |
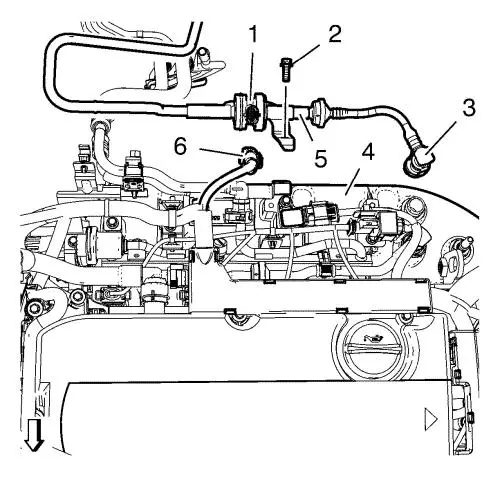
| 16. |
Remove the evaporative
emission vent pipe (5) from the intake manifold (4). |
| |
16.1 |
Disconnect the wiring harness
(6) from the evaporative emission vent purge valve (1).
|
| |
16.3 |
Close the vents with the
EN-6015 plugs . |
| |
16.4 |
Remove the evaporative
emission vent pipe retainer bolt (2). |
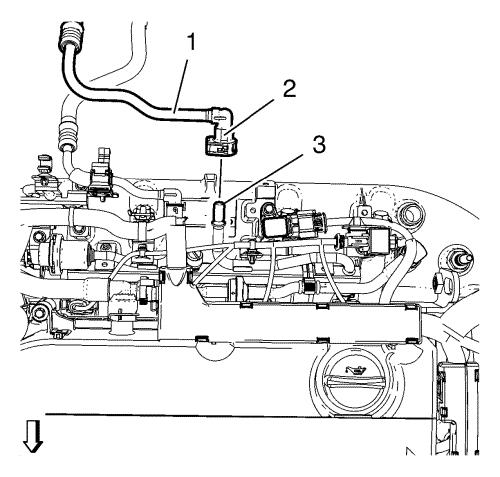
| 17. |
Disconnect the fuel filler
pipe (1) from the fuel rail (3). |
| |
17.1 |
Release the quick connector
(2). |
| |
17.2 |
Close the vents with the
EN-6015 plugs . |
| 18. |
Disconnect the fuel return
pipe (1) from the fuel rail (3). |
| |
18.1 |
Release the quick connector
(2). |
| |
18.2 |
Close the vents with the
EN-6015 plugs . |
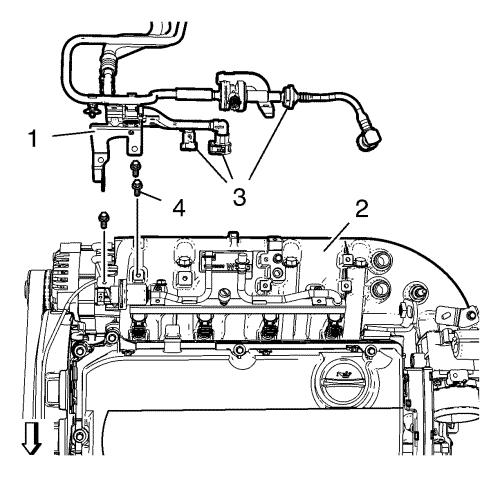
| 19. |
Remove the 3 engine wiring
harness bracket bolts (4). |
| 20. |
Remove the engine wiring
harness bracket (1) with the fuel pipes (3) from the intake
manifold (2). |
| 21. |
Remove the engine lift
bolt. |
| 22. |
Remove the engine lift intake
side. |
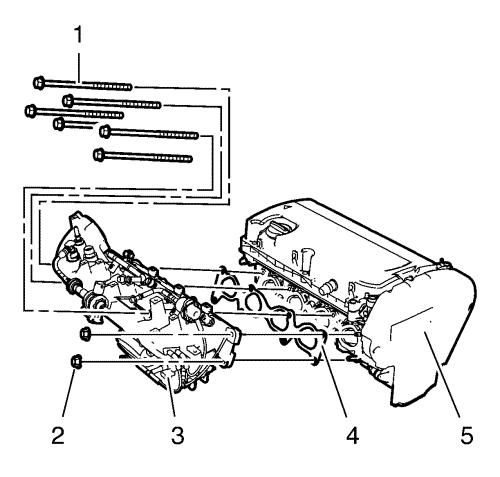
| 24. |
Loosen the intake manifold (3)
from the cylinder head (5) (bottom). |
| 26. |
Remove the intake manifold (3)
from the cylinder head (5) (top). |
| |
26.3 |
Remove the gasket (4).
|
Disassemble Procedure
Cleaning and Inspection Procedure
Clean and inspect the intake manifold. Refer to
Intake Manifold Cleaning and Inspection .
Assemble Procedure
Installation Procedure
| 1. |
Install the intake manifold
(3) to the cylinder head (5) (top). |
| |
1.1 |
Install the gasket (4).
|
| |
1.2 |
Install the nut (2) and
tighten to 20 N·m (15 lb ft) . |
| |
1.3 |
Install 3 bolts (1) and
tighten to 20 N·m (15 lb ft) . |
| 3. |
Install the intake manifold
(3) to the cylinder head (5) (bottom). |
| |
3.1 |
Install 2 bolts (1) and
tighten to 20 N·m (15 lb ft) . |
| |
3.2 |
Install 2 nuts (2) and tighten
to 20 N·m (15 lb ft) . |
| 5. |
Install the engine lift intake
side. |
| 6. |
Install the engine lift bolt
and tighten to 22 N·m (16 lb ft) .
|
| 7. |
Install the engine wiring
harness bracket (1) with the fuel pipes (3) to the intake manifold
(2). |
| 8. |
Install the 3 engine wiring
harness bracket bolts (4) and tighten to 8 N·m (71
lb in) . |
| 9. |
Connect the fuel return pipe
(1) to the fuel rail (3). |
| |
9.1 |
Remove the EN-6015
plugs . |
| |
9.2 |
Install the quick connector
(2). |
| 10. |
Connect the fuel filler pipe
(1) to the fuel rail (3). |
| |
10.1 |
Remove the EN-6015
plugs . |
| |
10.2 |
Install the quick connector
(2). |
| 11. |
Install the evaporative
emission vent pipe (5) to the intake manifold (4) |
| |
11.1 |
Connect the wiring harness (6)
to the evaporative emission vent purge valve (1). |
| |
11.3 |
Remove the EN-6015
plugs . |
| |
11.4 |
Install the evaporative
emission vent pipe retainer bolt (2) and tighten to 8
N·m (71 lb in) . |
| 12. |
Position the fuel injection
wiring harness. |
| 13. |
Connect the throttle body
wiring harness. |
| 14. |
Install the ECM wiring harness
bracket bolt (2) to the intake manifold (1) and tighten to
8 N·m (71 lb in) . |
| 15. |
Connect the 4 fuel injection
wiring harness plugs. |
| 17. |
Clip in the wiring
harness. |
| 19. |
Connect the booster vacuum
pipe to the intake manifold. |
| 20. |
Clip in the engine wiring
harness conduit. |
| 21. |
Install the charger air cooler
outlet air hose (2) to the throttle body (1). |
|
