Oil Pan Replacement
Special Tools
EN-37228 Separation Tool
For equivalent regional tools, refer to
Special Tools .
Removal Procedure
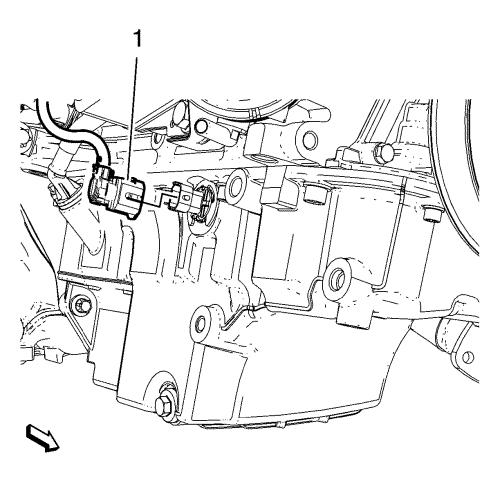
| 8. |
Disconnect the engine oil
level sensor wiring harness plug (1). |
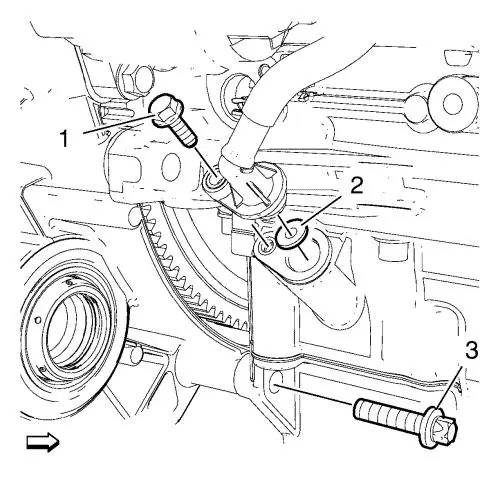
| 9. |
Remove the positive crankcase
ventilation tube bolt (1) and hang the tube aside. |
| 10. |
Remove the transmission bolt
(3). |
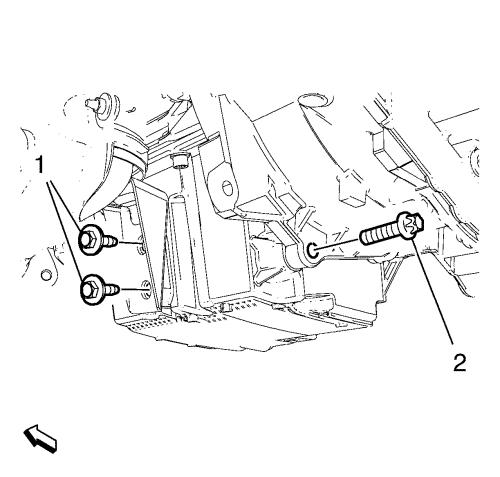
| 11. |
Remove the 2 catalytic
converter brace bracket bolts (1). |
| 12. |
Remove the transmission bolt
(2). |
|
Note: Mark the
positions of the oil pan bolts, because of different length.
|
|
Note: Use a suitable
tool.
|
|
Note: Be carefully DO
NOT damage the oil pan or the oil pan sealing surface.
|
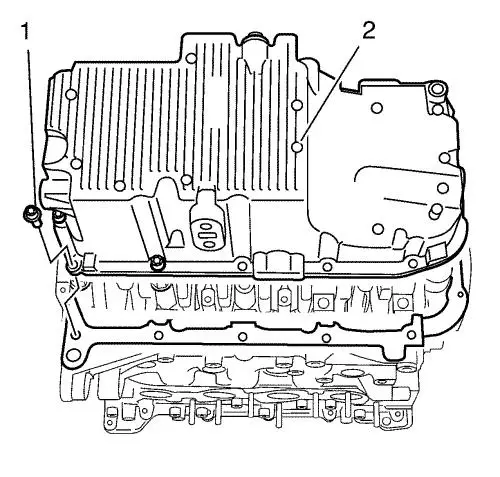
| 13. |
Remove the 12 bolts
(1). |
| 14. |
Turn the engine to get access
to the remaining 2 oil pan bolts through the opening in the
flywheel. |
| 15. |
Remove the oil sump (2) by
using the EN-37228 separating tool . |
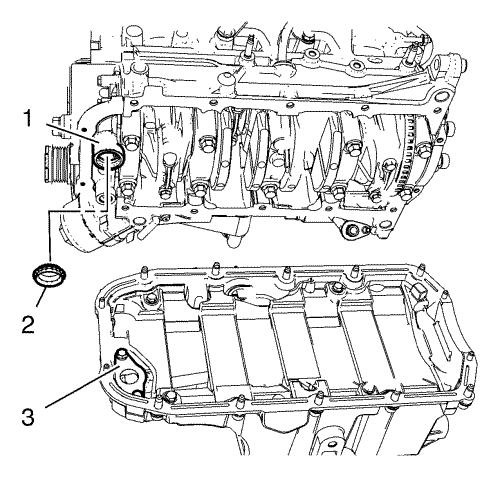
| 16. |
Remove the oil pump sealing
(2) from the oil pump (1). |
Installation Procedure
| 2. |
Install a NEW oil pump sealing
(2) to the oil pump (1). |
|
Note: Ensure that the
oil pan sealing surfaces are clear of oil, grease and oil gasket
material.
|
| 3. |
Clean the sealing surface from
oil pump suction pipe (3). |
| 4. |
Clean the oil pan sealing
surface. |
|
Note: DO NOT coat
sealant on the oil sump bolt holes, it could damage the oil sump
bolt threads or the engine block.
|
|
Note: Refer to
electronic parts catalogue to find a suitable sealing compound.
|
| 5. |
Coat the oil pan sealing
surface with suitable sealing compound. The thickness of the
sealing bead should be 2 mm (0.0787 in) .
|
|
Note: The
installation procedure should be done in 10 minutes.
|
| 6. |
Install the oil pan
(2). |
| 7. |
Install the 10 M8 bolts and
tighten to 25 N·m (18 lb ft) . |
| 8. |
Install the 4 M6 bolts and
tighten to 9 N·m (80 lb in) . |
| 9. |
Install the 2 catalytic
converter brace bracket bolts (1) and tighten to 20
N·m (15 lb ft) . |
| 10. |
Install the transmission bolt
(2) and tighten to 40 N·m (30 lb ft)
. |
| 11. |
Install a NEW seal ring (2) to
the positive crankcase ventilation tube. |
| 12. |
Install the positive crankcase
ventilation tube bolt (1) and tighten to 9 N·m (80
lb in) . |
| 13. |
Install the transmission bolt
(3) and tighten to 40 N·m (30 lb ft)
. |
| 14. |
Connect the engine oil level
sensor wiring harness plug (1). |
|
