
Astra J
Air Conditioning Evaporator Thermal Expansion Valve ReplacementSpecial ToolsGE 39400-A Halogen Leak DetectorFor equivalent regional tools, refer to Special Tools . Removal Procedure
|
| 1. | Recover the refrigerant. Refer to Refrigerant Recovery and Recharging . |
| 2. | Remove engine sight shield: |
| • | 1.3 Diesel LSF. Refer to Engine Sight Shield Replacement . |
| • | 1.7 Diesel LPV LPL. Refer to Engine Sight Shield Replacement . |
| • | 2.0 Diesel LBS. Refer to Engine Sight Shield Replacement . |
| 3. | Unclip brake pipes. |
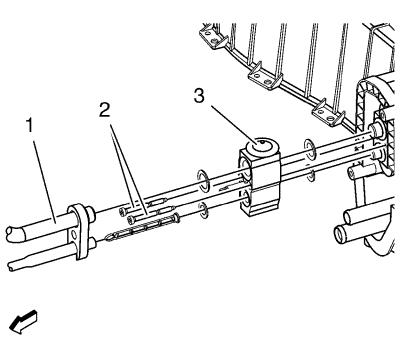
| 4. | Remove condenser hose (1) from A/C evaporator TXV. |
| 5. | Remove the 2 A/C TXV bolts (2). |
| 6. | Remove the TXV (3). |
Installation Procedure
Caution: Refer to Fastener Caution . |
| 1. | Install A/C TXV (3) and the 2 A/C TXV bolts (2) and tighten to 15 N·m (11 lb ft) . |
Note: Use NEW O-Ring seals. Refer to Air Conditioning O-Ring Seal Replacement . |
| 2. | Install condenser hose (1) to A/C evaporator TXV (3). Refer to Air Conditioning Compressor and Condenser Hose Replacement . |
| 3. | Install brake pipes. |
| 4. | Install engine sight shield: |
| • | 1.3 Diesel LSF. Refer to Engine Sight Shield Replacement . |
| • | 1.7 Diesel LPV LPL. Refer to Engine Sight Shield Replacement . |
| • | 2.0 Diesel LBS. Refer to Engine Sight Shield Replacement . |
| 5. | Evacuate and charge the refrigerant system. Refer to Refrigerant Recovery and Recharging . |
| 6. | Leak test the fittings using the GE 39400-A detector . |