Tire and Wheel Removal and Installation
Removal Procedure
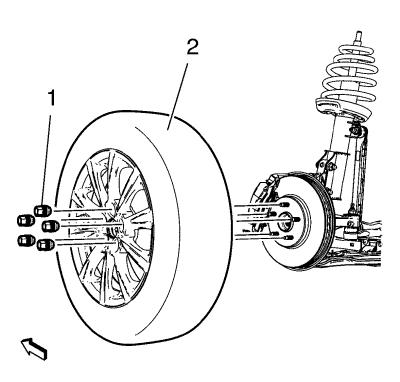
| 2. |
Remove the wheel center
cap. |
| 3. |
Mark the relationship of the
wheel (2) to the hub. |
| 4. |
Remove the wheel nuts
(1). |
|
Warning:
If penetrating oil gets on the vertical surfaces
between the wheel and the rotor or drum it could cause the wheel to
work loose as the vehicle is driven, resulting in loss of control
and an injury accident. |
|
Caution: Removing the wheel may be difficult because of foreign
materials or a tight fit between the wheel and the hub/rotor.
Slightly tap the tire side wall with a rubber mallet in order to
remove the wheel. Failure to follow these instructions may result
in damage to the wheel. |
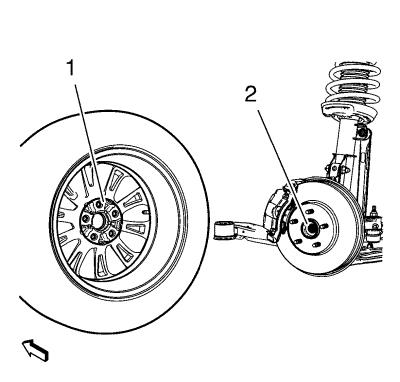
| 5. |
Remove the tire and wheel
assembly (2) from the vehicle. |
Installation Procedure
|
Warning:
Before installing the wheels, remove any buildup
of corrosion on the wheel mounting surface and brake drum or disc
mounting surface. Installing wheels with poor metal-to-metal
contact at the mounting surfaces can cause wheel nuts to loosen.
This can cause a wheel to come off when the vehicle is moving,
causing loss of control and possibly personal injury. |
|
Warning:
Never grease or lubricate wheel nuts, studs and
mounting surfaces. Wheel nuts, studs, and mounting surfaces must be
clean and dry. Tightening the lubricated parts can cause damage to
the wheel studs. This can cause a wheel to come off when the
vehicle is moving, causing loss of control and possibly personal
injury. |
| 1. |
Remove any corrosion or
foreign material from the wheel (1) and the hub (2) mounting
surfaces. |
| 2. |
Clean the threads on the wheel
studs and wheel nuts. |
|
Note: The disc wheels
are aligned to the front wheel hubs by using the center hole or the
wheel studs.
|
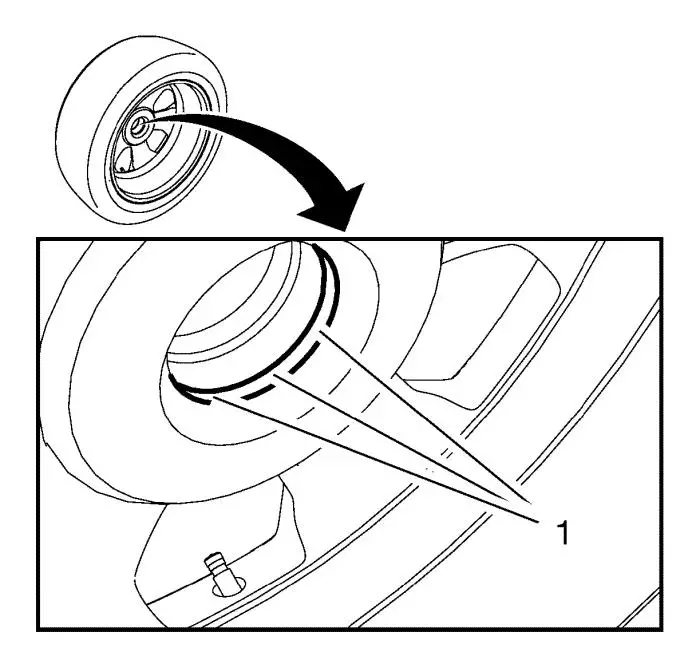
| 3. |
In order to prevent seizing up
the centering seat to the wheel, lightly grease the inner center
seat (1) of the rim with bearing grease before fitting.
|
| 4. |
Install the tire and wheel
assembly. Align the locating mark of the wheel to the hub.
|
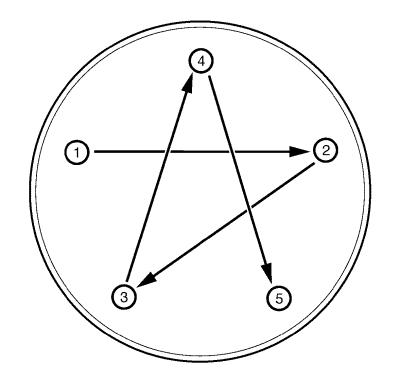
| 5. |
Install the wheel nuts.
|
|
Note: Tighten the
nuts evenly and alternately in the sequence shown, in order to
avoid excessive runout.
|
| 6. |
Tighten the wheel nuts in the
sequence shown tighten the nuts in sequence to 140
N·m (103 lb ft) . |
| 7. |
Install the wheel center
cap. |
|
