|
MTA Manual Transmission from Engine, Detach and
Attach
Note: Engine removed
 Remove Remove
| 1. |
Rope drive unit
| • |
To engine transport shackles
|
|
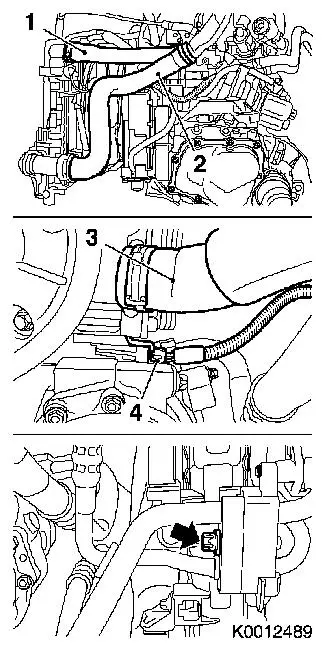
| 2. |
Detach upper coolant hose (1)
| • |
From thermostat housing
|
|
| 3. |
Detach lower coolant hose (3)
| • |
From heat exchanger/oil cooler
|
|
| 4. |
Remove charge air hose (2)
| • |
From charge air pipe at intercooler
|
|
| 5. |
Remove charge air hose
| • |
Open quick-release fitting
|
|
| 6. |
Detach air conditioning line
|
| 7. |
Disconnect wiring harness plug of AC compressor (4)
|
|
|

|
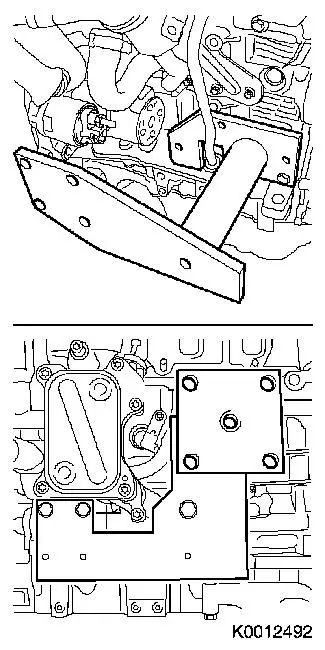
| 9. |
Remove compressor
| • |
Unscrew 3x bolts (1...3)
|
|
|
|
| 10. |
Detach compressor support (1)
|
|
| 11. |
Detach exhaust manifold heat shield
| • |
Remove engine transport shackle
|
|
| 12. |
Remove turbocharger/catalytic converter (3)
| • |
Detach oil feed line at oil cooler
|
| • |
Detach oil return line at cylinder block
|
| • |
Remove charge air pipe at turbocharger
|
| • |
Remove bolt
| – |
Catalytic converter bracket at cylinder block
|
|
| • |
Unscrew 3x nuts (arrows)
|
|
|

|
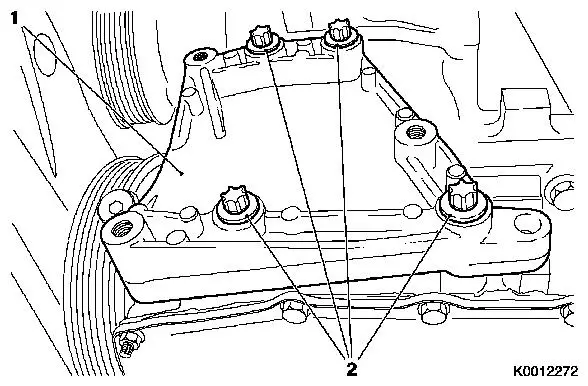
| 13. |
Detach alternator
| • |
Electrically disconnect alternator
|
|
| 14. |
Detach ground cable (3)
|
|
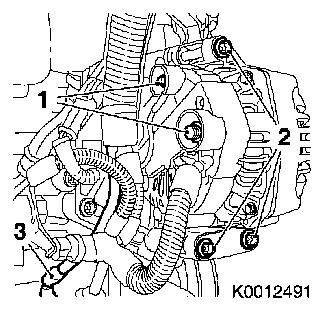
|
| 15. |
Detach alternator support
|
| 17. |
Attach engine transport shackle.
|
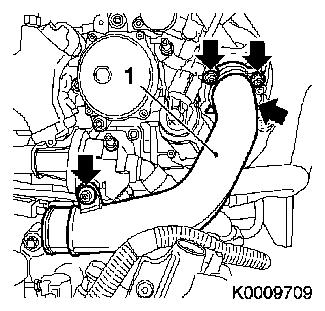
| 19. |
Detach charge air pipe (1) from intake manifold
| • |
Unscrew 4 bolts (arrows)
|
|
|
|
| 20. |
Detach rear reaction member
|
|
|
| 21. |
Remove front reaction member
| • |
Undo bolted connection (arrow)
|
|
|

|
| 23. |
Attach drive unit to KM-412-A
| • |
Remove ropes from drive unit
|
|
| 24. |
Remove transmission
| • |
From cylinder block
Note: Note differing
bolts
|
|
| 25. |
Remove transmission
Note: Second person
required
|
 Install
| 26. |
Insert transmission
Note: Second person
required
|
| 27. |
Attach transmission
| • |
To oil pan
| – |
4x transmission at cylinder block 60
Nm
|
|
|
| 29. |
Insert drive unit
| • |
On front axle unit
Note: Second person
required
|
|
| 30. |
Attach front reaction member
| • |
Tighten bolted connection 60 Nm
|
|
| 31. |
Attach rear reaction member
|
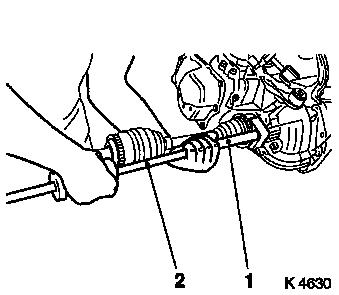
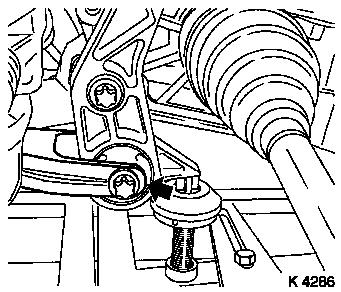
| 33. |
Replace 2 axle shaft retaining rings
|
| 34. |
Install 2 axle shafts
|
| 35. |
Fit charge air pipe at intake manifold
|
| 36. |
Connect ground cable.
|
| 37. |
Attach alternator support
|
| 38. |
Attach alternator
| • |
Electrically connect alternator
|
|
| 39. |
Install turbocharger/catalytic converter
| • |
Fit charge air pipe at turbocharger
|
| • |
Catalytic converter bracket at cylinder block
|
| • |
Attach oil return line at cylinder block
|
| • |
Attach oil feed line at oil cooler
| – |
Tighten banjo bolt 12 Nm
|
|
|
| 40. |
Attach exhaust manifold heat shield
| • |
Detach engine transport shackle
|
| • |
Insert engine transport shackle
|
|
| 41. |
Attach compressor support
|
| 43. |
Insert cooling module
|
| 44. |
Connect air conditioning compressor wiring harness plug
|
| 45. |
Connect air conditioning line
|
| 46. |
Attach charge air hose.
| • |
Close quick-release fitting
|
|
| 47. |
Attach charge air hose.
| • |
To upper charge air pipe
|
|
| 48. |
Connect lower coolant hose
| • |
To heat exchanger/oil cooler
|
|
| 49. |
Attach upper coolant hose
|
| 50. |
Remove ropes from drive unit
|
| 51. |
Check transmission fluid level, top up if necessary 
|
|