|
Fuel Tank, Remove and Install
Model F08, F08 & W5L, F68
Note: Fuel escapes
– observe safety measures and national legislation.
 Remove Remove
| 1. |
Disconnect earth lead from battery.
|
| 2. |
Reduce fuel pressure with pressure tester KM-J-34730-91 via test connection
Note: For petrol
engines
| • |
Collect escaping fuel in a suitable container
Note: If present,
detach upper engine cover and refit it subsequently.
|
|
| 3. |
Empty fuel tank with fuel transfer unit
Note: see catalogue
"Opel/Vauxhall Workshop Equipment".
| • |
Store drained fuel in suitable, lockable container
|
|
| 4. |
Remove right rear wheel
| • |
Mark position in respect of drum hub
Note: Only for vehicles
with rear drum brake
|
|
| 5. |
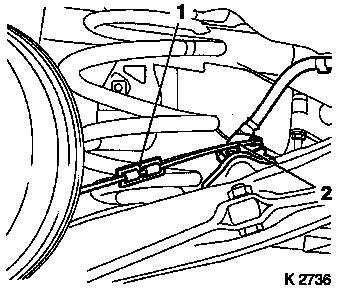
Unclip parking brake cable at right connecting piece (1) and
disengage from guide (2) at rear axle.
Note: Only for vehicles
with rear drum brake
|
|
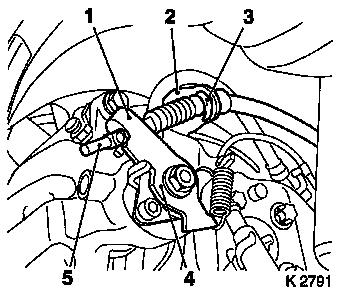
|
| 6. |
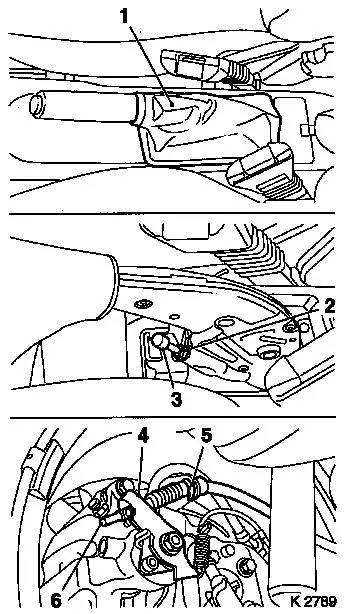
Release tension on parking brake cable – to do this,
unclip folding cover for parking brake lever (1) from centre
console and push up. Detach protective cap (3) and turn back
adjustment nut (2) completely.
Note: Only for vehicles
with rear disc brake
|
| 7. |
Detach parking brake cable (6) from actuation lever (4) at both
brake callipers of the rear axle.
Note: Only for vehicles
with rear disc brake
|
| 8. |
Detach retaining clamps (5) and remove parking brake cable from
counterholds on brake callipers and brackets on rear axle.
Note: Only for vehicles
with rear disc brake
|
|
|
| 9. |
Remove air guide plate on underbody
Note: For "ECO" model
version
|
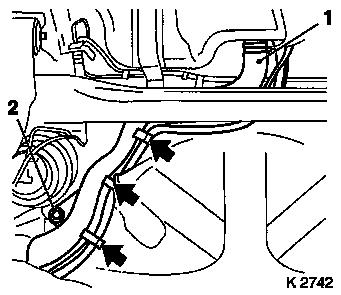
| 10. |
Remove parking brake cable from brackets at fuel tank (1).
Note: For "ECO" model
version
|
| 11. |
Detach rubber attachments (arrows) for rear silencer and lay
exhaust system on rear axle.
Note: For "ECO" model
version
|
| 12. |
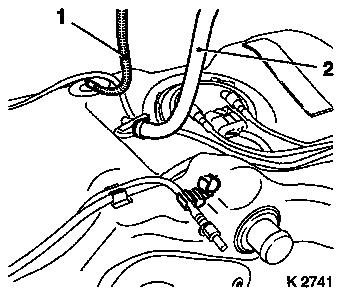
Release and disconnect wiring harness plug (2) for fuel tank
sensor and electric fuel pump (petrol engines) at vehicle
floor.
Note: Illustration
shows vehicle with Z 10 XE.
|
|

|
| 13. |
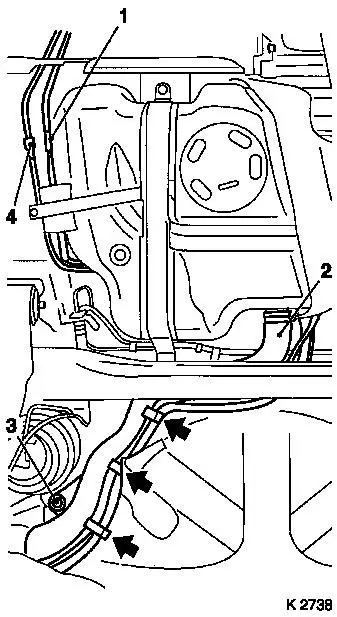
Disconnect fuel line from quick-release fitting (1) with KM-796 and seal with Closure Plug KM-807 (petrol engine) or KM-6015 (diesel engine)
|
| 14. |
Disconnect degassing line (petrol engine) or fuel return line
(diesel engine) at quick-release fitting (4) with KM-796 and seal with KM-807
.
|
| 15. |
Remove fastening bolt for lower fuel filler pipe (3) and
release ventilation and degassing hoses from brackets (arrows).
|
| 16. |
Remove fuel filler hose (2) from fuel tank.
Note: Illustration
shows "petrol engines" version.
|
|
|
| 17. |
Support fuel tank with hydraulic jack and remove both retaining
bands (1) (arrows).
|
| 18. |
Lower fuel tank carefully – move to the right and free
from exhaust system.
Note: Do not exert
tension on hoses, do not kink plastic hoses and lines.
|
|

|
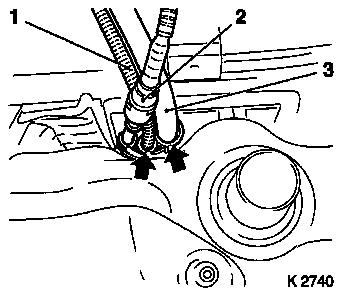
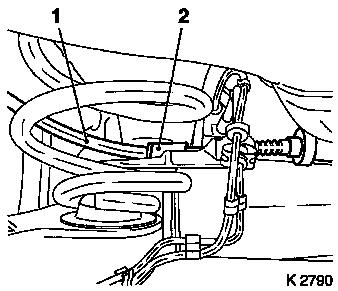
| 19. |
Remove degassing hose from rear degassing line at quick-release
fitting (2) with KM-796 and seal both
with KM-807
|
| 20. |
Release degassing hose (3) and rear degassing hose (1) from
brackets (arrows) at fuel tank.
|
|
|
| 21. |
Carefully Lower fuel tank further.
|
| 22. |
Detach gas venting hose (2) and rear gas venting hose (1) from
fuel tank connection.
Note: Fuel can escape
from hoses/lines.
|
| 23. |
Lower fuel tank with hydraulic jack and remove.
|
|
|
 Install
| 24. |
Transfer installed components:
Note: When replacing
the fuel tank
- Install in-tank module closure cap

- Install fuel pump for petrol engines
- Install fuel screen on diesel engines
- Install fuel tank sensor
- Attach in-tank module wiring harness
- Attach rear fuel line
- Attach fuel return line (petrol engines) or rear fuel return
line (diesel engines)
- Attach rear degassing line (petrol engines) or degassing line
(diesel engines)
- Attach heat shield
- Replace fuel filter, for petrol engines
|
| 25. |
Lift fuel tank with hydraulic jack
|
| 26. |
Install ventilation hose (2) with new clamp and rear degassing
hose (1) to pipe at fuel tank.
|
|
|
| 27. |
Lift fuel tank further with hydraulic jack
|
| 28. |
Clip degassing hose (3) and rear degassing hose (1) to brackets
(arrows) at fuel tank.
|
| 29. |
Remove KM-807 from degassing hose and
rear degassing line. Connect degassing hose and rear degassing line
with quick-release fitting (2)
Note: Quick-release
fitting must audibly engage
|
|
|
| 30. |
Lift fuel tank further carefully – move to the left and
position beneath exhaust system.
|
| 31. |
Install retaining bands (1) (arrows) – tightening torque
20 Nm
|
| 32. |
Remove hydraulic jack
|
|
|
| 33. |
Lay ventilation and degassing hoses at fuel filler pipe and
attach with brackets (arrows). Install fastening bolt (2) of lower
fuel filler pipe.
|
| 34. |
Install fuel filler hose (1) at fuel tank – tightening
torque of the hose clamp 2.5 Nm
|
|
|
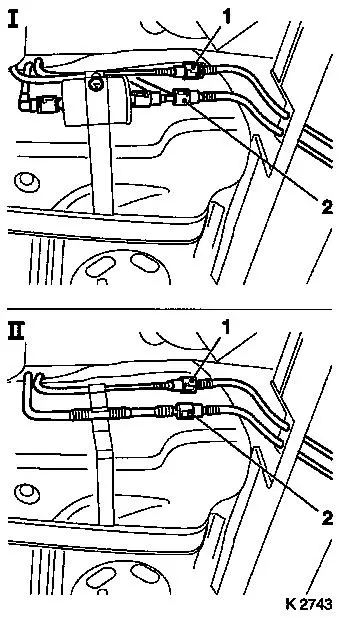
| 35. |
Remove KM-807 from degassing line and
rear degassing line (petrol engines) or from fuel return line and
rear fuel return line (diesel engines). Connect degassing line and
rear degassing line (petrol engines) or fuel return line and rear
fuel return line (diesel engines) with quick-release fitting
(1).
|
| 36. |
Remove KM-807 (petrol engines) or
KM-6015 (diesel engines) from fuel line
and rear fuel line. Connect fuel line and rear fuel line with
quick-release fitting (2).
Note: Quick release
fittings must engage perceptibly.
- "Petrol Engines" version
- "Diesel engines" version
|
|
|
| 37. |
Connect and secure wiring harness plug (2) for fuel tank sensor
and electric fuel pump (petrol engines) at vehicle floor.
|
| 38. |
Attach rubber attachments for rear silencer (arrows).
|
| 39. |
Install parking brake cable to brackets at fuel tank (1).
Note: For "ECO" model
variant: Install underbody air guide plate
Note: Illustration
shows vehicle with Z 10 XE.
|
|
|
| 40. |
Engage right parking brake cable in guide (2) at rear axle and
install with new connecting piece (1).
Note: Only for vehicles
with drum brake.
|
| 41. |
Install right rear wheel – tightening torque 110 Nm
|
|
|
| 42. |
Attach parking brake cable (1) on both sides to bracket (2) on
rear axle.
Note: Only for vehicles
with rear disc brake.
Note: Illustration
shows left side
|
|
|
| 43. |
Attach parking brake cable (5) to both brake callipers of rear
axle in counterhold (2) and actuation lever (4). Install retaining
clamps (3).
|
|
|
| 45. |
Fill fuel tank with fuel
Note: Comply with
national legislation.
|
| 46. |
Connect earth cable to battery.
|
| 47. |
Check correct operation of fuel tank sensor.
|
| 48. |
Check seal of fuel lines with engine running.
|
| 49. |
Petrol engines: Check correct operation of fuel pump.
|
| 50. |
Program volatile memories
|
|
