Field Remedy: 1859
| Subject: |
Steering gear - Noise |
| Models: |
Engines: |
Option: |
| Corsa-C 2004......,Corsa-C Combo
2004......,Meriva 2004.....,Tigra-B 2004...... |
All,All,All,All |
|
| Complaint: |
Clattering noise from steering while
driving. |
| Cause: |
Too big clearance in bushing of steering
gear. |
| Production: |
New parts in production as of : Combo-C: VIN
W0L0XCF..63050321 Tigra-B: VIN W0L0XCR976E015058 Meriva:
W0L0XCE7564235501 Corsa-C: W0L0XCF..64235209 Corsa-C Plant
Eisenach: W0L0XCF6866073844; W0L0XCF0866073763 |
Remedy:
In case of customer complaint, install the repairkit for the
steering gear.
It is necessary to build a mounting bracket for the steering gear
to change the bushing.
The production of the mounting bracket is described in step 1-4.
Note: The mounting bracket for the steering gear has to be stored
by dealer. The costs for the repair-tool can only covered one-time
per dealer not per vehicle.
The mounting bracket has to be built after removing the steering gear
(step 16) if no uninstalled steering gear is available at the start
of the operation.
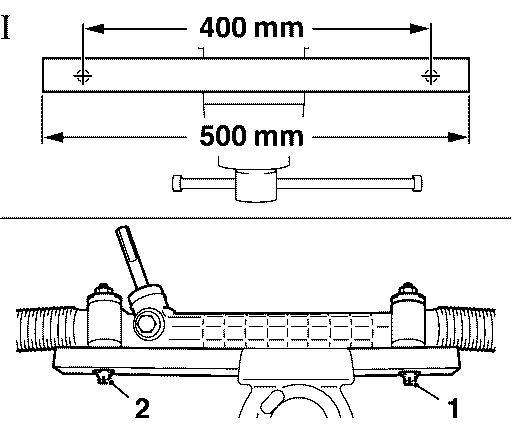
1. Cut square iron pipe 40 mm x 40 mm to length of 500 mm (picture I).
2. Drill 2x holes with 12,5 mm diameter
- hole centre distance 400 mm
 3. Install steering gear with 2 screws M12x130 (1, 2) onto
    square pipe
- use washers and nuts
4. Tack-weld screw heads (1, 2) with welding spots.
5. Remove front wheels.
6. Suspend radiator to air deflector panel
- use 2x cable strap
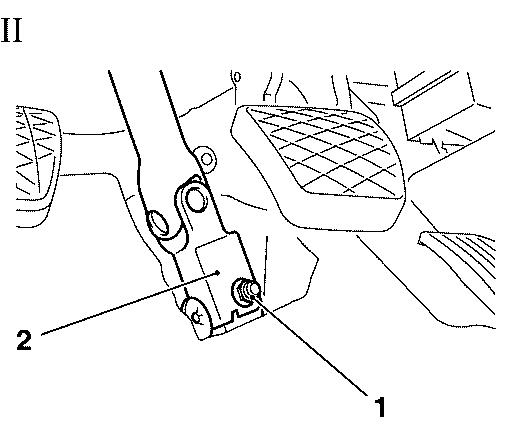
 7. Detach steering intermediate shaft (2) from steering
    pinion (picture II)
- unscrew and remove bolt (1)
 8. Detach 2x swing arm (1) from spring strut support
    tube (picture III)
    - counterhold at the two flattened areas of the knuckle bolt with
      open-ended wrench

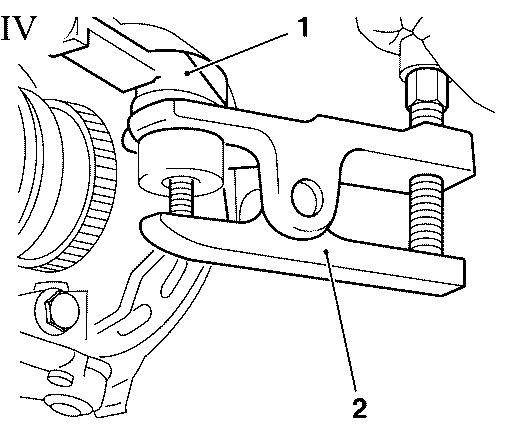
 9. Detach 2x tie rod end (1) with KM-507-C (2) from
    steering knuckle (picture IV).
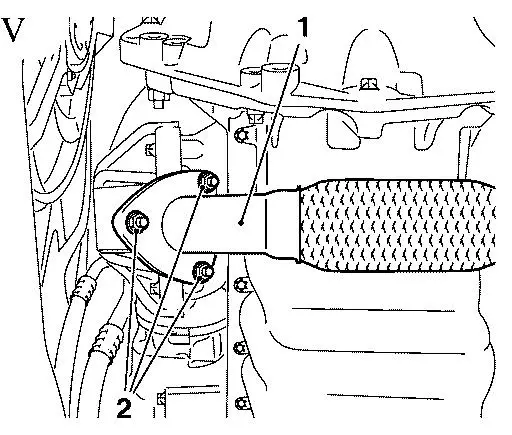
10. Remove front exhaust pipe (1) from catalytic converter (picture V)
- unscrew 3x nut (2).
11. Remove damping block, rear reaction member.
12. Detach exhaust system
- remove 2x mounting rubbers
    Note:
    Attach exhaust system to underbody with adequate item.
13. Disconnect wiring harness connector of oxygen sensor.
14. Detach front bumper from axle body
- remove 3x plastic rivet
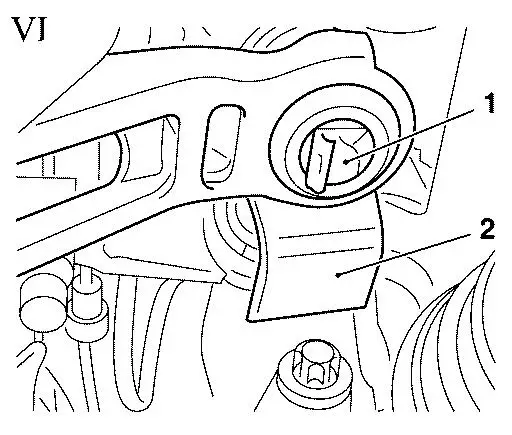
15. Detach shift mechanism (picture VI)
    - detach retaining clamp (1) from shift mechanism (2)
    - unhook shift mechanism at the top from the shift
      mechanism bracket
16. Place hydraulic lifter in conjunction with KM-904 and KM-6168
    under front axle body
    Important:
    Ensure that the guide pins of KM-6168 are seated on both sides
    in the guide holes of the front axle body.
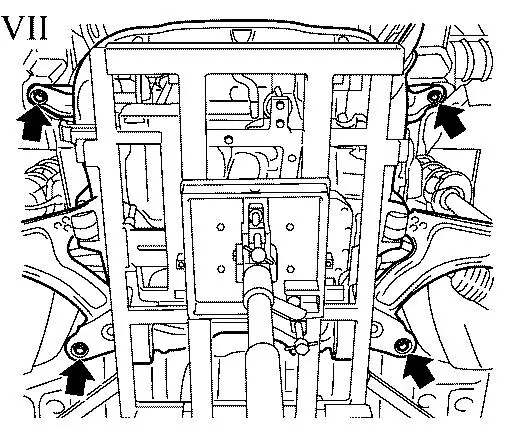
17. Remove 4x screws of front axle body (picture VII, arrows).
18. Lower front axle body with hydraulic lifter until screws of
    steering gear are accessible
    Note:
    Ensure that front axle body does not lift from KM-6168.
19. Remove steering gear from axle body
    - remove 2x screw
    - remove stering gear
20. Install steering gear to the produced mounting bracket
    (see picture I).
21. Remove 2x bellow
- remove 4x clamp
22. Remove 2x tie rod (picture VIII).

23. Bring steering gear to centre position (picture IX)
    Note:
    Messure projection of steering rack (1) to housing (2) with
    slide gauge (3) on both ends of steering rack.
    Clearance must be equal on both sides.
    Clearance can be adjusted by turning steering shaft.

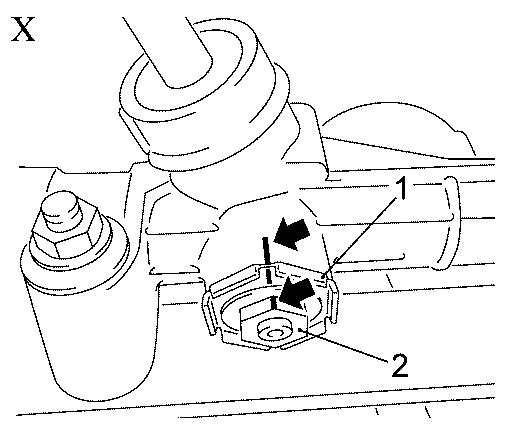
24. Mark positions with a marking pen (picture X, arrows)
- on housing alligned to lock nut (1) and adjusting screw (2)
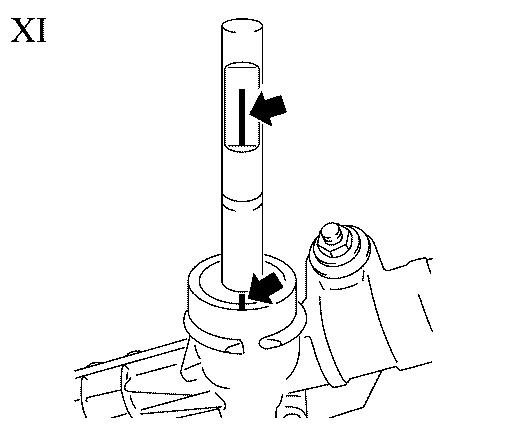
25. Mark positions with a marking pen (picture XI, arrows)
- on housing alligned to steering shaft
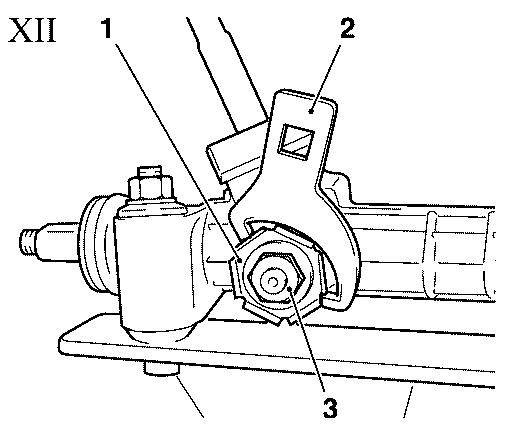
26. Loosen lock nut (picture XII)
- use KM-280 (2)
27. Remove adjusting screw (3)
    Note:
    Positon of contact nut to adjusting screw must not be changed!
    This is necessary to secure the correct fitting position.
28. Remove seal ring (picture XIII, 2)
    - use adequate tool (3) to push seal ring into housing
    - lever out seal ring from housing with screwdriver (1).

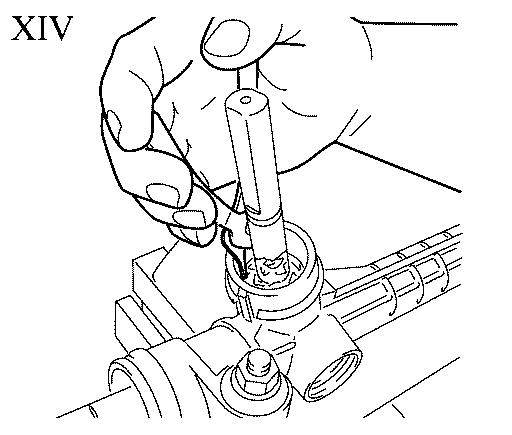
29. Remove locking ring (picture XIV)
    - remove locking grease
    - remove locking ring
30. Remove steering shaft from housing.
31. Remove steering rack from housing and check surface.
Note:
    If the surface is damaged e.g. scoring the steering gear
    has to be replaced.
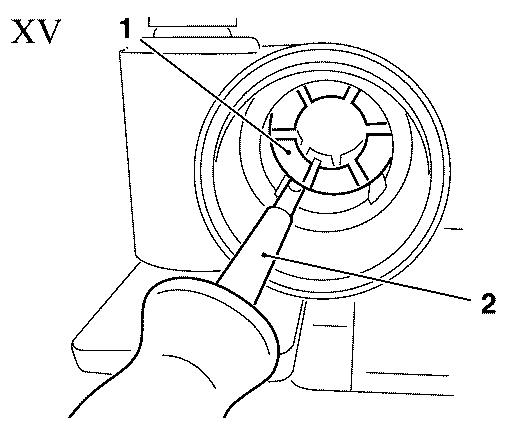
32. Remove old bushing (picture XV)
    - unlock bushing (1) with adequate tool (2)
    - push bushing out of housing from opposite side using a long tool
33. Clean seat of bushing.
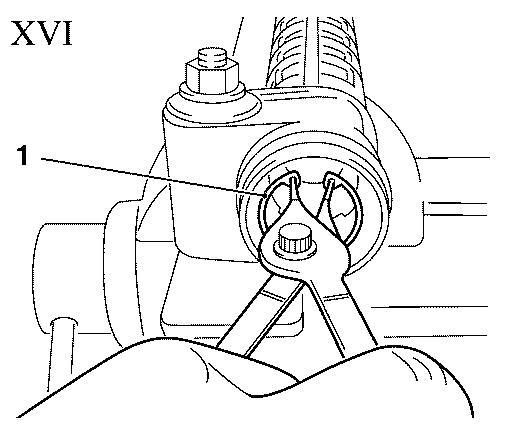
34. Install new bushing (picture XVI)
    - insert bushing till stop lug
    - install locking ring (1)
35. Lubricate bushing slightly with provided grease.
36. Install steering rack
    - lubricate steering shaft evenly with provided grease
    - insert steering shaft in centre of housing
37. Install steering shaft
    Note:
    steering rack must be mounted in centre position.
    Marks on steering shaft and housing must match (see picture XI).
    - messure projection of steering rack to housing with
      slide gauge on both ends of steering rack
    Note:
    Clearance must be equal on both sides.
    If projection is not equal repeat operation until result
    is ok.
38. Install locking ring.
39. Install new seal ring (1, picture XVII)
    - insert provided grease into housing
    - push in seal ring with fingers

40. Turn in adjusting screw with lock nut
    Note:
    Position of lock nut to adjusting screw must not be varied!
41. Tighten lock nut, torque 80 Nm. The marking on housing and
    adjustment screw have to be in corresponding position.
    Note:
    Counterhold adjusting screw if necessary. Retain adjustment of
    markings necessarily!
42. Install 2x tie rod
    - apply locking compound to threads of steering rack
    - tighten 2x tie rod (tightening torque 70 Nm)
    Note:
    Counterhold with open-ended wrench against flattened area
    of steering gear.
43. Install 2x bellow
- install 4x clamp
44. Remove steering gear from mounting bracket
- remove 2x nut
45. Attach steering gear to front axle body
    - insert 2x new bolt
    - use 2x new washer
    - tighten 2x new nut 45 Nm + 45° + 15°
46. Install front axle body
    - move front axle body carefully with KM-6394 on KM-6168-A and
      KM-904 with hydraulic lifter on to vehicle underbody, rear
      reaction member support bracket and/or front reaction member
    - insert steering pinion of steering gear into bulkhead
      penetration
47. Fasten front axle body
- tighten 4x new bolt 90 Nm + 45° + 15°
48. Attach shift mechanism
    - insert shift mechanism in shift mechanism bracket from above
    - attach retaining clamp
49. Attach front bumper to front axle body
- install 3x plastic rivet
50. Connect wiring harness connector to oxygen sensor.
51. Attach exhaust system
- install 2x mounting rubbers
52. Install damping block, front reaction member
- tighten bolt 60 Nm
53. Install front exhaust pipe to catalytic converter
- tighten 3x new nut 25 Nm
54. Attach 2x tie rod end to steering knuckle
- tighten new nuts 35 Nm
55. Attach 2x link to spring strut support tube
    - tighten nuts 65 Nm
    - counterhold at the two flattened areas of the knuckle bolt
      with open-ended wrench
56. Attach steering intermediate shaft to steering pinion
- tighten nut of clamp bolt 24 Nm
57. Remove suspension of radiator to air deflector panel
- cut 2x cable strap
58. Install front wheels.
Spare-Parts: Part-No.: Catalogue-No.:
repairing set steering gear 93190161 90 09 257
Labour Times: TC: Hours:
U3 185 90    Install repairing set           92          2.2
             steering gear (petrol engine)
U3 185 90    Install repairing set           92          2.3
             steering gear (diesel engine)
U3 185 91    Produce steering gear           92          0.3
             mounting bracket
U3 185 92 Complete vehicle alignment 92 0.6
U3 185 93 Adjust toe 92 0.3
The costs for this repair will be covered during the normal
warranty. The regular warranty procedure should be used for
claiming Set-up-time.
| FunctionalGroup: |
M - Steering |
| Complaint Group: |
14 - Noises or Vibrations |
| Trouble Code: |
None |
|
