|
Piston Rings, Replace
 Remove Remove
| 2. |
Raise vehicle by its full height
|
| 3. |
Drain engine oil
| • |
Place collecting basin underneath.
|
|
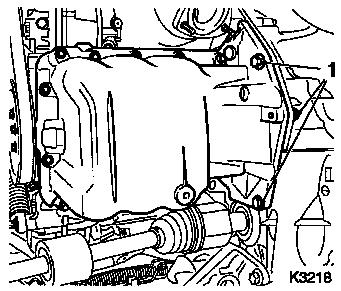
| 4. |
Remove oil pan
| • |
Cylinder block base plate
|
|
|
|
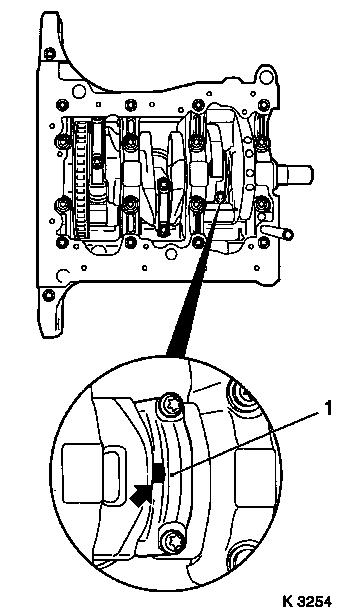
| 6. |
Remove con-rod bearing caps (1) of cylinder 1
Note: The mating
surfaces of the con-rods and con-rod bearing caps form an
individual fit and should never be swapped over or damaged. To
avoid damage, do not put the con-rods and con-rod bearing caps down
on the mating surfaces.
| • |
Mark order of con-rod bearing caps
|
| • |
Remove con-rod bearing cap
Note: Note installation
position, bead (arrow) on the con-rod bearing cap points towards
the transmission side
|
| • |
Push piston with con-rod upwards
|
|
|
|
| 7. |
Lower vehicle by its full height
|
| 8. |
Remove piston with con-rod from cylinder block
|
| 9. |
Turn crankshaft
| • |
Pull timing chain upwards
|
|
| 10. |
Raise vehicle by its full height
|
| 11. |
Remove con-rod bearing cap of cylinder 2
Note: The mating
surfaces of the con-rods and con-rod bearing caps form an
individual fit and should never be swapped over or damaged. To
avoid damage, do not put the con-rods and con-rod bearing caps down
on the mating surfaces.
| • |
Mark order of con-rod bearing caps
|
| • |
Remove con-rod bearing cap
Note: Note installation
position, bead (arrow) on the con-rod bearing cap points towards
the transmission side
|
| • |
Push piston with con-rod upwards
|
|
| 12. |
Lower vehicle by its full height
|
| 13. |
Remove piston with con-rod from cylinder block
|
| 14. |
Turn crankshaft
| • |
Pull timing chain upwards
|
|
| 15. |
Raise vehicle by its full height
|
| 16. |
Remove con-rod bearing cap of cylinder 3
Note: The mating
surfaces of the con-rods and con-rod bearing caps form an
individual fit and should never be swapped over or damaged. To
avoid damage, do not put the con-rods and con-rod bearing caps down
on the mating surfaces.
| • |
Mark order of con-rod bearing caps
|
| • |
Remove con-rod bearing cap
Note: Note installation
position, bead (arrow) on the con-rod bearing cap points towards
the transmission side
|
| • |
Push piston with con-rod upwards
|
|
| 17. |
Lower vehicle by its full height
|
| 18. |
Remove piston with con-rod from cylinder block
|
 Install
| 19. |
Clean and check all the components, replace if necessary
Note: Pistons may only
be replaced in conjunction with con-rod and piston pin
|
| 20. |
Insert con-rod bearing shells into con-rods and con-rod bearing
caps
|
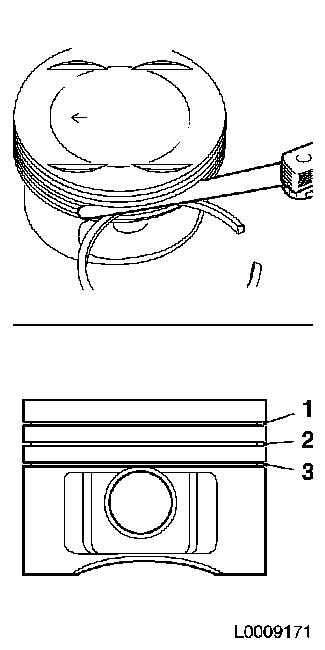
| 21. |
Check piston ring vertical play with feeler gauge in piston
ring groove.
| • |
Rectangular compression ring (1)
|
| • |
Tapered compression ring (2)
|
|
|
|
| 22. |
Install piston rings
| • |
Insert piston rings in ring groove using piston ring pliers
| – |
Marking "TOP" at the top
|
|
|
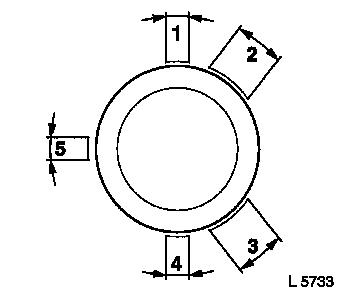
| 23. |
Set piston ring gap
| • |
First piston ring (right-hand ring) in position (1)
|
| • |
Second piston ring (minute ring) in position (4)
|
| • |
Interim ring of oil scraper ring in position (5), steel band
rings of oil scraper ring in position (2) and/or (3)
|
|
|
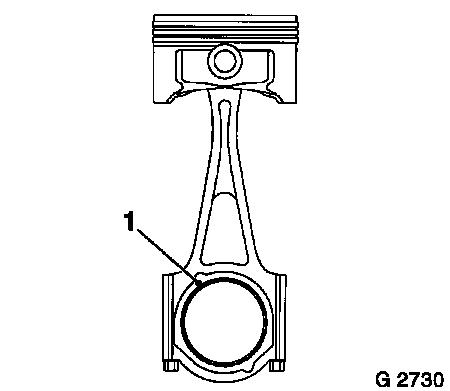
|
| 24. |
The bead (1) on the con-rod points towards the transmission
side
|
|
|
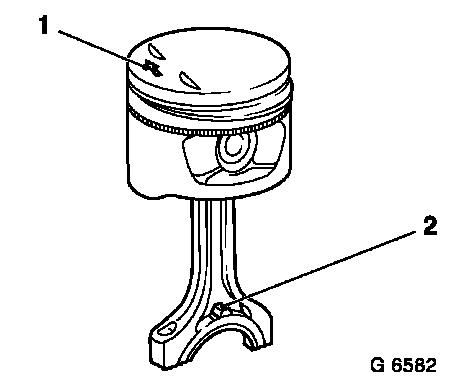
| 25. |
Install piston of cylinder 1
Note: Arrow (1) on the
piston head points to engine timing side – bead (2) on the
con-rod points to transmission side
| • |
Coat pistons and cylinder bores with engine oil
|
| • |
Push piston rings together with piston tightening strap
|
| • |
Push piston into cylinder bore with hammer shaft until con-rod
sits on the con-rod bearing journal of the crankshaft
|
|
|
|
| 26. |
Raise vehicle by its full height
|
| 27. |
Install con-rod bearing cap
Note: Bead on the
con-rod bearing cap points to transmission side
| • |
Wet con-rod bearing journal with engine oil
|
Important: Only use screws of
size M6.5
|
| • |
Tighten 2x bolt 13 Nm + 60° +
15°
|
|
| 28. |
Lower vehicle by its full height
|
| 29. |
Turn crankshaft
| • |
Pull timing chain upwards
|
|
| 30. |
Install piston of cylinder 2
Note: Arrow (1) on the
piston head points to engine timing side – bead (2) on the
con-rod points to transmission side
| • |
Coat pistons and cylinder bores with engine oil
|
| • |
Push piston rings together with piston tightening strap
|
| • |
Push piston into cylinder bore with hammer shaft until con-rod
sits on the con-rod bearing journal of the crankshaft
|
|
| 31. |
Raise vehicle by its full height
|
| 32. |
Install con-rod bearing cap
Note: Bead on the
con-rod bearing cap points to transmission side
| • |
Wet con-rod bearing journal with engine oil
|
Important: Only use screws of
size M6.5
|
| • |
Tighten 2x bolt 13 Nm + 60° +
15°
|
|
| 33. |
Install piston of cylinder 3
Note: Arrow (1) on the
piston head points to engine timing side – bead (2) on the
con-rod points to transmission side
| • |
Coat pistons and cylinder bores with engine oil
|
| • |
Push piston rings together with piston tightening strap
|
| • |
Push piston into cylinder bore with hammer shaft until con-rod
sits on the con-rod bearing journal of the crankshaft
|
|
| 34. |
Raise vehicle by its full height
|
| 35. |
Install con-rod bearing cap
Note: Bead on the
con-rod bearing cap points to transmission side
| • |
Wet con-rod bearing journal with engine oil
|
Important: Only use screws of
size M6.5
|
| • |
Tighten 2x bolt 13 Nm + 60° +
15°
|
|
| 36. |
Install oil pan with new gasket
Note: Comply with the
following tightening sequence
| • |
Tighten 14 bolts on cylinder block base plate 10 Nm
|
| • |
Tighten 3x bolt on transmission 40
Nm
|
|
| 37. |
Attach oil drain bolt to oil pan
| • |
Tighten drain bolt 10 Nm
|
|
| 38. |
Lock crankshaft
| • |
Pull timing chain upwards
|
| • |
Turn crankshaft evenly until KM-952
engages
|
|
| 39. |
Lower vehicle by its full height
|
| 40. |
Install cylinder head
|
|
