|
Replace synchro rings (F17+F17+ MTA)
Note: Transmission
remains installed.
 Remove Remove
|
| 1. |
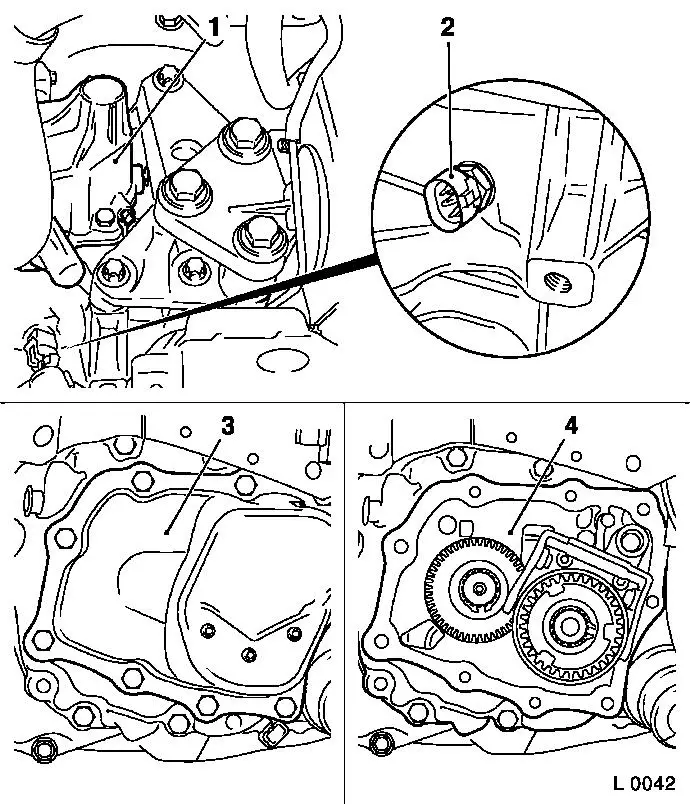
Remove gearshift cover (1)
Note: For transmission
F17+
Remove shift module
Note: For transmission
F17+ MTA
|
| 2. |
Remove reversing lamp switch (2)
| • |
Disconnect wiring harness plug for reversing lamp switch
|
| • |
Unscrew reversing lamp switch
|
|
| 3. |
Remove end shield cover (3) 
|
|
|
| 7. |
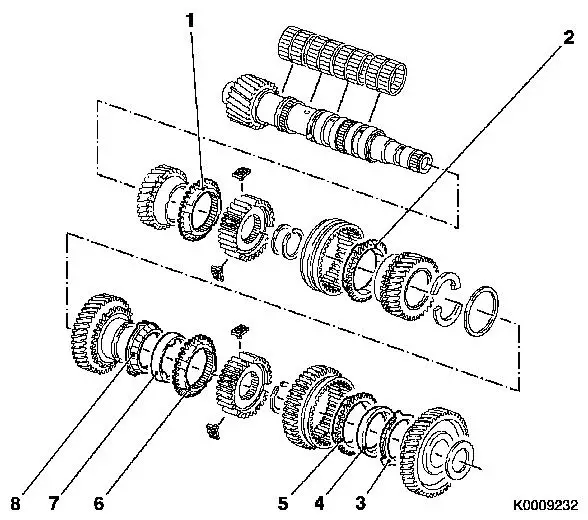
Inspect synchro rings
| • |
Check the synchro ring concerned, replace if necessary
|
1
|
4th gear synchroniser ring
|
|
2
|
3rd gear synchroniser ring
|
|
3
|
1st gear inner synchroniser ring
|
|
4
|
1st gear intermediate ring
|
|
5
|
1st gear outer synchroniser ring
|
|
6
|
2nd gear outer synchroniser ring
|
|
7
|
2nd gear intermediate ring
|
|
8
|
2nd gear inner synchroniser ring
|
|
|
|
 Install
Important: Coat the bearing,
running or seating surfaces of rotating parts and surfaces under
pressure with transmission fluid. If a synchro body assembly is
completely dismantled, observe the following procedure for
assembly.
|
| 8. |
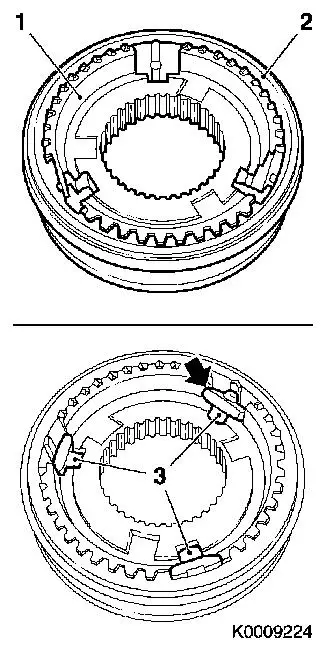
Assemble synchromesh body and shift sleeve
| • |
Insert synchromesh body (1) into shifter collar (2)
|
| • |
Insert 3 thrust pieces (3)
Note: Attach bevel and
then press into synchromesh body assembly.
|
|
|
|

|
| 11. |
Install end shield (1)
Note: Observe the
magnet
|
| 12. |
Install end shield cover (2)
|
| 13. |
Install gearshift cover (3)
Note: For transmission
F17+
Install shift module
Note: For transmission
F17+ MTA
|
| 14. |
Transmission Fluid Level, Check and Correct
|
| 15. |
Install reversing lamp switch (4)
| • |
insert with new seal ring
|
| • |
Tighten reversing lamp switch 20
Nm
|
| • |
Connect wiring harness plug
|
|
| 16. |
Check ease of gear shifting
|
|
|
