vauxhall Workshop Repair Guides

Vauxhall Workshop Service and Repair Manuals

Damping Bushings (Front) for Rear Differential, Replace > < Damping Bushings (Rear) for Rear Differential, Replace

Rear Axle with Rear Differential, Remove and Install

  Remove

Detach rear cover plate for vehicle jack on both sides.

Attach KM-6194 (2) to vehicle jack points. Raise vehicle – attach rear lifting platform arms to KM-6194 – ensure that the rear axle retaining plates (1) remain freely accessible.

Remove rear wheels.

For vehicles with xenon low beam headlamps: Disconnect wiring harness plug (3) from vehicle level control sensor.

For vehicles with level control system: Disconnect wiring harness plug for level control sensor.

Object Number: 2418236  Size: DEFAULT

Remove exhaust system starting at catalytic converter LUREF_1.gif

Remove fastening nuts (2) and fastening bolt (1) for heat shields from vehicle underbody and remove heat shields.

  Measure

Measure projection (I) of threaded rod in parking brake cable compensation yoke (3) and remove adjustment nut.

Object Number: 8125722  Size: DEFAULT

  Remove

Detach return spring (2) from brake backing plate and brake cable lever, and detach brake cable (1) from both sides of brake cable lever. Remove parking brake cables from brackets on semi-trailing arm.

Detach brake lines (3) from brake hoses at vehicle underbody, remove retaining plates (4), detach brake hoses and remove brake hoses from brackets on vehicle underbody.

Object Number: 2418238  Size: DEFAULT

Support semi-trailing arm with hydraulic jack and remove shock absorbers (1) on both sides. Carefully lower hydraulic jack.

Except V6: Remove rear springs (2).

Note:   For V6, the rear springs should be removed only when rear axle is lowered slightly.

Object Number: 2418239  Size: DEFAULT

  Remove

Remove propshaft (1) with disc joint (2) from rear differential.

Disconnect wiring harness plug (3) from wheel sensors.

Object Number: 2418240  Size: DEFAULT

Position hydraulic jack with KM-485 or KM-6195 (2) and KM-904 under rear differential – ensure that the level control sensor (1) is not damaged.

Detach front damping bushing for rear axle with supporting strut (3) from vehicle underbody.

Detach rear (4) damping blocks from vehicle underbody.

Lower rear axle – for V6, remove rear springs after lowering slightly.

Object Number: 2418241  Size: DEFAULT

Attach rear axle to vehicle underbody using hydraulic jack and KM-485 or KM-6195 and KM-904 – for V6 insert rear springs when lifting.

Attach rear damping blocks (1) to vehicle underbody – tightening torque 65 Nm / 48 lbf. ft.

Install front fastening bolts for damping blocks (2) for rear axle with supporting strut to vehicle underbody – tightening torque 125 Nm / 92 lbf. ft.

Attach supporting strut (3) to vehicle underbody – tightening torque 65 Nm / 48 lbf. ft.

Lower hydraulic jack.

Object Number: 2418242  Size: DEFAULT

  Install

Except V6: Insert rear springs (2) with rubber dampers (1).

Turn rear springs until the upper end of spring faces towards rear of vehicle.

Connect wiring harness plugs for both wheel sensors and clip onto vehicle underbody.

Apply hydraulic jack under each side of the semi-trailing arm consecutively and lift until the bore holes align with the shock absorbers (3). Attach shock absorber to semi-trailing arm – tightening torque 110 Nm /81 lbf. ft. Lower hydraulic jack.

Object Number: 2418243  Size: DEFAULT

Insert brake hoses in bracket on both sides of the vehicle underbody and attach retaining plate (2) – ensure brake hoses are not twisted. Attach brake lines (1) to brake hoses – tightening torque 16 Nm / 12 lbf. ft.

Attach parking brake cables (3) in brackets on both sides of semi-trailing arm and to brake cable lever. Attach return springs (4) to brake cable levers and to brake backing plates.

Object Number: 2418244  Size: DEFAULT

Attach parking brake compensation yoke (1) to parking brake cable threaded rod with fastening nut.

  Adjust

Adjust projection of threaded rod on parking brake cable compensation yoke to dimension (I) determined during removal.

  Install

Attach propshaft (2) with disc joint (3) to rear differential – tightening torque 95 Nm / 70 lbf. ft. (for Torx bolts: use new fastening bolts and nuts and tighten to 50 Nm / 37 lbf. ft. + 75° + 15°).

For vehicles with level control system: Disconnect wiring harness for level control sensor.

Object Number: 2418245  Size: DEFAULT

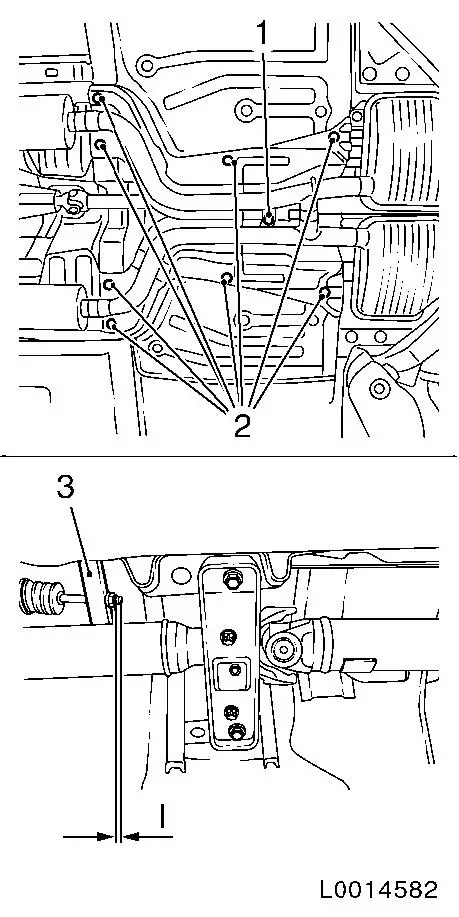
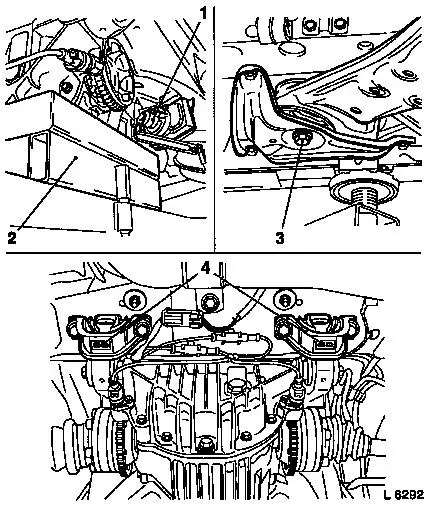
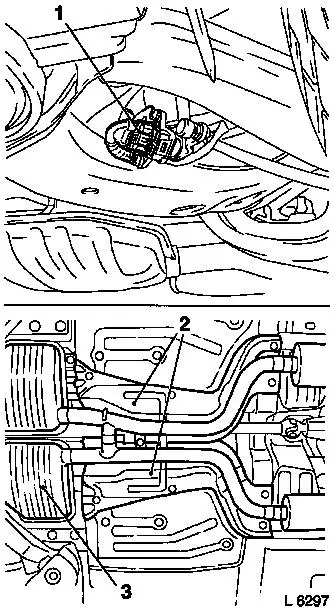
Attach heat shields (2) to vehicle underbody.

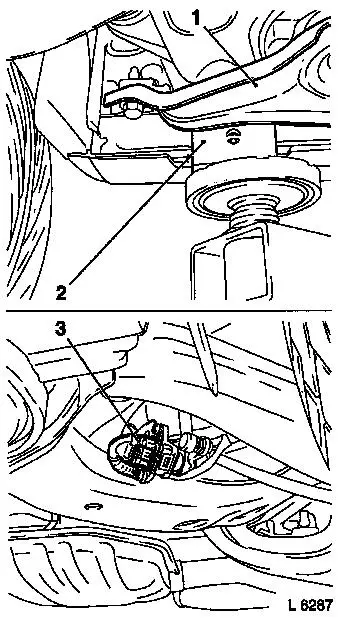
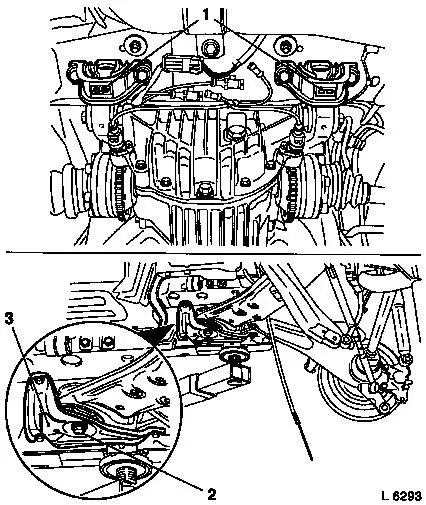
For vehicles with xenon low beam headlamps: Connect wiring harness plug (1) to vehicle level control sensor.

Caution

Following removal and installation or replacement of vehicle level control sensors, a comparison is required via TECH2 – see corresponding Checking Procedure.

  Install

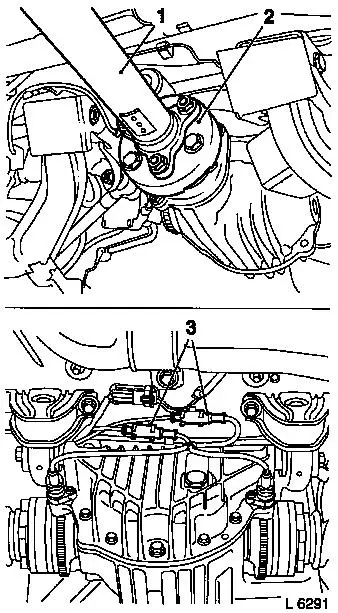
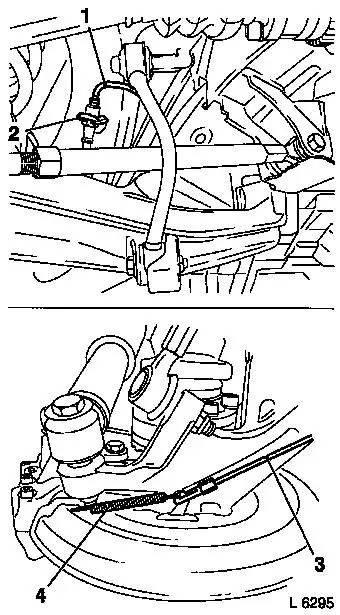
Suspend exhaust system with damping rings from vehicle underbody and attach retaining plates for damping rings. Attach exhaust system (3) to catalytic converters LUREF_1.gif – tightening torque 25 Nm / 18.5 lbf. ft.

Attach rear wheels – tightening torque 110 Nm / 81 lbf. ft.

Bleed brake system – see operation "Brake System, Bleed" and "Brake System, Check for Leaks" in group "H".

Object Number: 2418246  Size: DEFAULT


Related Literature Units
-
-
-
-

Damping Bushings (Front) for Rear Differential, Replace > < Damping Bushings (Rear) for Rear Differential, Replace