|
Upper Part of Oil Pan Housing, Remove and
Install
 Install
|
Attach engine to Engine Bridge KM-883-1 (1) – tension
chains.
 Remove Remove
Remove lower part of oil pan housing – see operation
"Lower Part of Oil Pan Housing, Remove and Install".
|

|
|
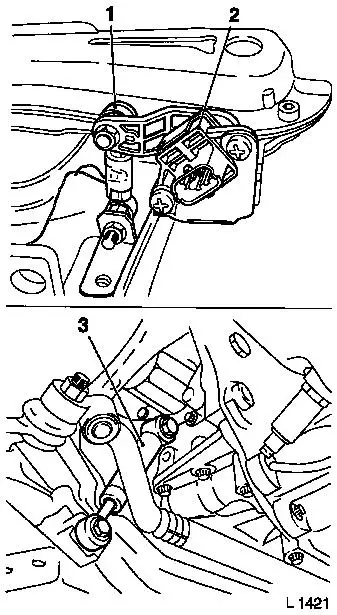
For vehicles with xenon headlamp:
Disconnect wiring harness plug from vehicle level control sensor
(2). Remove ball head (1) from vehicle level control sensor.
If present: Remove vibration damper (3).
Detach right idler bracket from side member. Pull centre and
right tie rods downwards.
|
|
|
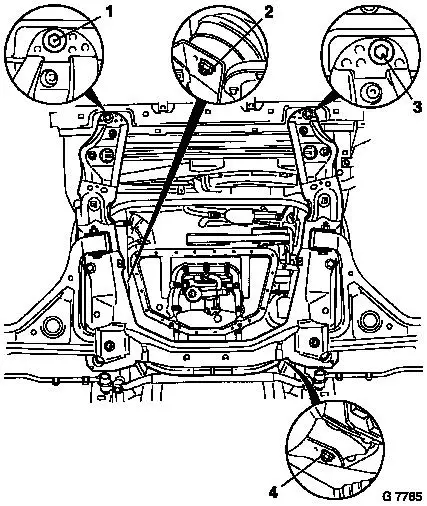
Remove fastening nuts for engine damping blocks (2) and (4) from
front axle body.
Raise front axle body with hydraulic jack.
Loosen front fastening nuts (1) and (3) by approx. 4 rotations
(do not remove).
|
|
|
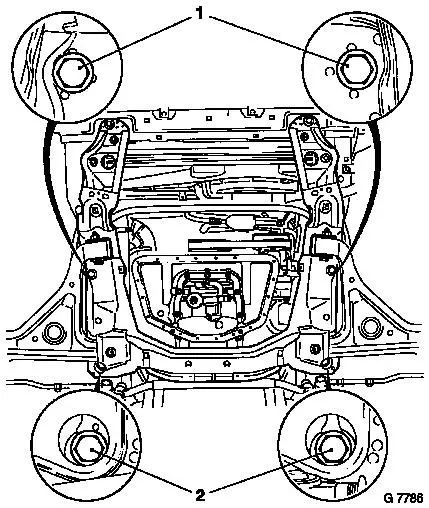
Remove fastening nuts (1) and (2) and carefully lower front axle
body approx. 10 cm – note different bolt lengths.
|
|
|
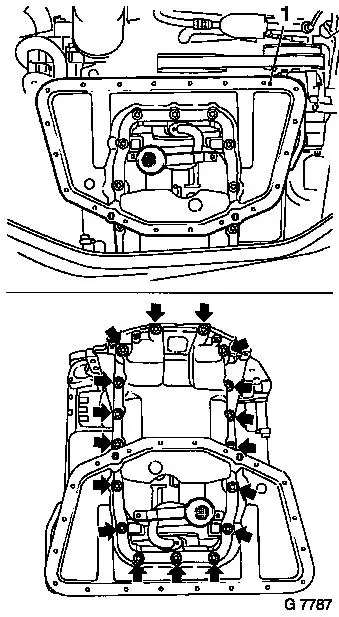
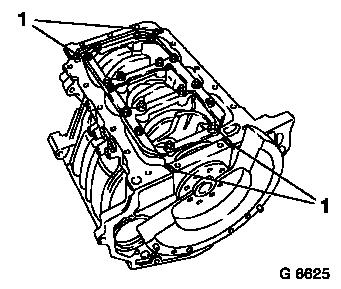
Remove upper part of oil pan housing (1) from cylinder
block.
The positions of the fastening bolts (arrows) are shown on a
dismantled engine for clearer representation.
For version with fluid seal:
Cut silicone sealing compound with a knife and separate upper
part of oil pan housing from cylinder block and oil pump using a
wide spatula.
|
|
 Clean Clean
Clean sealing surfaces and remove gasket residue – sealing
surfaces must be completely free of oil and grease.
Caution
The silicone sealing compound (grey) must be applied and the oil
pan must be installed within 10 minutes.
|
Install
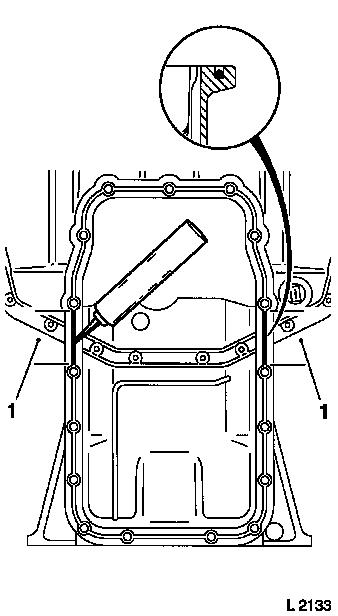
For version with elastomer seal:
Apply a bead of silicone sealing compound (grey) to joints (1)
of oil pump and rear crankshaft bearing cap.
|
|
|
Apply a bead of silicone sealing compound (grey) to groove of
upper oil pan housing (area "1").
Screw in 2 threaded bolts (M6) to secure the oil sump in the
cylinder block.
|
|
|
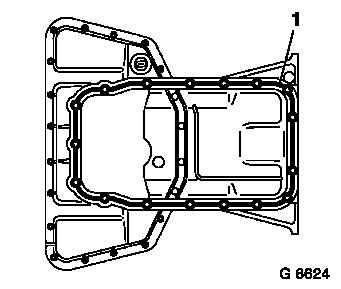
Insert new elastomer form seal (1) in the groove of the oil pan
housing upper part – make sure that installation position is
perfect.
|
|
|
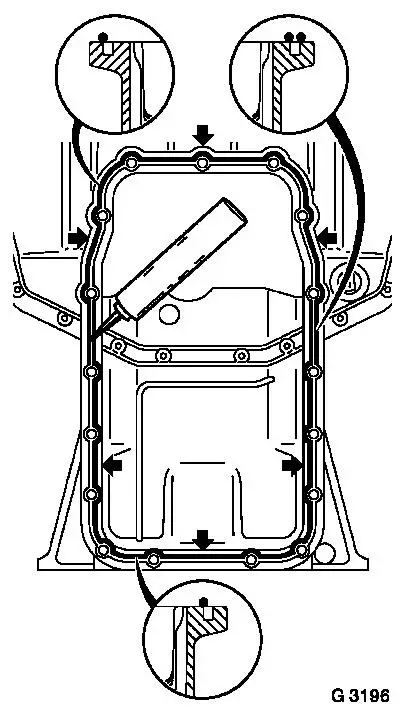
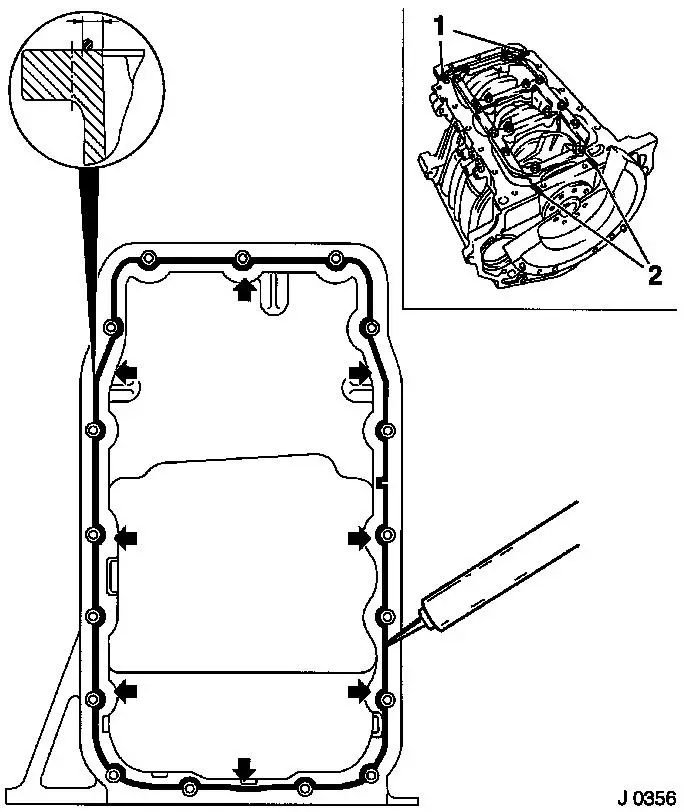
After inserting oil pan seal, apply an approx. 3 mm thick bead
of silicone sealing compound (grey) to outside (upper arrows) and
inside (lower arrows) of sealing surfaces.
|
|
|
For version with liquid seal: Apply a bead of silicone sealing
compound (grey) to joints (1) of oil pump and rear crankshaft
bearing cap (2).
Screw in 2 threaded bolts (M6) to secure the oil sump in the
cylinder block.
Now apply a 3 mm bead of silicone sealing compound (grey) at a
distance of approx. 3 to 4.3 mm from inner edge of oil pan, as
shown in Illustration J 0356.
|
|
Caution
The application of silicone sealing compound (grey),
installation of oil pan and tightening to torque must be performed
within 10 minutes.
Install
Connect oil pan housing upper part to oil pump, cylinder block
and transmission housing – note installation sequence.
Installation sequence:
|
1.
|
Loosely tighten all fastening bolts
|
|
2.
|
Connect/fasten oil pan housing to oil pump and cylinder block
– tightening torque 15 Nm / 11.1 lbf. ft.
|
|
3.
|
Attach/tighten oil pan housing to transmission housing
|
|
|
Bolt M8 – tightening torque 20 Nm / 15 lbf. ft.
|
|
|
M10 bolt – tightening torque 40 Nm / 29.5 lbf. ft.
|
Raise front axle body – engine damping blocks must sit in
front axle body with guide pins.
Install front axle body – see operation "Front Axle Body,
Remove and Install" in group "E".
Install engine damping blocks on front axle body –
tightening torque 55 Nm / 40.5 lbf. ft.
Connect idler bracket to side member.
If present: install vibration damper – 40 Nm / 29.5 lbf.
ft.
For vehicles with xenon headlamp: Attach ball head and wiring
harness plug for vehicle level control sensor.
Install lower part of oil pan housing – see operation
"Lower Part of Oil Pan Housing, Remove and Install".
Remove
Remove Engine Bridge MKM-883-1.
 Inspect
Start engine and allow it to run until oil pressure telltale
extinguishes. Check engine oil level and correct if necessary.
|
