|
3rd Gear Clutch Assembly, Disassemble and
Assemble
|
Illustration
|
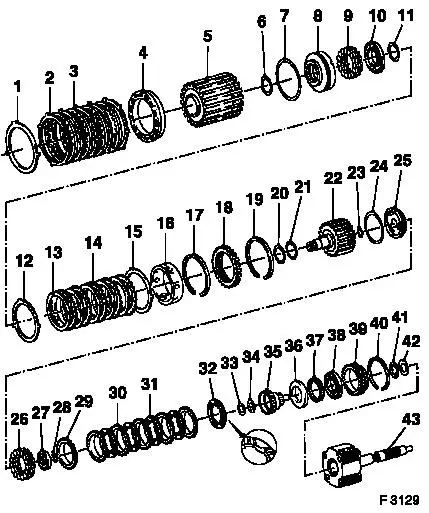
1
|
Damping cushion, reverse gear clutch
|
|
2
|
Clutch plate (steel)
|
|
3
|
Clutch plate (lining)
|
|
4
|
Thrust ring for reverse gear clutch
|
|
5
|
Clutch drum, 2nd gear
|
|
6
|
Seal ring for clutch piston (inner)
|
|
7
|
Seal ring for clutch piston (outer)
|
|
8
|
Clutch piston, 2nd gear
|
|
9
|
Relief springs
|
|
10
|
Seat for relief springs
|
|
11
|
Retaining ring
|
|
12
|
Damping cushion, 2nd gear clutch
|
|
13
|
Clutch plate (steel) – x 6, V6 engines: x 7
|
|
14
|
Clutch plate (lining) – x 5, V6 engines: x 6
|
|
15
|
Damping cushion, 2nd gear clutch
|
|
16
|
Spacer sleeve, 2nd gear clutch
|
|
17
|
Retaining ring
|
Illustration F 3129 shows assembly for 2nd and 3rd gear
clutch.
|
|
|
18
|
Internal gear
|
|
19
|
Retaining ring
|
|
20
|
Retaining ring
|
|
21
|
Thrust washer
|
|
22
|
Clutch drum, 3rd gear
|
|
23
|
Seal ring for clutch piston (inner)
|
|
24
|
Seal ring for clutch piston (outer)
|
|
25
|
Clutch piston, 3rd gear
|
|
26
|
Relief springs
|
|
27
|
Seat for relief springs
|
|
28
|
Retaining ring
|
|
29
|
Damping spring, 3rd gear
|
|
30
|
Clutch plate (steel) – x 5
|
|
31
|
Clutch plate (lining) – x 4
|
|
32
|
Clutch plate (lining) – only with V6 engines, special
plate with 4 recesses on the internal diameter of the friction
surface
|
|
33
|
Thrust washer
|
|
|
|
34
|
Axial needle bearing
|
|
35
|
Drive sun gear
|
|
36
|
Bearing race, overrunning clutch
|
|
37
|
Overrunning clutch
|
|
38
|
Bearing race, overrunning clutch
|
|
39
|
Race, overrunning clutch
|
|
40
|
Retaining ring
|
|
41
|
Axial needle bearing
|
|
42
|
Washer
|
|
43
|
Planetary carrier assembly
|
|
|
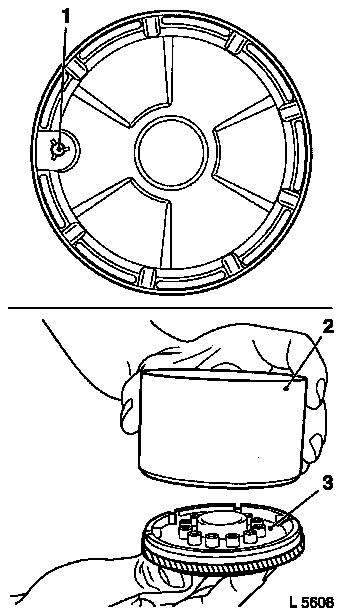
 Remove Remove
|
Remove 3rd gear clutch assembly from housing – see
operation "Assemblies, Remove and Install".
 Disassemble
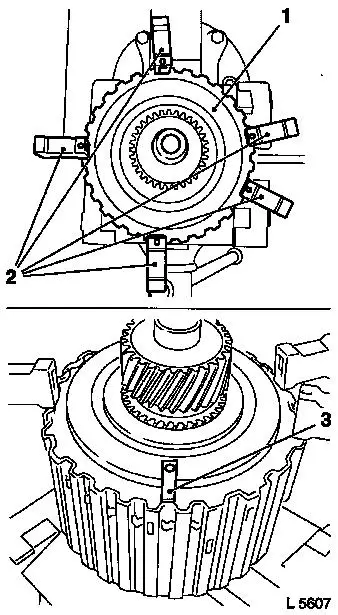
Clamp 3rd gear clutch assembly (1) at drive shaft in vice
– use protective jaws.
Determine position of the ends of the retaining ring.
 Assemble
Press retaining ring end inwards through the recesses with the
aid of a screwdriver and insert one KM-688 (2) at the inner
diameter of the clutch drum (3) up to the stop of the handle (for a
clearer representation, Figure L 5607 shows a KM-688 without
handle).
Repeat this operation on the other end of retaining ring and,
while doing this, insert another KM-688. Insert remaining 3 parts
of KM-688, distributed on circumference of clutch drum.
|
|
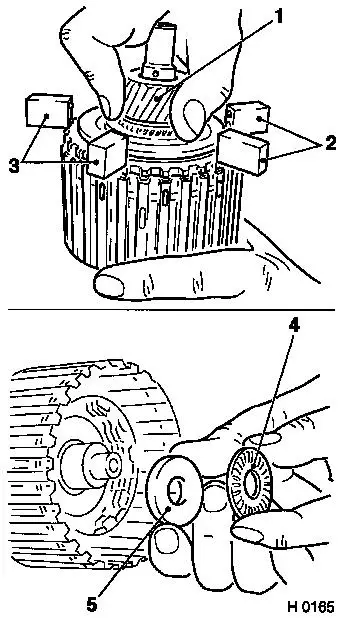
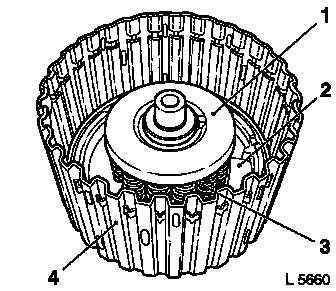
Disassemble
|
Remove overrunning clutch assembly (1) with input sun gear from
clutch drum.
Caution
Freed Tools KM-688 (2) and (3) spring to the side.
Disassemble
Remove the freed bearing with cover, axial needle bearing (4)
and thrust washer (5).
Caution
Note installation position of bearing.
|
|
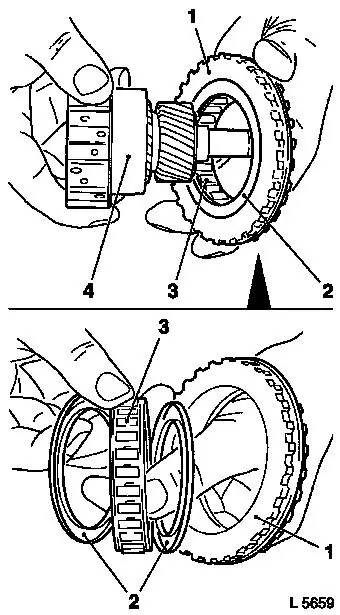
Disassemble
|
Detach overrunning clutch assembly (4) from input sun gear
assembly.
Detach overrunning clutch (3) form race (1).
Detach bearing rings (2) from overrunning clutch.
 Inspect
Check all parts of overrunning clutch and input sun gear
assembly for wear and damage, replace with new parts, if
necessary.
|
|
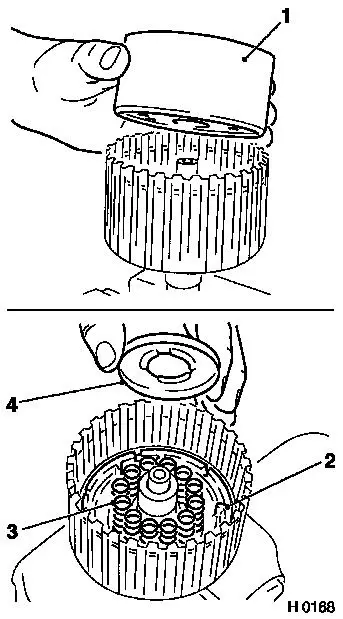
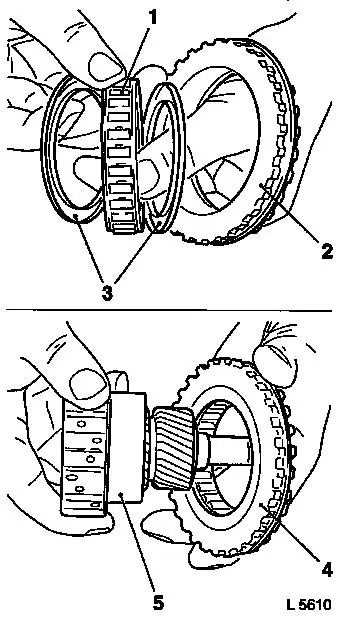
Disassemble
|
Remove clutch plates (1) and damping cushion (2) from clutch
drum.
Steel plates: x 5
Lining plates: x 4, vehicles with V6 engine: x 5.
Damping cushion: x 1
If clutch plates are not being replaced, reinstall in original
position. See also "Technical Data" for number of steel and lining
plates.
|
|
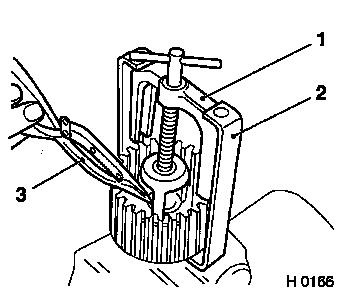
|
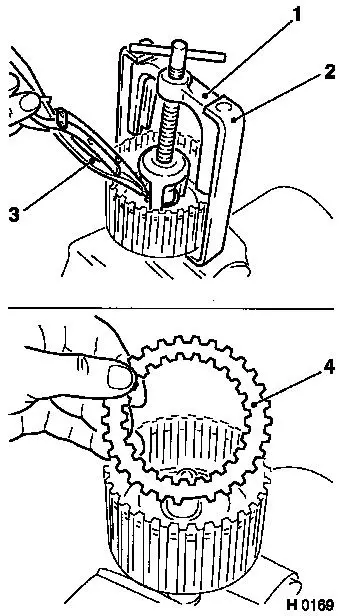
Attach KM-J-23075-A (1) with KM-110 (2) to clutch drum and
compress relief springs until the retaining ring is free.
In doing so, do not tighten KM-J-23075-A too much.
Ensure that relief spring seat does not become jammed in ring
groove.
Remove retaining ring with KM-396 (3).
Relieve tension on KM-J-23075-A and detach.
|
|
|
Remove seat (1) for relief springs and 12 relief springs (3).
Remove clutch piston (2) from clutch drum (4).
|
|
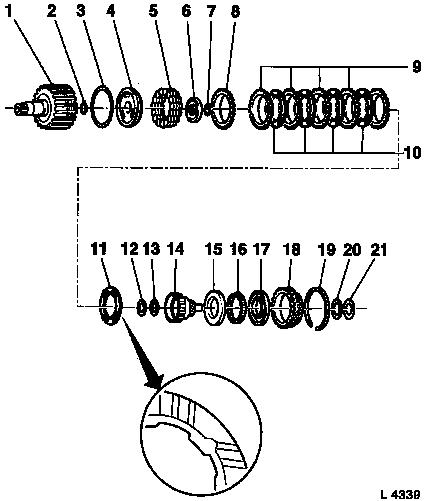
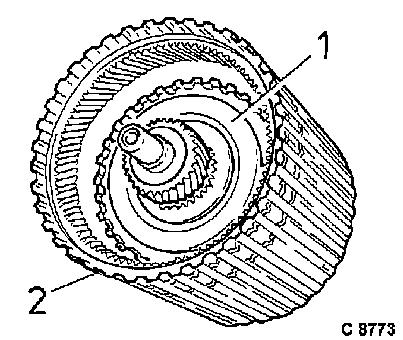
Illustration
|
Components of 3rd gear clutch
| 1. |
Clutch drum, 3rd gear |
| 2. |
Seal ring for clutch piston (inner) |
| 3. |
Seal ring for clutch piston (outer) |
| 4. |
Clutch piston |
| 5. |
Relief springs |
| 6. |
Seat for relief springs |
| 7. |
Retaining ring |
| 8. |
Damping springs |
| 9. |
Clutch plate (steel) – x 4 |
| 10. |
Clutch plate (lining) – x 4 |
| 11. |
Clutch plate (lining) with 4 indentations on the
lining inner diameter (for V6) |
| 12. |
Thrust washer |
| 13. |
Axial needle bearing |
| 14. |
Drive sun gear |
| 15. |
Bearing race, overrunning clutch |
| 16. |
Overrunning clutch |
| 17. |
Bearing race, overrunning clutch |
| 18. |
Race, overrunning clutch |
| 19. |
Retaining ring |
| 20. |
Axial needle bearing |
| 21. |
Washer |
|
|
Inspect
|
Before assembly, check all parts of 3rd gear clutch for wear or
damage, replace with new parts, if necessary.
Replace inner and outer seal ring of clutch piston – the
sealing lip of the seal rings points to the piston head.
By shaking the clutch piston check whether valve ball (1) is
fitted and can move freely. If the valve ball is missing or has
fallen out, replace the clutch piston.
Assemble
Push KM-J-23084 (2) onto clutch piston (3) to protect sealing
lip on outer seal ring.
The inner seal ring is seated on clutch drum hub and is not
damaged during installation of clutch piston.
|
|
|
Install clutch piston in conjunction with KM-J-23084 (1) in
clutch drum. Coat sealing lips of seal rings for this purpose with
transmission fluid or installation grease.
Remove KM-J-23084.
Caution
If one relief spring is defective, replace all relief
springs.
Assemble
Insert relief springs (3) into clutch piston (2).
Insert seat (4) for relief springs and retaining ring.
|
|
|
Attach KM-J-23075-A (1) in conjunction with KM-110 (2) to clutch
drum and compress relief springs until retaining ring can be
inserted into groove with KM-396 (3).
Install retaining ring. Ensure correct seating.
Detach KM-J-23075-A.
Install damping springs (4) in clutch drum with curvature facing
outwards.
|
|
|
Alternately install steel plates (2) and lining plates (1) in
the clutch drum.
Immerse lining plates beforehand in transmission fluid for about
20 minutes.
Vehicles with V6 engine: Note special plate with 4 indentations
on lining inner diameter. This is the last lining plate to install
and faces towards outer overrunning clutch ring.
Caution
On insertion, use installation grease in order to fix
position.
Assemble
Install thrust plate (4) and axial needle bearing with thrust
washer (3) and cover.
|
|
|
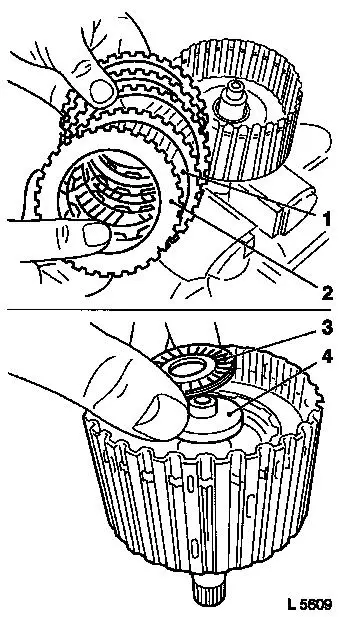
Assemble overrunning clutch.
Attach bearing rings (3) to overrunning clutch (1).
Insert overrunning clutch into race (2).
Push overrunning clutch assembly (4) onto input sun gear
(5).
|
|
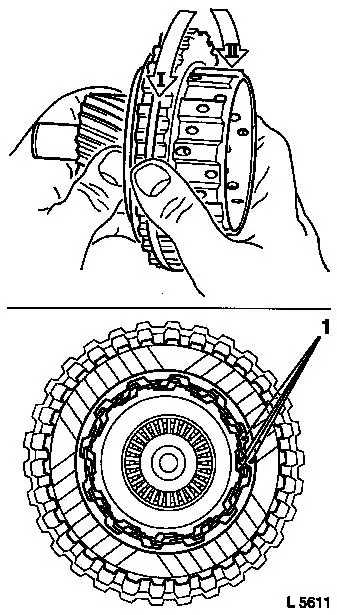
Inspect
|
Check function of overrunning clutch: Hold input sun gear with
left hand. With right hand, turn race anti-clockwise (I), free
wheeling. Clockwise (II) overrunning clutch blocks.
Assemble
Install overrunning clutch assembly in clutch drum –
before installing, align carrier pins (1) of lining plates for 3rd
gear clutch.
|
|
|
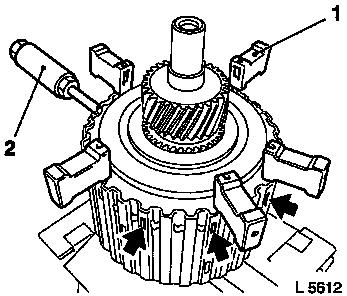
Install input sun gear with race to the stop in 3rd gear
clutch.
Attach KM-688 (1) at inner diameter of clutch drum at the level
of the retaining ring end.
Press retaining ring inwards with a screwdriver (2) through
openings (arrows) and attach the remaining KM-688 (1) according to
the number.
Slide overrunning clutch assembly into clutch drum until
retaining ring engages in ring groove.
Note correct seating.
Remove
Detach KM-688 (if necessary by gently pressing against retaining
ring).
|
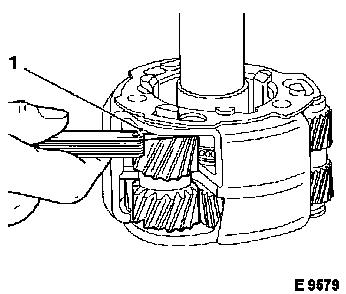
|
Caution
|
Before inserting, align carrier pins of lining plates for 2nd
gear clutch using a screwdriver.
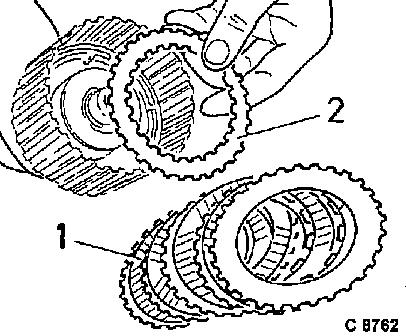
Assemble
Assemble 3rd gear clutch (1) and 2nd gear clutch (2).
|
|
|
 Measure
Measure planetary gear: Measure play between planetary gear and
planetary carrier at point "1" using a feeler gauge. Dimension:
0.127 mm to 0.889 mm (0.005" to 0.035").
Inspect
Check planetary gear for wear and damage, replace if
necessary.
 Install
Install 3rd gear clutch assembly in transmission – see
operation "Assemblies, Remove and Install".
|
|
|
