|
Tailgate Window, Remove and Install - Model
F68
 Remove Remove
|
|
Remove inner panelling of tailgate and central brake light - see
operation "Tailgate Inner Panelling, Remove and Install, Model
F68". Central brake light - see operation "Central Brake Light,
Remove and Install - Models F19/F68 (up to MY '99) in group
"N".
Cut out tailgate window from inside
(swinging blade MKM-846-1E or MKM-846-1P). Using the wire cutters
MKM-589-B is not envisaged.
|
Blade types:
|
|
Blade Kit MKM-846-80
|
|
-
|
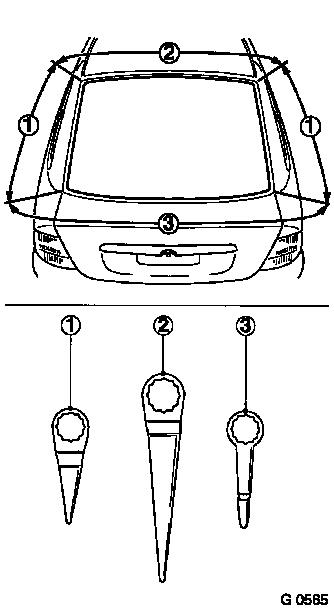
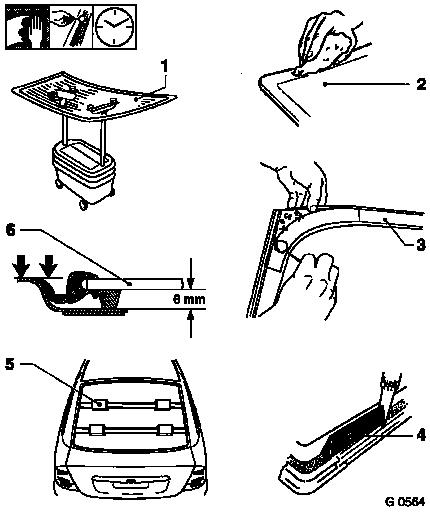
MKM 846-9 for the cut in the side area (1),
|
|
-
|
MKM 846-10 for the cut in the upper area (2),
|
|
-
|
MKM 846-8 for the cut in the lower area (3).
|
|
|
Caution
Do not damage the insulation of the plug connection for the
heated tailgate window. Never damage the plug contacts by
incorrectly handling the cutting blade (cut off).
Cutting blade must not touch the edge of the glass during
cutting.
|
|
Remove
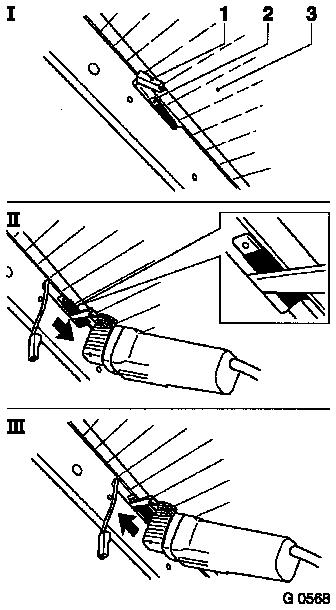
Removing panes on the side:
Disconnect plug connections (1) of heated tailgate window.
Fasten heating connections (2) with adhesive tape (3) to tailgate
window (I). Starting with Cutting Blade MKM-846-9.
Apply swinging blade to cut-out of frame and cut in direction of
lower corner of tailgate window (II).
Guide swinging blade back to cut-out of frame and in same manner
cut in direction of upper corner of tailgate window (III).
Carry out the same procedure on the other side of the tailgate
window.
|
|
Remove
|
|
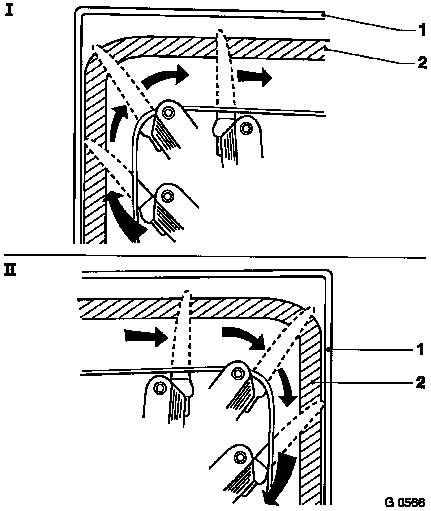
Removing panes above:
- = left side
- = right side
Commence with Cutting Knife MKM-846-10 at side of frame. Operate
swinging blade at a bias of approx. 45°.
Do not damage PUR outline (1)
Then slowly guide the swinging blade around the radius, insert
more and more deeply until the adhesive bead (2) is cut through
completely.
|
|
Remove
|
|
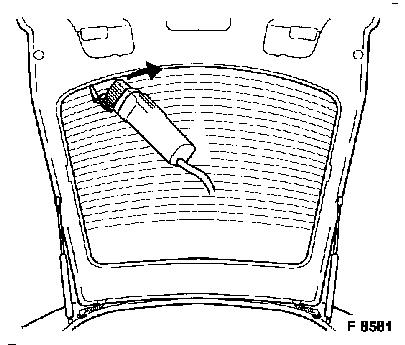
Removing panes below:
Apply Cutting Knife MKM-846-8 at frame and cut along edge.
Lift tailgate window with Suction Lifter MKM-641 from frame of
tailgate.
|
|
Caution
The PUR-outline (rubber seal) on the inside of the tailgate
window is vulcanised on. Cutting out must be undertaken carefully
in these areas to avoid damaging the rubber seal. If the rubber
seal is damaged, the tailgate window must be replaced.
 Install
|
|
Lay glass on the holding device (1).
For re-used tailgate window:
Immediately before installing the tailgate window, cut back
residue of bead of adhesive to a thickness of 1 mm with standard
commercial scraper or with MKM-846-70.
Apply glass cement (2).
Note: Apply adhesive
to the residual bead on the glass. Use pre-cut applicator nozzle
from adhesive set. Never apply primer to the residual adhesive bead
(no adhesion). After applying the glass cement, insert glass
immediately with suction lifter MKM-641 (3), press gently into the
adhesive bed and secure with tensioning belt MKM-591. To avoid
excessively high tenmsions and the risk of the glass breaking,
comply with a minimum height for the glass cement after securing of
6 mm.
|

|
Install
|
|
For new tailgate windows:
Lay tailgate glass on the holding device (1). Clean/activate
area of glass to be bonded (2) and then wipe dry. Apply black glass
primer (3). To do this, use the template from the technical
information TI-C -45, 03.1996 - allow to dry for 15 minutes. Apply
glass cement (4), use pre-cut applicator nozzle of the adhesive
set.
After applying the glass cement, insert glass immediately with
suction lifter MKM-641 (3), press gently into the adhesive bed and
secure with tensioning belt MKM-591 (5). To avoid excessively high
tensions and the risk of the glass breaking, comply with a minimum
height for the glass cement after securing (6) of 6 mm.
Caution
For lay-over times of recently adhered glass panes in
conjunction with glass cement and airbag equipment – see
operation "Lay-over Times for Vehicles".
Observe processing instructions from manufacturer of adhesive
and on package!
Install
Plug connection for heated tailgate window, centre brake light,
tailgate inner panelling.
|
|
|
