
Vectra B
Field Remedy: 1300
Remedy:Warning: Observe Safety Regulations-Air Conditioning. There are two possible cases: 1. The Air conditioning system has a pressure drop caused by an leaky hose. 2. The Air coditioning system is pressureless caused by a cracked hose. First case: - Check system pressure. - Visual check
Check air conditioning system for leaks by use of a leak
detector (only at vehicles without contrast detergent),
Check air conditioning system for leaks by use of an UV-lamp
(only at vehicles with contrast detergent).
- Drain air conditioning system. - Replace air conditioning pipe with damping rubber. - Evacuate and refill air conditioning system. Second case: - Check system pressure. - Visual check
Check air conditioning system for leaks by use of a leak
detector (only at vehicles without contrast detergent),
Check air conditioning system for leaks by use of an UV-lamp
(only at vehicles with contrast detergent).
- Drain air conditioning system. - Replace air conditioning pipe with damping rubber. - Replace receiver dryer. - Evacuate and refill air conditioning system. Working procedure: 1. Disconnect battery. 2. Check system pressure. Note: If there is only a pressure drop at the air conditioning system,
follow the instructions of the description "first case".
     If the system is pressureless, follow the instructions of the
     description "second case".
First case: 1. Check air conditioning system for leaks (only at vehicles without
contrast detergent)
     - see working procedure "Leak Detection in the Refrigerant Circuit
     (up to 10/98)", group "D", Service Instruction Vectra-B.
 2. Check air conditioning system for leaks (only at vehicles with
    contrast detergent)
     - see working procedure "Leak Detection in the Refrigerant Circuit
     (as of 10/98)", group "D", Service Instruction Vectra-B.
3. Drain air conditioning system - see working procedure "Evacuate and refill air conditioning
system", group "D", Service Instruction Vectra-B.
4. Unscrew refrigerant pipe at the separation point (Pic. I,arrow). 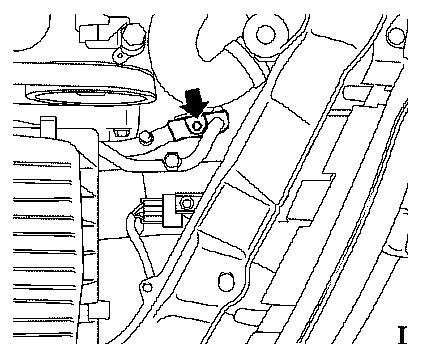
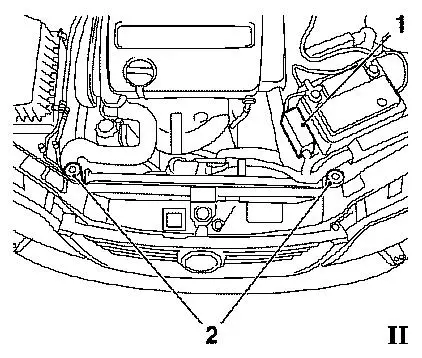
 5. Remove both upper radiator brackets (Pic. II, 2).
 6. Disconnect relay frame, engine compartment (Pic. II, 1)
- see working procedure "Disconnect relay bracket, engine
compartment", group "N", Service Instruction Vectra-B.
7. Remove air conditioning pipe from joint and radiator (Pic.III). 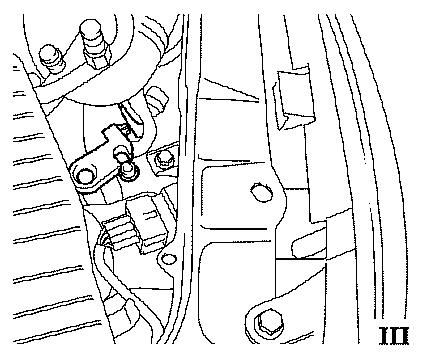
8. Disconnect refrigerant pipe from compressor. 9. Lift vehicle. 10. Remove engine compartment side cover. 11. Separate and remove refrigerant pipe. 12. Remove hose clamps (Pic. IV, 1). 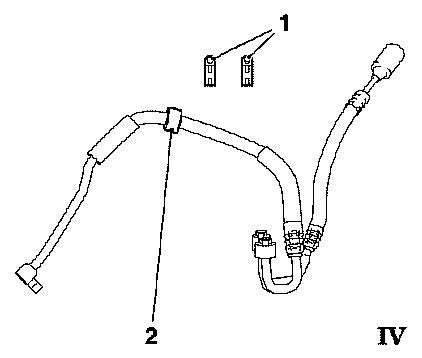
13. Install new refrigerant pipe with damping rubber and new O-rings,
    hook up and tighten joints (see Pic. IV, 2).
14. Lower vehicle.
15. Connect the refrigerant pipe at the separator point and
    attach to the radiator.
16. Attach refrigerant pipe to the compressor.
17. Install relay frame, engine compartment
     - see working procedure "Remove and reinstall relay bracket, engine
     compartment", group "N", Service Instruction Vectra-B.
18. Install both upper radiator brackets. 19. Tighten refrigerant pipe at the separator point. 20. Lift vehicle. 21. Reposition damping rubber (Pic. V). 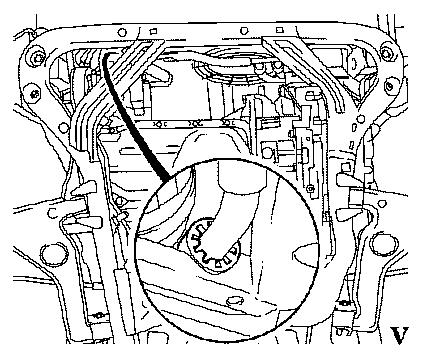
22. Install one clamp (under coolant, Pic. VI). 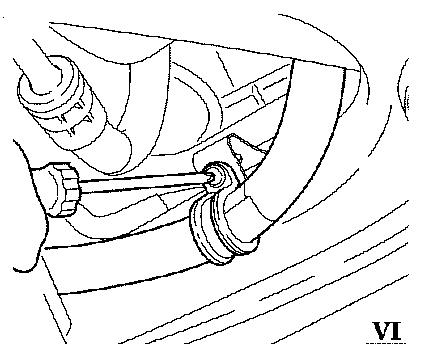
23. Fix a vacuum pipe with length of ca. 20 mm on the stud (Pic. VII). 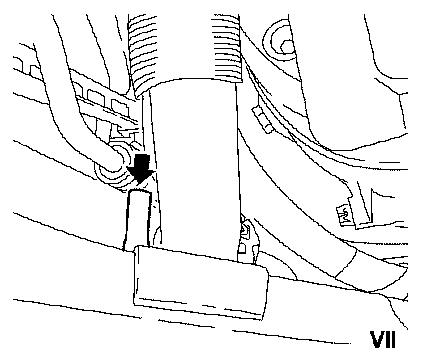
24. Reinstall engine compartment side cover.
25. Lower vehicle.
26. Refill air conditioning system
- see working procedure "Evacuate and refill air conditioning
system", group "D", Service Instruction Vectra-B.
27. Reconnect battery.
28. Program volatile memories.
Second case: 1. Check air conditioning system for leaks (only at vehicles without
contrast detergent)
     - see working procedure "Leak Detection in the Refrigerant Circuit
     (up to 10/98)", group "D", Service Instruction Vectra-B.
 2. Check air conditioning system for leaks (only at vehicles with
    contrast detergent)
     - see working procedure "Leak Detection in the Refrigerant Circuit
     (as of 10/98)", group "D", Service Instruction Vectra-B.
3. Drain air conditioning system - see working procedure "Evacuate and refill air conditioning
system", group "D", Service Instruction Vectra-B.
4. Unscrew refrigerant pipe at the separation point (see Pic. I, arrow). 5. Remove both upper radiator brackets (see Pic. II, 2). 6. Disconnect relay frame, engine compartment (see Pic. II, 1) - see working procedure "Disconnect relay bracket, engine compartment",
group "N", Service Instruction Vectra-B.
 7. Remove air conditioning pipe from joint and radiator (see Pic. III).
 8. Disconnect refrigerant pipe from compressor.
 9. Lift vehicle.
10. Remove engine compartment side cover.
11. Separate and remove refrigerant pipe.
12. Remove hose clamps (see Pic. IV, 1).
13. Remove receiver-dryer
- see working procedure "Receiver-dryer, Remove and install",
group "D", Service Instruction Vectra-B.
14. Install new receiver-dryer - see working procedure "Receiver-dryer, Remove and install",
group "D", Service Instruction Vectra-B.
15. Install refrigerant pipe with damping rubber and new O-rings, hook up
    and tighten joints (see Pic. IV, 2).
16. Lower vehicle.
17. Connect the refrigerant pipe at the separator point and attach to the
    radiator.
18. Attach refrigerant pipe to the compressor.
19. Install relay frame, engine compartment
     - see working procedure "Remove and reinstall relay bracket, engine
     compartment", group "N", Service Instruction Vectra-B.
20. Install both upper radiator brackets.
21. Tighten refrigerant pipe at the separator point.
22. Lift vehicle.
23. Reposition damping rubber (see Pic. V).
24. Install one clamp (under coolant,see Pic. VI).
25. Fix the vacuum pipe with length of ca. 20 mm on the stud (see Pic. VII).
26. Reinstall engine compartment side cover.
27. Lower vehicle.
28. Charge air conditioning system
- see working procedure "Evacuate and refill air conditioning system",
group "D", Service Instruction Vectra-B.
29. Reconnect battery.
30. Reprogram volatile memories.
Spare-parts: Part-No.: Catalogue-No.: Pipe, Liquid Refrigerant 24 436 605 68 50 656 Vacuum Pipe 09 117 817 08 20 338 Condenser with reveiver dryer 52 485 120 18 50 062 from MY '96 to MY '98 Condenser with reveiver dryer 52 485 274 18 50 065 from MY '99 Labour times: TC: Hours: First case: T 8 130 00 Check system pressure 92 1.8 Visual check (only at vehicles
with contrast detergent)
            Refrigerant - Drain (only at
            vehicles with contrast detergent)
            Replace refrigerant pipe with
            damping rubber
Refrigerant - Refill 001 Refrigerant - Drain and 92 1.2
refill (only at vehicles
without contrast detergent)
            Air conditioning - check for leaks
            with leak detector (only at vehicles
            without contrast detergent)
Second case: T 8 130 01 Check system pressure 92 2.7 Visual check (only at vehicles
with contrast detergent)
            Refrigerant - Drain (only at
            vehicles with contrast detergent)
            Replace refrigerant pipe with
            damping rubber
Replace receiver dryer Replace Refrigerant - Refill 001 Refrigerant - Drain and 92 1.2
refill (only at vehicles
without contrast detergent)
            Air conditioning - check for leaks
            with leak detector (only at vehicles
            without contrast detergent)
The costs for this repair will be covered for vehicles not older than
3 years and a mileage lower than 100.000 Km.
The regular warranty procedure should be used for claiming Set-up-time.
|
||||||||||||||||||||