Oil Filter Housing, Remove and Install (as of MY '98)
 Remove, Disconnect Remove, Disconnect For X 20 DTL: Remove engine cover. For X 20 DTH: Release hose clamps (arrows) and detach upper charge air hose (1) from upper part of intake manifold and from intercooler. Release wiring harness plug (2) in direction of arrow and detach from fuel injection pump control unit. | 
|
 Remove, Disconnect Remove, Disconnect Release oil filter housing cover and raise slightly - as a result the oil residing within the oil filter housing runs back into the oil pan. Remove lower engine compartment cover. Unclip coolant hose from hose bracket (1) on oil filter housing and remove hose bracket. Disconnect wiring harness plug (2) from oil temperature sensor and wiring harness plug (3) from dynamic oil level control sensor. | 
|
 Remove, Disconnect Remove, Disconnect For vehicles with air conditioning: Unclip coolant lines from bracket (1).
 Important! Important! Do not bend refrigerant line.
 Remove, Disconnect Remove, Disconnect Release spring strip clamps (arrows) and detach coolant hoses (2) from heat exchanger - collect escaping coolant. | 
|
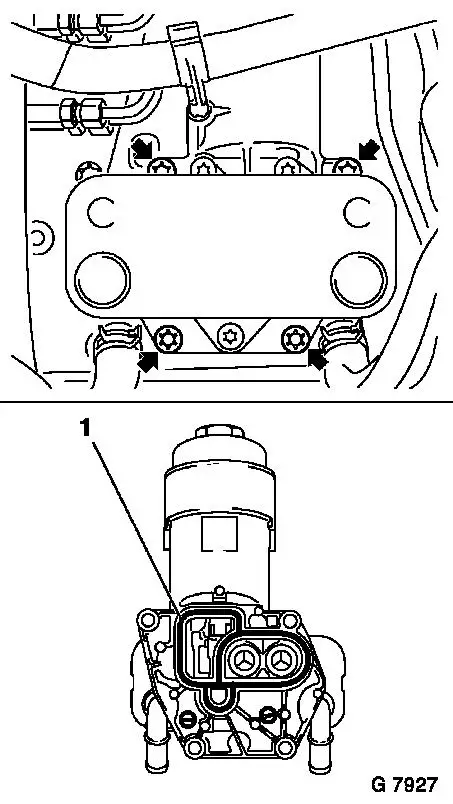
 Remove, Disconnect Remove, Disconnect Remove fastening bolts (arrows) and remove oil filter housing downwards together with heat exchanger. Remove seal ring (1) and clean sealing surfaces.
 Install, Connect Install, Connect Insert oil filter housing from below together with heat exchanger.
 Important! Important! Only position new gasket in housing, after the oil filter housing after the oil filter housing has been guided from below past the refrigerant lines.
 Install, Connect Install, Connect Attach oil filter housing to cylinder block - tightening torque 20 Nm / 15 lbf. ft. | 
|
 Install, Connect Install, Connect Attach coolant hoses to heat exchanger. For vehicles with air conditioning: Clip coolant hoses in bracket. Connect wiring harness plugs to oil temperature sensor and to dynamic oil level control sensor. Attach hose bracket to oil filter housing and clip in coolant hose. Install lower engine compartment cover. Fasten oil filter housing cover - tightening torque: with metal cover 20 - 25 Nm / 15 - 18 lbf. ft., with plastic cover 25 - 30 Nm / 18 - 22 lbf. ft. Connect wiring harness plug to injection pump control unit. For X 20 DTL: Install engine cover.
Notice: Before assembling components of the intake system (hoses, connections, etc.), they must be cleaned of any possible contamination (grease, oil, etc.). When tightening the hose clamps, be sure to observe exactly the tightening torque of 3.5 Nm / 2.6 lbf. ft.
 Important! Important! It is only ensured that the intake system is free of leaks, thus ensuring operational safety of the engine, if the hose clamps are tightened correctly to the prescribed tightening torque.
 Install, Connect Install, Connect For X 20 DTH: Install upper charge air hose. Check engine oil level, if necessary correct. Top up cooling system - see operations "Cooling System, Top up and Bleed" and "Cooling System, Check for Leaks".
|