volkswagen Workshop Repair Guides

Volkswagen Workshop Service and Repair Manuals

Removing and installing condenser > < Removing expansion valve
Heating, Air conditioning
Repair work on the refrigerant circuit which can only be carried out by properly trained mechanics (Specialist workshops for air conditioning systems)
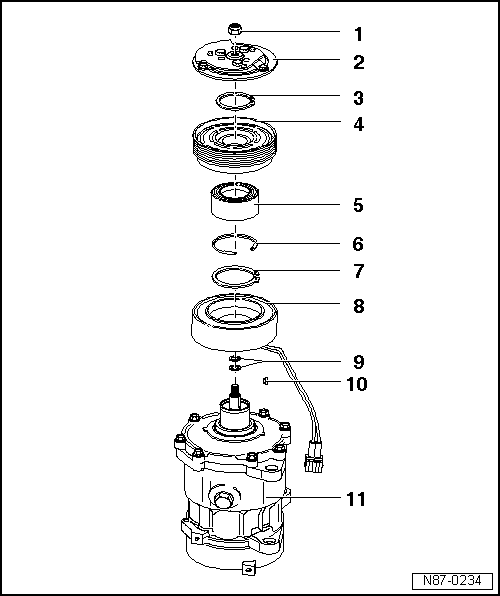
Servicing magnetic coupling -N25- when compressor is removed; Manufacturer Sanden
 
W87-0001

Special tools, workshop equipment, test and measuring appliances and aux. items required

  • ◆ 3212 Two hole pin wrench
  • ◆ VW 401 Press plate
  • ◆ VW 402 Press plate
  • ◆ VW 412 Press piece
  • ◆ VW 432 Press piece
  • ◆ VW 441 Base plate

Not illustrated:

  • ◆ Commercially available two-arm puller e.g. Kukko 20-10 with arms for a depth of 100 mm.
  • ◆ Depth gauge
 
V87-1248
  • ◆ → V.A.G 1616 Counter-hold tool for coupling plate
 
V87-1247
  • ◆ → V.A.G 1616/1 Puller for magnetic coupling
 
N87-0234

Perform following work first:

  • ‒ Extract refrigerant with Service station V.A.G 1885.

Notes:

Releasing refrigerant into the environment is a punishable offence.

  • ‒ Take air conditioner compressor off bracket =>Removing and installing bracket for air conditioner compressor
  • Hexagon nut
    • ◆ Self-locking
    • ◆ Replacing
    • ◆ 20 Nm
    • ◆ Undoing =>Fig.1
  • Coupling plate
    • ◆ Pulling off =>Fig.2
    • ◆ Checking clearance =>Fig. 7
 
N87-0234
  • Circlip
    • ◆ Replacing
    • ‒ Install correctly:
      Flat side faces compressor
    • ◆ Ensure seated correctly in groove
  • Belt pulley
    • ◆ Pulling off =>Fig. 3
    • ◆ Pressing on =>Fig.6
  • Ball bearing
    • ◆ Pressing off =>Fig.4
    • ◆ Pressing in =>Fig.5
  • Circlip
    • ◆ Replacing
    • ‒ Install correctly:
      Flat side faces compressor
    • ◆ Ensure seated correctly in groove
 
N87-0234
  • Circlip
    • ◆ Replacing
    • ‒ Install correctly:
      Flat side faces compressor
    • ◆ Ensure seated correctly in groove
  • Magnet windings
    • ◆ Locked with fitted pin
    • ◆ Secured with circlip -7-

Notes:

An overheating protection is installed in the magnet windings. The overheating protection interrupts the magnet windings as soon as the magnetic coupling overheats (for example a binding compressor).

  • Spacers
    • ◆ To adjust the clearance between coupling and belt pulley
    • ◆ Checking clearance =>Fig.7
 
N87-0234
  • Woodruff key
  • Compressor

Removing magnetic coupling from compressor and reinstalling

 
N87-0235

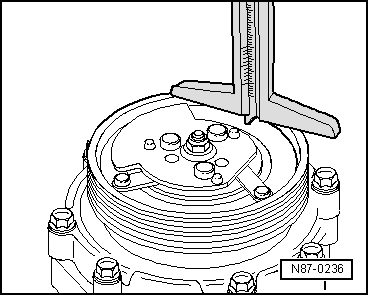
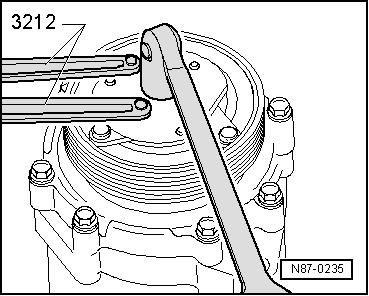
→ Fig.1     Undoing hexagon nut

  • ‒ Use counter-hold for coupling plate 3212 or V.A.G 1616 and undo hexagon nut.
 
N87-0237

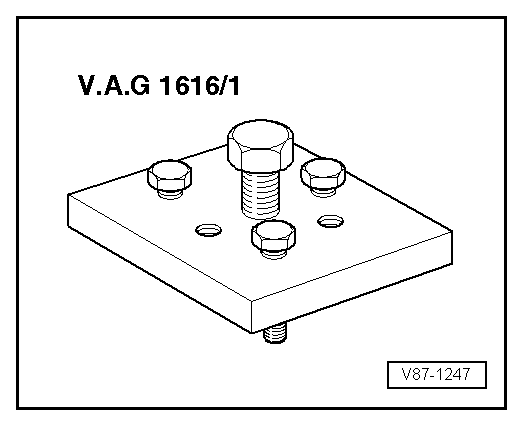
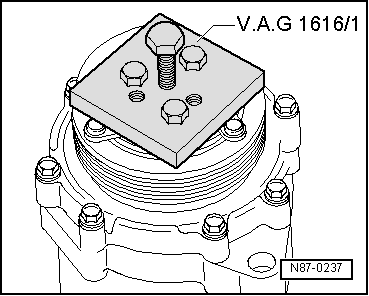
→ Fig.2     Pulling off coupling plate

Note:

The three hexagon bolts of the V.A.G 1616/1 have a 1/4" thread.

 
N87-0238

→ Fig.3     Pulling off belt pulley for magnetic coupling

  • ‒ Locate hooks -arrow- as shown in illustration.

Note:

If the hooks are fitted on the lower edge of the belt pulley, there is a danger of damaging the magnetic coupling -N25- coil.

  • ‒ Pull off belt pulley with a commercially available tow-arm puller, e.g. Kukko 20-10 with arms for a depth of 100 mm.
 
N87-0240

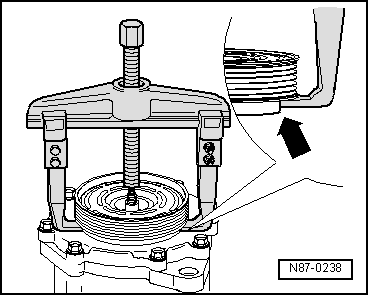
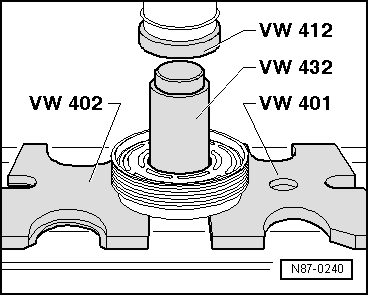
→ Fig.4     Pressing off ball bearing

 
N87-0241

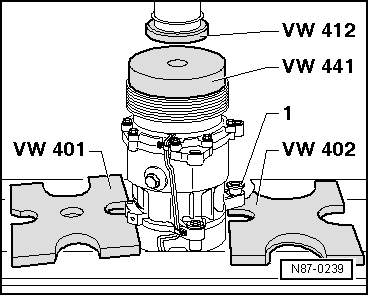
→ Fig.5     Pressing in ball bearing

 
N87-0239

→ Fig.6     Pressing on magnetic coupling belt pulley

Note:

Place compressor down flat, otherwise there is a danger that the belt pulley will be deformed when pressing on.

  • ‒ Drive in threaded bush -1-.
 
N87-0236

→ Fig.7     Checking and adjusting clearance

  • ‒ Check clearance with a depth gauge by repeatedly switching the magnetic coupling on and off (applying a voltage of 12 V).
  • ◆ Specification: 0.4...0.8 mm
  • ‒ Adjust clearance using shims if necessary. Pull off coupling plate to do this.

Notes:

  • ◆ The clearance must lie within the permitted tolerances over the complete circumference.
  • ◆ The clearance can be measured when the compressor is installed.
  • ◆ If the clearance is outside the specification, remove coupling plate and adjust clearance by removing or installing spacers.

Removing and installing condenser > < Removing expansion valve