volkswagen Workshop Repair Guides

Volkswagen Workshop Service and Repair Manuals

Checking coolant continued circulation pump and radiator fan run-on > < Removing and installing radiator and radiator fan
6-cyl. fuel injection engine Mechanics
Removing and installing parts of cooling system
Removing and installing coolant pump
 
W19-0003

Special tools, workshop equipment, test and measuring appliances and auxiliary items required

  • ◆ 1022A Engine support bracket
  • ◆ 1022A/3 Adapter
  • ◆ 3277 Fitting tool
  • ◆ V.A.G 1590 Water pump spanner
  • ◆ Hexagon bolt M8x80
 
N26-0030

Removing

  • ‒ With ignition switched off disconnect battery earth strap.

Note:

If necessary the anti-theft coding for the radio must be obtained first.

  • ‒ → If fitted remove hose for cooling front exhaust pipe.
  • ‒ Disconnect exhaust pipe from catalyst flange , exhaust manifold, front exhaust pipe and catalyst with attachments.
 
N10-0017
  • ‒ Drain coolant => Page 19-13
  • ‒ Remove ribbed belt => Page 13-22 .
  • ‒ Remove intake hose:

=> Repair group 24; Motronic injection and ignition system; Servicing injection part

  • ‒ → Pull H.T. cables out of ignition transformer and unclip from the H.T. cable guide -2-.
  • ‒ Remove H.T. cable guide -2-.
  • ‒ Pull off vacuum hose between intake manifold upper part and fuel pressure regulator.
 
N19-0015
  • ‒ Remove intake manifold temperature sender from intake manifold upper part.
  • ‒ Detach coolant expansion tank and place to side; hoses remain connected.
  • ‒ → Fit engine support bracket 10-222 A with adapter 10-222A/3.
  • ‒ Locate support bracket in lifting eyes on left and right of cylinder head and take-up weight of engine.
  • ‒ Detach gearbox at rear left assembly mounting and engine at rear right assembly mounting.
 
V10-1221
  • ‒ → Detach engine from front assembly mounting from above.
  • ‒ Carefully lift engine.
  • ‒ Remove coolant pump pulley (use V.A.G 1590 to loosen and tighten the securing bolt).

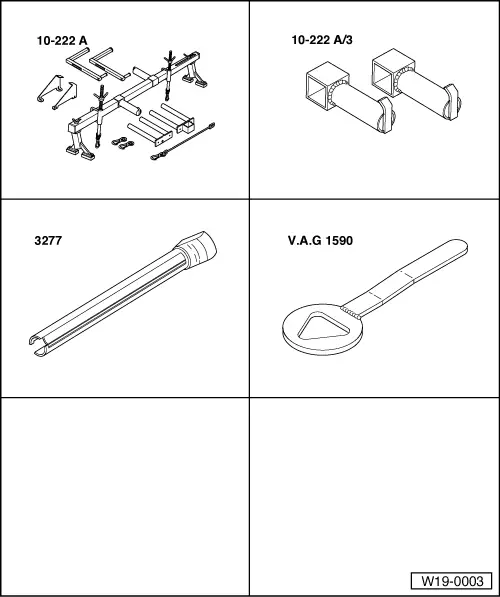
Note:

If necessary modify water pump spanner V.A.G 1590

, Fig. 1 .

  • ‒ Remove coolant pump.

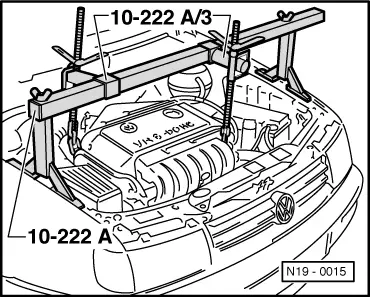
Note:

To remove and install the coolant pump push engine by hand slightly to left, to gain clearance for removing and installing.

Installing

Installation is carried out in the reverse order, when doing this note the following:

 
V10-1230
  • ‒ → When installing the rear right and front assembly mountings, ensure that the recess on the rear right console and the recess on the front console locates on the rubber mounting -arrows-.
  • ‒ Screw in all bolts on assembly mountings by hand approx. 5...6 turns.
  • ‒ Align engine mountings stress-free by rocking.
  • ‒ First tighten assembly mountings front and rear right, then tighten rear left assembly mounting.
         Tightening torques => Page 10-12 ,
         assembly mountings.
  • ‒ Install intake hose:

=> Repair group 24; Motronic injection and ignition system; Servicing injection part

  • ‒ Install ribbed belt => Page 13-22 .
  • ‒ Filling with coolant => Page 19-13

Tightening torques

Bolted connection

Tightening torque

Coolant pump to cylinder block

20 Nm

Pulley to coolant pump

25 Nm

Coolant expansion tank to
body


10 Nm

Intake manifold temperature sender to intake manifold upper part


15 Nm

Drain plug in coolant pipe

10 Nm

Front exhaust pipe to catalyst

25 Nm

Checking coolant continued circulation pump and radiator fan run-on > < Removing and installing radiator and radiator fan