volkswagen Workshop Repair Guides

Volkswagen Workshop Service and Repair Manuals

Checking valve timing > < Removing and installing injection pump
Diesel direct injection and glow plug system
Servicing Diesel direct injection system
Dynamically checking and adjusting commencement of injection

Special tools, workshop equipment, testers, measuring instruments and auxiliary items required

  • ◆ Fault reader V.A.G 1551 or vehicle system tester V.A.G 1552 with cable V.A.G 1551/3
  • ◆ Ring spanner 3035
  • ◆ V.A.G 1331 Torque wrench (5...50 Nm)

Notes:

  • ◆ Dynamically checking and correcting commencement of injection is only possible in function 04 "Engine basic setting".
  • ◆ The commencement of injection must always be checked after renewing the toothed belt or loosening the injection pump bolts or toothed belt sprockets and if necessary adjusted.

Checking and adjustment conditions

  • ● Mechanical engine basic setting OK.
  • ● Toothed belt tension OK.

Work sequence

  • ‒ Connect fault reader V.A.G 1551 (V.A.G 1552). Start engine and select "Address word" 01 of engine control unit. When doing this the engine must be running at idling speed.
    (Connecting fault reader and selecting engine control unit .)
 
→ Indicated on display:
Rapid data transfer     HELP
Select function XX
  • ‒ Press keys 0 and 4 for the function "Introduction of basic setting" and confirm entry with Q key.
 
→ Indicated on display:
Basic setting     HELP
Input display group number XXX
  • ‒ Press key 0 three times for "Display group number 0" and confirm entry with Q key.
 
→ Indicated on display:
(1...10 = Display zones)
Basic setting 0     ⇒
1     2     3     4     5     6     7     8     9     10

The commencement of injection in display zone 2 is dependent on the fuel temperature in display zone 9.

 
N23-0068

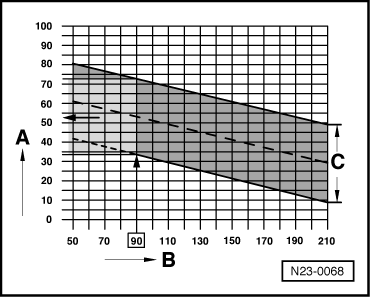
→ Engine codes AFN, AVG, AHU, ALE, 1Z:

  • A - Display zone 2 commencement of injection
    B - Display zone 9 fuel temperature
    C - Specified range for commencement of injection

Example:

The numerical value 90 in display zone 9 (B) corresponds to a numerical value range of 34...73 in display zone 2 (A).
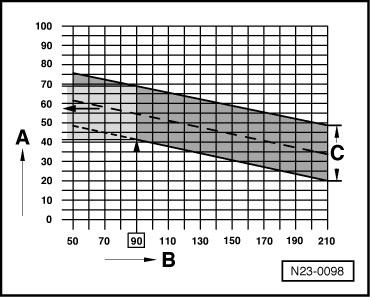
 
N23-0098

→ Engine code AEY:

  • A - Display zone 2 commencement of injection
    B - Display zone 9 fuel temperature
    C - Specified range for commencement of injection

Example:

The numerical value 90 in display zone 9 (B) corresponds to a numerical value range of 42...69 in display zone 2 (A).

Notes:

  • ◆ If the commencement of injection is advanced turn injection pump in engine direction of rotation, if the commencement of injection is retarded turn against direction of rotation.
  • ◆ If when checking the commencement of injection the specifications are within zone -C- then no adjustment is required. After repairs e.g. removing and installing injection pump, adjusting timing then the commencement of injection is to be set to the mean valve (dashed line) of specification zone -C-.
  • ‒ Loosen injection pump securing bolts approx. one turn, leaving the easiest bolt to reach till last.
  • ‒ Hold injection pump by hand under tension in direction to be adjusted.
  • ‒ Carefully loosen last securing bolt until the pump can be turned slightly and then retighten securing bolt.
  • ‒ Observe figures in display zone 2 and if necessary adjust again until the mean value for specification zone -C- is displayed.
  • ‒ Tighten injection pump securing bolts to 25 Nm.
  • ‒ Check commencement of injection again.
  • ‒ Press the ⇒key.
  • ‒ Press keys 0 and 6 for the "End data transfer" function and confirm input with the Q key.

Note:

Loosen and re-tighten (25 Nm) the injection pipes on the injection pump after dynamically adjusting the injection pump. This relieves the strain on pipes and prevents vibration breakages.

Checking valve timing > < Removing and installing injection pump