volkswagen Workshop Repair Guides

Volkswagen Workshop Service and Repair Manuals

Rear axle assembly-overview (vehicles with four wheel drive) > < Servicing rear axle (vehicles with four wheel drive)
Running gear
Servicing rear axle (vehicles with four wheel drive)
Removing and installing rear axle

When removing and installing the rear axle, we recommend that the axle and final drive are removed together and separated away from the vehicle.

If only the axle beam is to be removed and installed then the wishbones can remain on the shock absorber.

Notes:

  • ◆ Always renew self-locking nuts/bolts.
 
V42-1069
  • ◆ Always renew corroded nuts/bolts.

Removing

  • ‒ Pull off handbrake lever trim.
  • ‒ Remove rear ashtray (central console).
  • ‒ → Remove rear central console.
  • ‒ Disconnect handbrake cables from handbrake lever.
 
V42-1070
  • ‒ Separate ABS sensor wiring at connector under rear seat, and pass through floor plate.
  • ‒ Separate vacuum and electrical wiring connections.
  • ‒ → Disconnect brake pipes (arrows).
  • ‒ Unhook exhaust system from the axle beam.
  • ‒ Remove anti-roll bar.
  • ‒ Pull handbrake cables out of guide tubes.
  • ‒ Disconnect propshaft from viscous coupling.
 
V42-1073
  • ‒ → Place gearbox jack V.A.G 1383 A under final drive.
  • ‒ Disconnect final drive mounting from cross member.
 
V42-1071
  • ‒ → Disconnect shock absorber (arrow) from wishbone
 
V42-1072
  • ‒ → Remove bolts -A- and -B-
 
V42-1142
  • ‒ → Lower rear axle using gearbox jack V.A.G 1383 A.

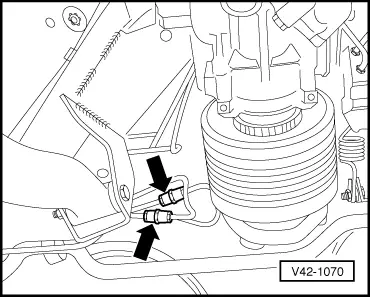
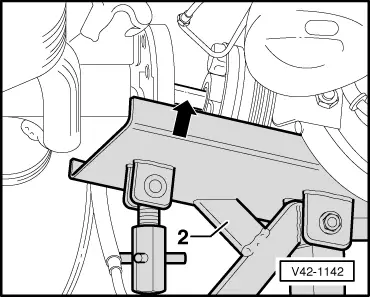
Note:

When disconnecting and lowering, ensure that the viscous coupling centralizing pin (arrow) is not canted in the propshaft or the propshaft oil seal damaged.

Adjust angle of gearbox jack plate -A- so that the rear of the differential lowers first.

Installing

Install in reverse order

Rear axle assembly-overview (vehicles with four wheel drive) > < Servicing rear axle (vehicles with four wheel drive)