volkswagen Workshop Repair Guides

Volkswagen Workshop Service and Repair Manuals

Solenoid valves > < Removing and installing valve body
Removing valve body
Removing valve body
–  Move selector lever to position “2”.
–  Remove multifunction switch -F125- → Chapter.
–  Raise vehicle.
–  Remove noise insulation tray.
–  Place drip tray under gearbox.
   
–  Remove drain plug -arrow-.
–  Drain ATF.
  N37-0817
–  Remove earth strap -1- from bracket on gearbox.
–  Remove power steering line -2- from front of gearbox.
–  Remove bracket -3-.
–  Then remove power steering line from back of gearbox (near pendulum support).
–  Tie line up to side.
–  Remove retainer from valve body cover.
  N37-0785
–  Remove pendulum support -arrows A and B-.
  N37-0811
–  Lay tensioning belt -T10038- around right drive shaft -2- and anti-roll bar -1-.
–  Use tensioning belt -T10038- to pull engine and gearbox to anti-roll bar.
  N38-0163
–  Carefully lever off breather cap -1-.
–  Unscrew bolts of valve body cover -2-.
–  Carefully press valve body cover off gearbox housing, e.g. using a screwdriver.
  N38-0164
–  Pull off connectors -1- and -2-.
–  Unhook wiring harness -3- from tabs -4-.
  N38-0165
–  Secure spool valve -A- against falling out with a rubber band.
Even the “slightest” damage will lead to faults in operation. Then the valve body must be renewed.
–  To remove valve body, remove only bolts (silver colour) marked with an -arrow-.
–  Remove valve body.
–  Use a flat scraper to remove sealant residue from gearbox housing.
  N38-10051
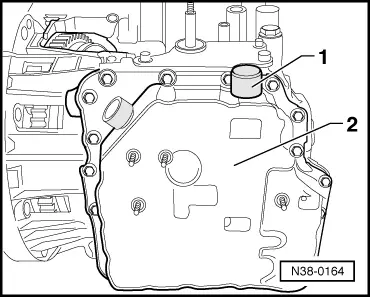
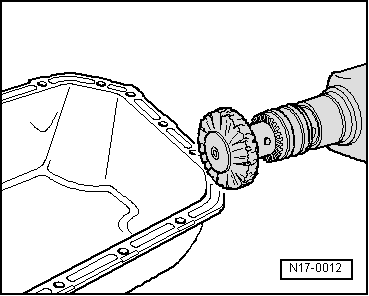
–  Use a rotating brush, e.g. a hand drill with a plastic bristle insert, to remove residual sealant from oil pan.
  Caution
Wear eye protection.
–  Clean sealing surfaces with cleaning solution -D 009 401 04-. They must be free of oil and grease.
Make sure no sealant or brush residue remains in valve body cover. Even the smallest contamination particles lead to malfunctions!
  N17-0012

Solenoid valves > < Removing and installing valve body