| t
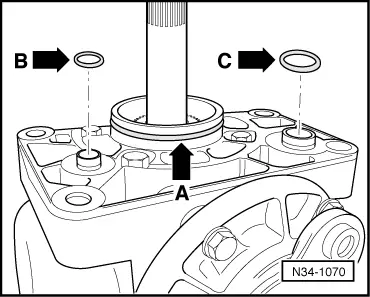
| Always renew O-ring for sealing bevel box and gearbox -arrow A- and O-rings for sealing sleeves for oil supply system -arrow B- and -arrow C-, lightly coating with oil. |
| t
| Push bevel box completely onto gearbox, ensuring that splines of bevel box input shaft are guided centrally onto differential connecting piece. |
| t
| Align splines of right flange shaft and differential bevel gear, turning flange shaft if necessary. |
| t
| If splines are correctly positioned and shafts are centred, then bevel box will slide to stop against gearbox. |
| t
| Insert bevel box carrier before screwing in engine/gearbox connecting bolts. |
| t
| Do not use securing bolts to pull bevel box onto gearbox, or bevel box will cant and bolt holes can break off. |
| t
| When removing and installing, do not damage seals in propshaft flanges. |
| t
| Renew propshaft if damaged. |
| t
| Ensure that propshaft is horizontal when pushing onto guide pin. |
| t
| Propshaft to bevel box → Item. |
| t
| Bolt oil return line for turbocharger and charge air control pressure unit for charge pressure control valve to engine → Rep. gr.21. |
| t
| Check oil in gearbox with bevel box → Chapter. |
|
|

|
 Note
Note
 Note
Note