Golf Mk4
| Part III |
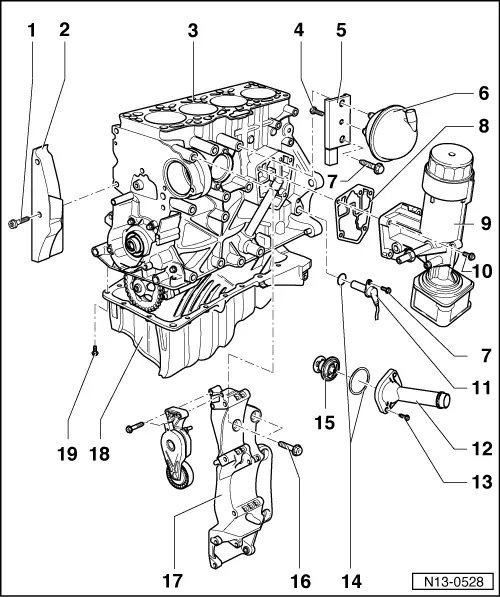
| 1 - | 45 Nm |
| 2 - | Screen |
| 3 - | Cylinder block |
| q | Removing and installing sealing flange and flywheel → Chapter |
| q | Removing and installing crankshaft → Chapter. |
| q | Dismantling and assembling pistons and conrods → Chapter |
| 4 - | 10 Nm |
| 5 - | Bracket |
| q | For vacuum reservoir |
| 6 - | Vacuum reservoir |
| q | Attached to charge air pipe on vehicles with engine code ARL → Chapter Removing and installing parts of charge air cooling system |
| 7 - | 15 Nm |
| 8 - | Gasket |
| q | Renew |
| 9 - | Oil filter bracket |
| q | Dismantling and assembling → Chapter. |
| 10 - | 15 Nm + turn 90° further |
| q | Renew |
| q | First fit upper left and lower right bolts and then tighten all four bolts in diagonal sequence |
| 11 - | Engine speed sender -G28- |
| 12 - | Connection |
| q | For thermostat |
| 13 - | 15 Nm |
| 14 - | O-ring |
| q | Renew |
| 15 - | Thermostat |
| q | Removing and installing → Chapter |
| q | Observe installation position, → Chapter Removing and installing thermostat |
| q | Checking: Heat thermostat in water. |
| q | Opening begins at approx. 85 °C. |
| q | Ends at approx. 105 °C. |
| q | Opening lift min. 7 mm. |
| 16 - | 45 Nm |
| q | Observe tightening sequence → Fig.. |
| 17 - | Bracket for ancillaries |
| q | For alternator, power steering vane pump and A/C compressor |
| 18 - | Sump |
| q | Clean sealing surface before fitting. |
| q | Install with silicone sealant -D 176 404 A2- → Chapter. |
| 19 - | 15 Nm |