volkswagen Workshop Repair Guides

Volkswagen Workshop Service and Repair Manuals

Piston and cylinder dimensions > < Industrially cracked conrods
Checking pistons, piston rings and cylinder bores
   
Checking piston ring gap
Special tools and workshop equipment required
t  Feeler gauges
Test sequence:
–  Push ring squarely from above down to approx. 15 mm from bottom end of cylinder.
  V13-0016
Piston ring Gap
  NewWear limit
Compression rings (top)mm0.15…0.350.8
Compression rings (bottom)mm0.40...0.400.8
Oil scraper ringmm0.20…0.700.9

   
Checking ring-to-groove clearance
Special tools and workshop equipment required
t  Feeler gauges
Clean groove before check.
  V13-0687
Piston ring Ring-to-groove clearance
  NewWear limit
Top compression ringsmm0.04…0.0750.15
Middle compresion ringsmm0.02...0.0550.15
Oil scraper ringmm0.05…0.130.20

   
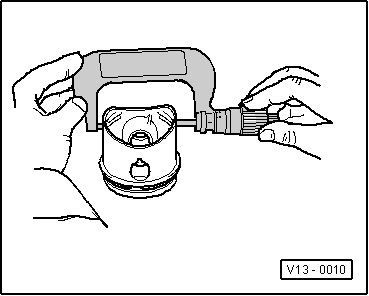
Checking piston
Special tools and workshop equipment required
t  External micrometer 75...100 mm
Measure pistons approx. 10 mm from the lower edge of skirt, at 90° to the piston pin axis.
Deviation from nominal dimension max. 0.04 mm.
  V13-0010
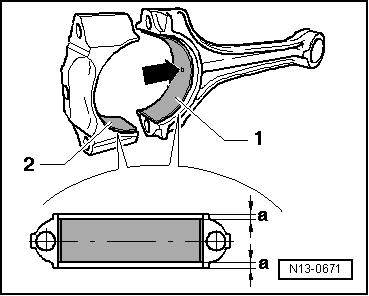
Bearing shells - installation position
Bearing shell -1- with oil hole -arrow- for conrod.
Bearing shell -2- without oil hole for conrod bearing cap.
–  Fit bearing shells in centre of conrod and conrod cap.
Dimension -a- must be the same on the left and right, max. deviation: 0.2 mm.
  N13-0671
Checking cylinder bores
Special tools and workshop equipment required
t  Cylinder gauge 50...100 mm
t  Measure at 3 positions both across -A- and in-line with engine -B-
t  Deviation from nominal dimension max. 0.08 mm
  Note
Cylinder bores must not be measured when cylinder block is mounted on a repair stand with engine and gearbox support -VW 540-, as measurements may then be incorrect.
  V13-0280

Piston and cylinder dimensions > < Industrially cracked conrods