volkswagen Workshop Repair Guides

Volkswagen Workshop Service and Repair Manuals

Removing and installing flywheel > < Removing and installing crankshaft seal on gearbox side
Renewing crankshaft sealing flange -vibration damper side-
   
Renewing crankshaft sealing flange -vibration damper side-
Special tools and workshop equipment required
t  Counterhold -T10069-
t  Assembly tool -T10215-
t  Torque wrench -V.A.G 1601-
t  Torque wrench -V.A.G 1332-
t  Sealant -D 176 501 A1-

Removing
–  Remove poly V-belt → Chapter.
–  Remove vibration damper → Chapter.
–  Remove sump → Chapter.
–  Unbolt sealing flange.
–  Remove remaining sealant from sealing surfaces.
Installing
–  Remove oil residue from crankshaft journal using clean cloth.
   
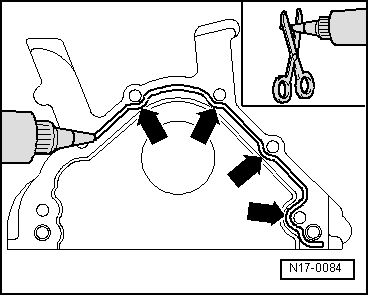
–  Cut off tube nozzle at forward marking (Ø of nozzle approx. 3 mm).
–  Apply sealant bead sealant -D 176 501 A1- of about 2…3 mm as shown -arrows- to clean sealing surface of sealing flange.
  Note
t  Before applying sealant bead, cover sealing ring with a clean cloth.
t  The sealing compound bead must not be thicker that 2…3 mm. Otherwise excessive sealing compound will enter the sump and may block the oil suction pipe strainer.
t  Observe expiry date of sealing compound.
t  The sealing flange must be installed within 5 minutes after applying the silicone sealant.
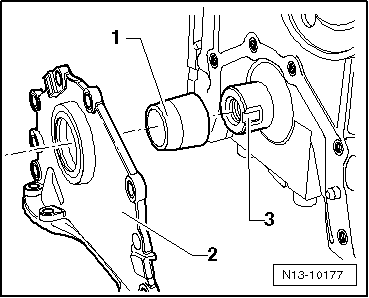
–  Push guide sleeve -T10215/1--1- at front onto crankshaft journal -3-.
–  Now slide sealing flange with oil seal -2- carefully over guide sleeve.
  N17-0084
–  Bolt sealing flange to cylinder block.
–  Install sump → Chapter.
–  Install vibration damper → Chapter.
–  Install poly V-belt → Chapter.
  N13-10177

Removing and installing flywheel > < Removing and installing crankshaft seal on gearbox side