
Golf Mk6
| Assembly overview - differential |
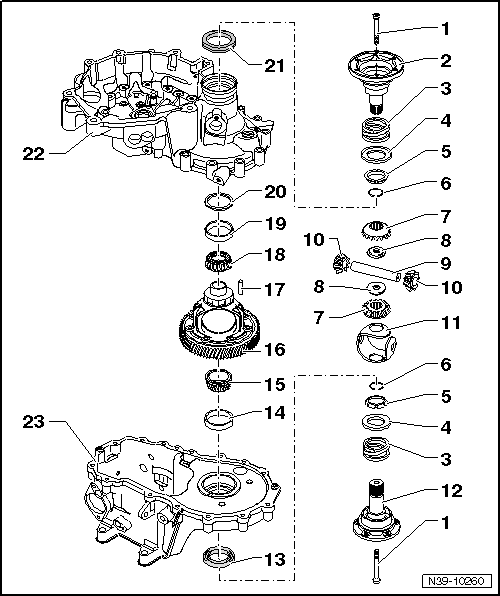
| 1 - | Countersunk bolt, 25 Nm |
| q | Screw in together with threaded piece |
| 2 - | Right flange shaft |
| 3 - | Compression spring for flange shaft |
| q | Installed behind flange shafts |
| 4 - | Thrust washer |
| q | Installation position: shoulder towards spring |
| 5 - | Tapered ring |
| q | Installation position: taper towards differential cage |
| 6 - | Retaining ring |
| q | Holds tapered ring, thrust washer and spring in position when flange shaft is removed |
| 7 - | Large differential bevel gear |
| q | Installing → Fig. |
| 8 - | Threaded piece |
| q | Installing → Fig. |
| 9 - | Differential pinion pin |
| q | To remove, shear off spring pin → Fig. |
| q | Installing → Fig. |
| 10 - | Small differential bevel gear |
| q | Installing → Fig. |
| 11 - | One-piece thrust washer |
| q | Coat with gear oil when installing |
| 12 - | Left flange shaft |
| 13 - | Oil seal for left flange shaft |
| q | Renewing with manual gearbox installed → Chapter. |
| 14 - | Tapered roller bearing outer race |
| q | Pulling out → Fig. |
| q | Pressing in → Fig. |
| 15 - | Tapered roller bearing inner race |
| q | Pulling off → Fig. |
| q | Pressing on → Fig. |
| 16 - | Differential cage |
| q | With final drive gear |
| 17 - | Spring pin |
| q | For securing differential pinion pin |
| q | Will be sheared off when removed → Fig. |
| 18 - | Tapered roller bearing inner race |
| q | Pulling off → Fig. |
| q | Pressing on → Fig. |
| 19 - | Tapered roller bearing outer race |
| q | Pressing out → Fig. |
| q | Pressing in → Fig. |
| 20 - | Shim |
| q | For differential |
| q | Determining thickness → Chapter |
| 21 - | Oil seal for right flange shaft |
| q | Renewing with manual gearbox installed → Chapter. |
| 22 - | Clutch housing |
| q | Repairing → Chapter. |
| 23 - | Gearbox housing |
| q | Repairing → Chapter. |