volkswagen Workshop Repair Guides

Volkswagen Workshop Service and Repair Manuals

Removing and installing charge pressure sender > < Assembly overview - charge-air hose connections
Removing and installing charge air cooler
Removing
–  Removing radiator → Chapter.
–  Remove front bumper cover → General body repairs, exterior; Rep. gr.63.
–  Unbolt air ducts on left and right from charge air cooler.
   
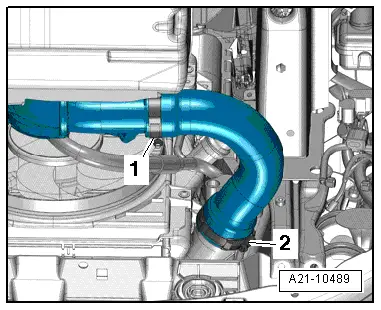
–  Remove air hose, loosen hose clips -1- and -2- for this.
  WARNING
Risk of injury caused by refrigerant.
The air conditioner refrigerant circuit must not be opened.
  Caution
Danger of damage to condenser, refrigerant lines and hoses.
Do NOT stretch, kink or bend refrigerant lines and hoses.
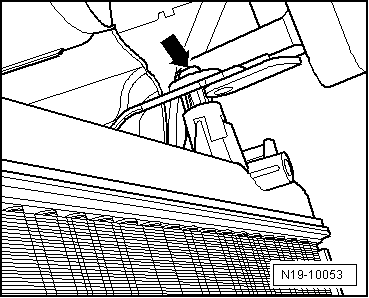
–  Unscrew bolt from refrigerant line retaining clamp next to longitudinal member.
  A21-10489
–  Unscrew bolts -1- for charge air cooler and -2- for condenser.
–  Swing charge air cooler backwards slightly.
  A19-0474
–  Unscrew bolt from lower right refrigerant line bracket on charge air cooler.
–  Swing condenser forwards into opening on lock carrier.
–  Detach charge air cooler upwards out of lock carrier and remove diagonally downwards.
Installing
l  Specified torques → Chapter „Assembly overview - charge air system“.
Installation is carried out in the reverse order; note the following:
  Note
t  Hose connections and air intake pipes/hoses must be free of oil and grease when installing.
t  Secure hose connections with hose clips corresponding to the series equipment → Electronic parts catalogue.
–  Install condenser → Rep. gr.87 → Heating, air conditioning system; Rep. gr.87.
–  Installing intake hoses with screw-type clips → Chapter.
–  Install front bumper cover → General body repairs, exterior; Rep. gr.63.
–  Installing radiator → Chapter.
  N19-10053

Removing and installing charge pressure sender > < Assembly overview - charge-air hose connections