volkswagen Workshop Repair Guides

Volkswagen Workshop Service and Repair Manuals

Assembly mountings > < Securing engine to assembly stand
Installing engine
Installing engine
Install engine in the reverse order. When installing, note the following:
  Caution
When doing any repair work, especially in the engine compartment, pay attention to the following due to the cramped conditions:
t  Route all hoses, pipes and cables so that they are in their original positions.
t  To avoid damage to lines/wiring, ensure sufficient clearance to all moving or hot components.
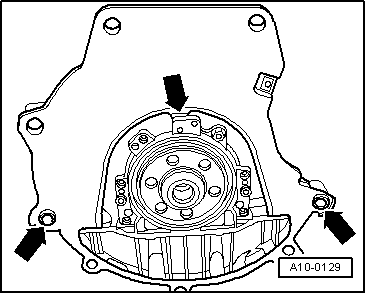
–  Insert new fitted sleeves in cylinder block for centring engine and gearbox.
   
–  Hook intermediate plate onto sealing flange and slide onto dowel sleeves -arrows-.
Vehicles with manual gearbox:
–  Lightly grease input shaft splines with grease -G 000 100-.
–  Check clutch and clutch operating mechanism and install → 5-speed manual gearbox 0AF; Rep. Gr.30
Continuation for all vehicles:
–  When installing engine and gearbox assembly, ensure sufficient clearance to subframe and radiator.
–  Align engine mountings stress-free by rocking, if necessary loosen engine mountings to body.
–  Install pendulum support.
  Note
t  Specified torques for assembly mountings → Chapter.
t  Electrical connections and routing → Electrical system; Rep. Gr.97.
–  Install right drive shaft and bolt left drive shaft to gearbox → Running gear, axles, steering; Rep. Gr.40.
–  Install front exhaust pipe → Chapter.
Vehicles with manual gearbox
–  Install shift mechanism and adjust if necessary → 5-speed manual gearbox 0AF; Rep. Gr.34
–  Install slave cylinder for hydraulic clutch → 5-speed manual gearbox 0AF; Rep. Gr.30.
Vehicles with an automatic gearbox:
–  Install selector lever cable and adjust if necessary → Automatic gearbox 09G; Rep. Gr.37.
Continuation for all vehicles:
–  Install air conditioner compressor → Heating, air conditioning; Rep. Gr.87
–  Install poly V-belt → Chapter.
–  Install noise insulation → General body repairs, exterior; Rep. Gr.50.
–  Install plenum chamber bulkhead → General body repairs, exterior; Rep. Gr.50.
–  Fill coolant system with coolant → Chapter.
–  Connect battery → Electrical system; Rep. Gr.27.
–  Connect vehicle diagnosis tester.
–  Erase learnt values → vehicle diagnosis tester “Guided fault finding”.
–  Read all fault memories and clear all fault entries which may have been created due to assembly.
–  Carry out a road test.
–  Then carry out a vehicle system test and correct any faults that have been created.
  Note
If the fault memory was cleared, the readiness code must be generated → vehicle diagnosis tester “Guided functions”.
Torque settings:
  A10-0129
Threaded connection Torque setting
Bolts, nutsM810 Nm
 M820 Nm
 M1045 Nm
 M1260 Nm


Assembly mountings > < Securing engine to assembly stand