volkswagen Workshop Repair Guides

Volkswagen Workshop Service and Repair Manuals

Removing and installing washer fluid reservoir (vehicles with an auxiliary heater) > < Removing and installing filler neck for washer fluid reservoir
Removing and installing washer fluid reservoir (vehicles with no auxiliary heater)
Removing:
–  Switch off ignition and all electrical consumers and remove ignition key.
–  Remove filler neck for washer fluid reservoir → Chapter.
–  Remove front bumper cover → General body repairs, exterior; Rep. gr.63.
  Note
The connections to the pump and hose lines are colour-coded in order to prevent the washer fluid lines being incorrectly connected to the front and rear washer fluid pump -V59-. The hose fittings must be connected to the correct colour-coded pump connections during installation.
   
–  To release, turn securing clips at hose connections -3- and -5- and pull these off windscreen and rear window washer pump -V59--4-.
–  Drain any escaping fluid in a suitable container.
–  Release and disconnect connector -6- for windscreen washer fluid level sender -G33--7-.
–  Pull windscreen and rear window washer pump -V59--4- upwards out of reservoir and disconnect connector -2-.
–  Pull headlight washer pump -V11--9- upwards out of reservoir and disconnect connector -10-.
  N92-10095
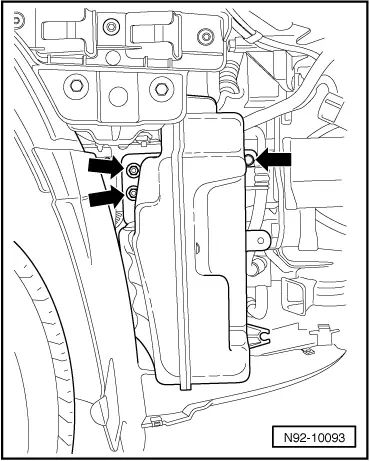
–  Remove securing bolts and nuts -arrows- from reservoir and remove reservoir from vehicle together with the connecting pipe for filler neck.
Installing:
Install in the reverse order of removal. When doing this, note the following:
–  Tighten all threaded connections to torques specified in assembly overview → Chapter.
–  On completion of installation work, bleed headlight washer system → Chapter.
  N92-10093

Removing and installing washer fluid reservoir (vehicles with an auxiliary heater) > < Removing and installing filler neck for washer fluid reservoir