
New Beetle
| Assembly overview - lock carrier |
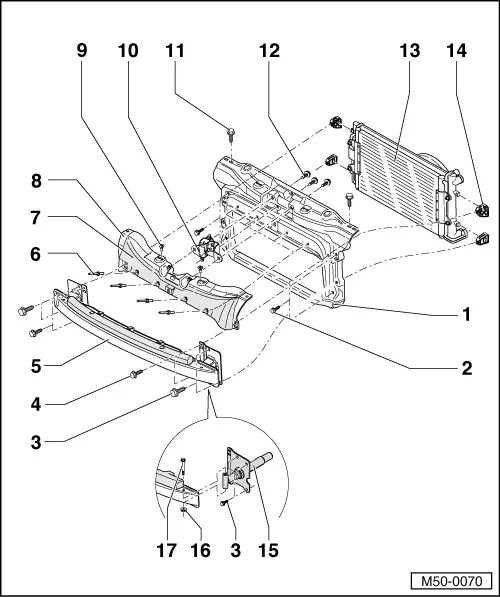
| 1 - | Lock carrier |
| q | Removing: |
| – | Removing front part → Chapter. |
| – | Disconnect cable on lock and separate electrical connections. |
| – | Remove bolts → Item and → Item and take off bumper carrier → Item. |
| – | Unbolt radiator and condenser from lock carrier. |
| – | Secure radiator and condenser in engine compartment. |
 Note
Note| t | Do not hang condenser up on lines. |
| t | Do not kink condenser lines. |
| – | Remove bolts → Item. |
| – | Remove lock carrier with connecting plate and lock. |
| q | Installing: |
| – | Align lock carrier to side members. |
| – | Adjust headlights. |
| 2 - | Bolt |
| q | Qty. 4 |
| q | 6 Nm |
| q | For radiator mounting |
| 3 - | Bolt |
| q | Qty. 4 |
| q | Qty. 6 (USA) |
| q | 30 Nm |
| 4 - | Bolt |
| q | Qty. 4 |
| q | 9 Nm |
| 5 - | Bumper carrier |
| q | With insulation |
| 6 - | Pop rivet |
| q | Qty. 4 |
| 7 - | Insulation |
| q | Bonded with butyl adhesive cord -AKL 450 005 05- |
| 8 - | Connecting plate |
| q | Secured to lock carrier with pop rivet |
| 9 - | Pop rivet nut |
| q | Qty. 2 |
| 10 - | Lid lock |
| q | Removing and installing → Chapter |
| 11 - | Bolt |
| q | 20 Nm |
| 12 - | Hexagon head bolt (self-locking) |
| q | 12 Nm |
| q | If reusing: clean thread of bolt using wire brush and thread of nut using thread chaser; coat bolt with locking fluid -D 185 400 A2- |
| 13 - | Radiator and condenser |
| 14 - | Radiator mounting |
| 15 - | Impact damper (USA) |
| 16 - | Nut (USA) |
| 17 - | Bolt (USA) |