volkswagen Workshop Repair Guides

Volkswagen Workshop Service and Repair Manuals

Checking oil pressure and oil pressure switch > < Renewing valve stem seals
4-Cyl. fuel injection engine (4-valve), Mechanics
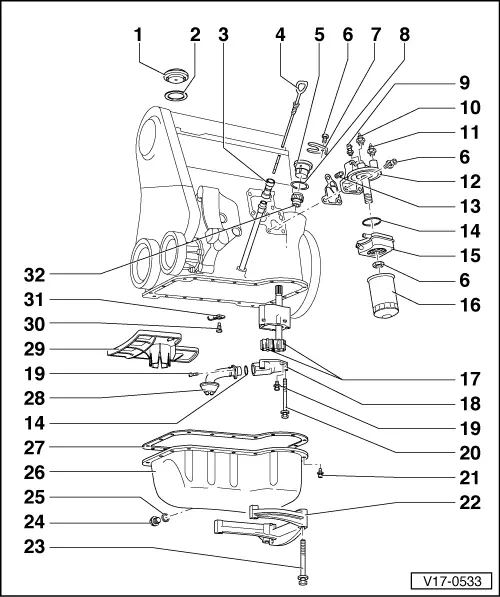
Removing and installing parts of the lubrication system

Notes:

  • ◆ If when repairing an engine, metal shavings or a large quantity of small metal particles caused, for example, by partial seizure of crankshaft and conrod bearings, are found in the engine oil, to prevent consequential damage, apart from thoroughly cleaning oil passages, it is necessary to renew the oil cooler.
  • ◆ The oil level must not be above the max. mark - danger of damaging catalyst!
    Marks , Fig. 3 .

Checking oil pressure => Page 17-8

Oil system capacity1):

     without oil filter 3.8 ltrs.
     with oil filter 4.3 ltrs.

     1)     Up-to-date figures:

=> Emissions test binder

Engine oil specifications:

Use engine oil to VW standard 500 00 or 501 01. Only in exceptional cases: Multi-grade oils corresponding to API-SF or SG.

 
V17-0533
  • Cap
  • Gasket
    • ◆ Renew if damaged
  • Guide
    • ◆ Pull off to draw out oil
  • Dipstick
    • ◆ The oil level must not be above the max. mark!
    • ◆ Marking => Fig. 3
  • Cap
    • ◆ With play compensation
  • 25 Nm
  • Clamp
  • Gasket
    • ◆ Renew
 
V17-0533
  • Oil temperature sender (G8), 10 Nm
    • ◆ For oil temperature gauge
    • ◆ White
  • 0,3 bar oil pressure switch (F22), 25 Nm
    • ◆ Brown
    • ◆ Wiring: blue/black
    • ◆ Checking => Page 17-8
    • ◆ If sealing ring is leaking nip open and replace.
  • 1,8 bar oil pressure switch (F1), 25 Nm
    • ◆ White
    • ◆ Wiring: yellow
    • ◆ Checking => Page 17-8
    • ◆ If sealing ring is leaking nip open and replace.
  • Oil filter bracket
  • Non-return valve, 5 Nm
 
V17-0533
  • O ring
    • ◆ Renew
  • Oil cooler
    • ◆ Coat contact area to flange, outside the seal, with AMV 188 100 02
    • ◆ Ensure clearance to adjacent components
    • ◆ Observe note
      => Page 17-1
  • Oil filter
    • ◆ Loosen with strap wrench
    • ◆ Tighten by hand
    • ◆ Observe installation instructions on oil filter
  • Gears
    • ◆ Checking backlash
      => Fig. 1
    • ◆ Checking axial clearance
      => Fig. 2
 
V17-0533
  • Oil pump cover with pressure relief valve
    • ◆ Opening pressure: 5.7...6.7 bar
  • 10 Nm
  • 20 Nm
  • 20 Nm
    • ◆ Remove and install with socket 3249
  • Support
  • 45 Nm
  • Oil drain plug, 40 Nm
  • Seal
    • ◆ Renew
  • Sump
    • ◆ Clean sealing surface before installing
 
V17-0533
  • Gasket
    • ◆ Renew
    • ◆ Before fitting coat sump/cylinder block flanges with "D2"
  • Suction pipe
    • ◆ Clean strainer if soiled
  • Baffle plate
    • ◆ Only fit with oil pump removed
  • Pressure relieve valve, 27 Nm
    • ◆ Opening pressure: 2.5...3.2 bar
  • Oil spray jet
    • ◆ For piston cooling
  • Drive gear
    • ◆ For oil pump drive
 
V17-0005

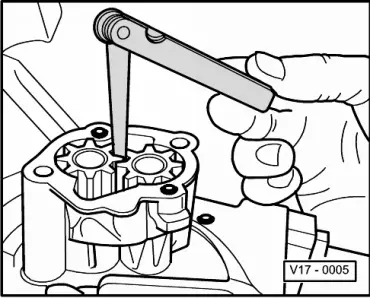
→ Fig. 1     Checking oil pump backlash

     New: 0.05 mm

     Wear limit: 0.20 mm

 
V17-0006

→ Fig. 2     Checking oil pump axial clearance

     Wear limit: 0.15 mm

 
N17-0037

→ Fig. 3     Marking on oil dipstick

  •      1 -     max. mark
  •      2 -     min. mark
  •      a -     Area above hatched field up to max. mark: Do not top-up with engine oil!
  •      b -     Oil level within hatched field: can be topped-up with engine oil
  •      c -     Area from min. mark up to hatched field: fill with max. 0.5 ltr. of engine oil!

Checking oil pressure and oil pressure switch > < Renewing valve stem seals