volkswagen Workshop Repair Guides

Volkswagen Workshop Service and Repair Manuals

Checking hydraulic bucket tappets > < Removing and installing camshaft oil seal
4-Cyl. Injection Engine, Mechanic
Servicing valve gear
Removing and installing camshaft

Special tools, testers and auxiliary items

  • ◆ Counter-hold tool 3036
  • ◆ Torque wrench V.A.G 1331 (5 - 50 Nm)
  • ◆ Torque wrench V.A.G 1576 (75 - 400 Nm)

Removing

  • ‒ Remove toothed belt guard upper part.
  • ‒ Loosen camshaft sprocket (counter-hold with 3036).
 
V13-1217
  • ‒ → Set camshaft sprocket to TDC No. 1 cylinder by turning the crankshaft. Mark on camshaft sprocket must align with arrow on toothed belt guard.
  • ‒ Release tensioner and take off toothed belt.
  • ‒ Remove upper part of intake manifold and cylinder head cover.
  • ‒ Pull off camshaft sprocket.
  • ‒ Remove woodruff key from camshaft.
  • ‒ First remove bearing caps 1, 3 and 5. Loosen bearing caps 2 and 4 alternately and diagonally.

Installing

Notes:

  • ◆ When installing the camshaft No. 1 cylinder cams must point upwards.
 
V15-0098
  • ◆ → When installing the bearing cap note offset, before installing camshaft fit bearing caps and determine fitting position.
  • ‒ Oil camshaft running surfaces.
  • ‒ Tighten bearing caps 2 and 4 alternately and
    diagonally to
         20 Nm.
  • ‒ Install bearing caps 1, 3 and 5 and also tighten to
         20 Nm.
  • ‒ Insert woodruff key in camshaft.
  • ‒ Install camshaft sprocket and tighten to
         80 Nm
    (counter-hold with 3036).
  • ‒ Install and tension toothed belt (adjusting valve timing)
    .

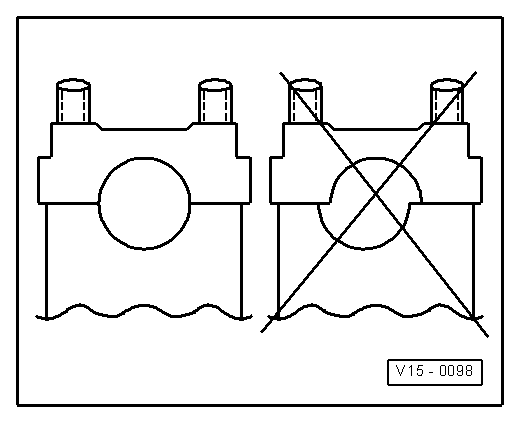
Note:

When new tappets have been installed the engine must not be started for about 30 minutes. Hydraulic compensation elements must settle (otherwise valves will strike pistons).

Checking hydraulic bucket tappets > < Removing and installing camshaft oil seal