volkswagen Workshop Repair Guides

Volkswagen Workshop Service and Repair Manuals

Servicing valve gear > < Removing and installing cylinder head
4-Cyl. injection engine (4 valve, roller rocker finger), Mechanics
Removing and installing cylinder head
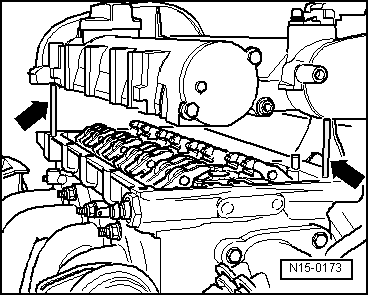
Removing and installing camshaft housing
 
W13-0047

Special tools, workshop equipment, test and measuring appliances and auxiliary items required

  • ◆ 10-222A Support bracket
  • ◆ 10-222A/1 Support for support bracket
  • ◆ T 10028 Counter-hold
  • ◆ T 10016 Camshaft locking device
  • ◆ V.A.G 1331 Torque wrench (5...50 Nm)
  • ◆ V.A.G 1332 Torque wrench (40...200 Nm)
  • ◆ D 188 003 A1 Sealant

Removing

Notes:

  • ◆ The camshafts are mounted in the camshaft housing on this engine. Therefore the camshaft housing can only be removed after first removing both toothed belts.
  • ◆ The camshaft housing sealing surface must not be reworked.
  • ◆ Removing and installing camshaft , Servicing valve gear.

Work sequence

  • ‒ First check whether a coded radio is fitted. If this is the case obtain the anti-theft coding.
  • ‒ With the ignition switched off disconnect the battery earth strap.
  • ‒ First remove both toothed belts
    .
  • ‒ Remove spark plug connectors with H.T. cables.
  • ‒ Pull 4 pin connector off ignition transformer.
  • ‒ Pull connector off Hall sender.
 
N15-0074
  • ‒ → Remove securing bolts from exhaust gas recirculation valve -1- as well as cable retainer -2-.
  • ‒ Remove toothed belt guard rear securing bolt (in area of right-hand lifting eye).
  • ‒ Loosen camshaft housing bolts (from outside to inside and in cross-over sequence) and remove.
  • ‒ Carefully lift camshaft housing off.

Installing

Prerequisites

  • ● The crankshaft toothed belt sprocket is secured to the crankshaft with the securing bolt and two washers.
  • ● The pistons must not be positioned at TDC.
  • ● Camshaft sprockets locked into camshaft housing fitting holes with T 10016 and secured against turning.

Note:

If a piston is at TDC the valves could strike the piston when turning the camshafts.

  • ‒ Remove sealant remnants on cylinder head and camshaft housing with a commercially available sealant remover.
  • ‒ Prevent dirt and sealant remnants from entering cylinder head.
 
N15-0075
  • ‒ Clean sealing surface, must be free of oil and grease.
  • ‒ → Apply a thin even coat of sealant onto the clean camshaft housing sealing surface. See hatched area on illustration.

Note:

The sealant must not be applied too thick otherwise excess sealant can enter the oil channels and cause damage to the engine.

 
N15-0076
  • ‒ → Ensure all roller rocker fingers contact the valve ends -1- correctly and they are clipped into their respective support elements -2-.
  • ‒ Screw two studs (M6 x 70) into cylinder head before installing camshaft housing.
 
N15-0173
  • ‒ → Carefully fit the camshaft housing vertically onto the cylinder head studs and dowel pins -arrows- from above.
  • ‒ Tighten camshaft housing new securing bolts (evenly from inside to outside using cross-over sequence).

Ensure that camshaft housing is not canted.
     Tightening torque: 10 Nm + 1/4 turn (90 °) further.

Note:

  • ◆ Sealant must be left dry for approx. 30 minutes after installing camshaft housing.

The rest of the assembly is basically a reverse of the dismantling sequence.

Servicing valve gear > < Removing and installing cylinder head