
Polo Mk4
 WARNING
|
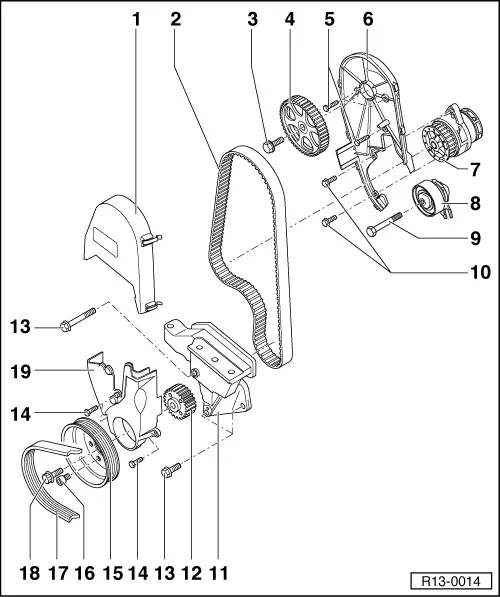
| 1 - | Upper cover to mechanical distributor |
| 2 - | Toothed belt |
| q | Mark rotation direction before removal. |
| q | Check for wear. |
| q | Do not bend. |
| q | Removal, installation and adjustment → Chapter. |
| 3 - | 20 Nm + 90° |
| q | Replace after each removal. |
| q | To loosen and tighten, immobilize the camshaft gear with the Pin wrench -3036-. |
| 4 - | Camshaft gear |
| q | Check the fastening during installation. |
| q | Check the installation position of toothed belt → Chapter. |
| 5 - | 10 Nm |
| q | Install with Liquid sealant -D000 600 A2-. |
| 6 - | Front cover of the mechanical distribution |
| 7 - | Water pump |
| q | With integrated sealing gasket. |
| q | The sealing gasket must not be separated from the water pump. |
| q | In case of damages and leaks, replace the entire pump together with the sealing. |
| q | Check if it turns smoothly. |
| q | Removal and installation → Rep. gr. 19 „Cooling system“. |
| 8 - | Toothed belt tensioning roller |
| q | Check → Chapter. |
| q | Toothed belt: removal, installation and adjustment → Chapter. |
| 9 - | 20 Nm |
| 10 - | 20 Nm |
| 11 - | Engine support |
| 12 - | Crankshaft sprocket |
| q | Check installation position of toothed belt → Chapter. |
| 13 - | 50 Nm |
| 14 - | 10 Nm |
| 15 - | Crankshaft pulley |
| q | Check the fastening during installation. |
| q | Removal and installation → Chapter. |
| q | Remove and install of Poly-V belt → Chapter. |
| 16 - | 20 Nm |
| 17 - | Poly-V belt |
| q | Mark the spinning direction before the removal. |
| q | Remove and install of Poly-V belt → Chapter. |
| q | Poly-V belt routing → Chapter. |
| 18 - | 90 Nm + 90° |
| q | Replace after each removal. |
| q | To loosen and tighten, use Wrench -3415-. |
| q | Tightening continuation can be carried out in several steps. |
| q | Tightening angle can be measured with a common protractor, for example, Hazet 6690. |
| 19 - | Lower cover to the mechanical distributor |
 Note
Note
|

| 1 - | Cylinder block |
| q | Remove and install crankshaft → Chapter. |
| q | Remove and install pistons and conrods → Chapter. |
| q | Of cast iron. |
| 2 - | 50 Nm |
| q | Tightening sequence: first tighten the upper right screw, then the lower right screw, and finally the left screw (front view, in the direction the vehicle moves). |
| 3 - | Oil filter |
| q | Release → Chapter |
| q | Hand tighten. |
| q | Follow the oil filter installation instructions. |
| 4 - | M 8: Tighten to 20 Nm + 90°, M 10: 45 Nm |
| q | Replace after each removal. |
| 5 - | 10 Nm + 90° |
| q | Replace after each removal. |
| q | Loosen fastening screws from crankcase to cylinder block, on the pulley side (4 units), from inner side of the the crankcase. |
| 6 - | Crankcase |
| q | Two parts. |
| q | Clean sealing surface thoroughly before installation. |
| q | Install with Silicone sealant for engine -D 176 404 A2 ou A3-. |
| q | To remove and install, remove oil sump from crankcase. |
| q | Removal and installation → Chapter. |
| 7 - | Oil draining plug, 30 Nm |
| q | With integrated sealing ring. |
| q | Replace. |
| 8 - | Compact support |
| q | For Generator (Alternator) -C-, air conditioner compressor, power steering oil pump and Poly-V belt fastening element. |
| q | Remove and install the compact support in vehicles with air conditioning: → Ventilation system; Rep. gr.87. |
| 9 - | Tensioning roller |
| q | To Poly-V belt. |
| q | Not applied to the (elastic) Poly-V belt. |
| q | Vehicles with air conditioning and/or power steering only. |
| q | To loosen Poly-V belt, turn with 16-mm wrench. |
| q | Remove and install of Poly-V belt → Chapter. |
| 10 - | Support |
| q | For snap-in connectors. |
| 11 - | 40 Nm. |