
Up!
|
|
|
|
|
|
|
|
|
 Note
Note| t | There's very limited space between lock carrier and wings. |
| t | There is a high risk of damage to the wings. |
| t | It is essential to protect the wing ends against damage accordingly. |
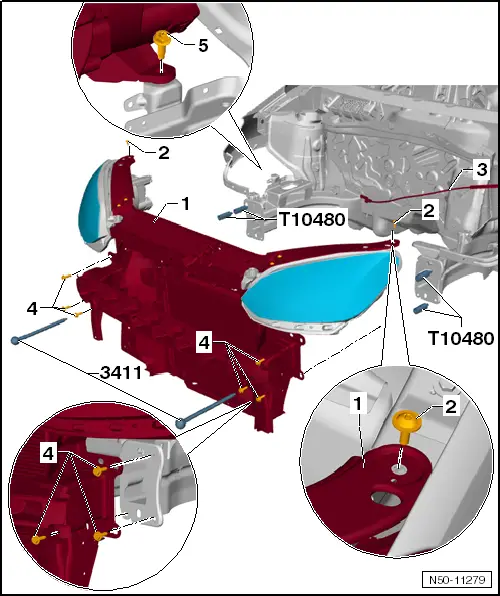
| – | Remove front bumper cover → Chapter. |
| – | Unscrew bolt -5- from headlight. |
| – | Detach cable -3- from bonnet lock → Chapter. |
| – | Only remove one bolt -4- on left and right side of each longitudinal member. |
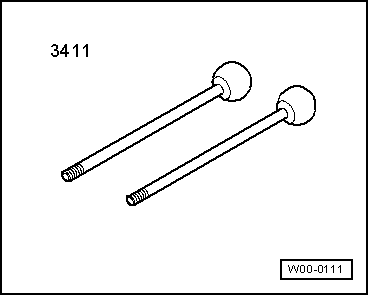
| – | Screw in special tool guide pins -3411- to left and right longitudinal members where the bolts were previously located. |
| – | Remove bolts -2-. |
| – | Remove remaining bolts -4- on left and right side of longitudinal members. |
| – | The lock carrier with add-on parts -1- can be pulled forwards about 10 cm on the special tool guide pins -T 10093-. When doing this, be careful with the electrical wires/cables leading to lock carrier and, if necessary, detach connectors. |
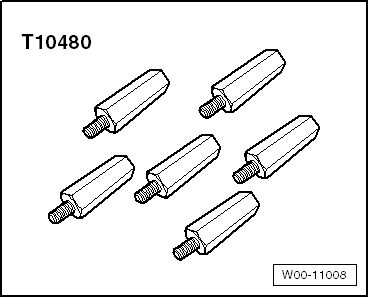
| – | To secure lock carrier, install special tool T10480 -Adapter- on left and right between bumper carrier and longitudinal member. |
|
| Carry out following work: |
| – | Remove special tool T10480 -Adapter- on left and right from between bumper carrier and longitudinal member. |
| – | Push lock carrier together with add-on parts -1- on the guide pins -3411- and onto the longitudinal member. |
| – | Start bolts -2 and 4-. |
| Further installation is performed in the reverse order of removal. |
| – | Align lock carrier together with add-on parts -1- to longitudinal members and between wings → Rep. gr.00. |
| Specified torque for bolts -2 and 4- → Chapter. |
| – | Adjust headlights → Electrical system; Rep. gr.94. |