audi Workshop Repair Guides

Audi Workshop Service and Repair Manuals

Checking condensation drain hose > < Possible cause of odour formation at the air conditioner
Cleaning evaporator of air conditioner with ultrasonic A/C cleanerVAS 6189A
Cleaning evaporator of air conditioner with ultrasonic A/C cleaner -VAS 6189A-
  Note
t  The odour can only be eliminated by cleaning with the ultrasonic A/C cleaner -VAS 6189A- if it actually occurs in the evaporator.
t  A wide variety of evaporator cleaning methods which act in different ways are available on the market. The currently approved evaporator cleaning method authorised by Audi employs the ultrasonic A/C cleaner -VAS 6189A-, for example. Further methods authorised and approved by Audi and the corresponding information can be found for example in the „Audi ServiceNet“ (⇒ table).
–  Select the path:
   
Audi ServiceNet
 Products
  Maintenance and wear
   Air conditioner cleaning

Special tools and workshop equipment required
t  Ultrasonic A/C cleaner -VAS 6189A-
t  Cleaning fluid -VAS 6189/1-
t  Suction nozzle -VAS 6288-
t  Commercially available dust extractor
Sequence of operations
–  By switching from fresh air to air recirculation mode, check whether the air conditioning unit evaporator is really the source of the odour → Chapter „Possible cause of odour formation at the air conditioner“.
–  Check and if necesssary clean the plenum chamber water drain → Chapter.
–  Remove the dust and pollen filter → Chapter.
–  Clean the mounting slot for the dust and pollen filter → Anchor.
–  Seal the opening for the dust and pollen filter at the air conditioning unit.
–  Start the engine.
–  Open the dash panel vents, close the windows and sun roof of the vehicle.
   
Vehicles with manually controlled air conditioner:
–  Use the rotary air distribution switch -3- to set the air flow direction to „dash panel vents“.
–  On the operating unit, air conditioning system control unit -J301-, activate „air recirculation mode“ and switch off the air conditioner compressor.
l  The lamp in the button -5- lights.
l  The lamp in the button -4- does not light.
–  Set the lowest possible temperature.
l  Rotary temperature switch -1- on „Cold“ stop.
–  Set the rotary fresh air blower switch -2- to speed „1“.
  A87-10864
Vehicles with automatically controlled air conditioner:
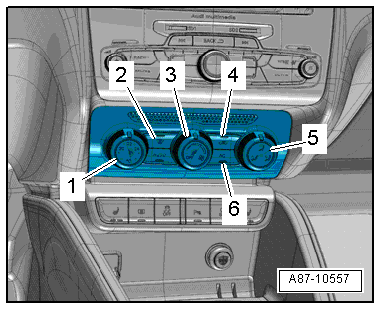
–  On the operating unit, Climatronic control unit -J255-, activate „air recirculation mode“ and switch off the air conditioner compressor.
l  
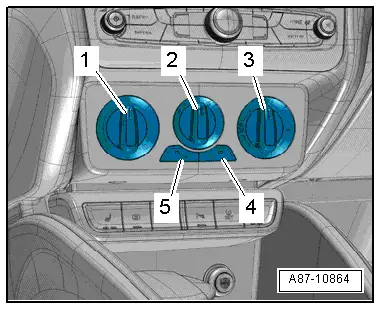
The lamp in the button -4- lights.
l  The lamp in the button -6- does not light.
–  Set the lowest possible temperature.
l  Rotary temperature switch -1- on „Cold“ stop.
–  Use the rotary air distribution switch -5- to set the air flow direction to „dash panel vents“.
–  Set the rotary fresh air blower switch -3- to the lowest blower speed ( -V2- runs at minimum speed).
All vehicles (continued):
–  Shake the bottle of cleaning fluid -VAS 6189/1- and pour the fluid into the ultrasonic A/C cleaner -VAS 6189A-.
  Note
For handling of ultrasonic A/C cleaner, refer to → Operating instructions of VAS 6189A.
–  Position the ultrasonic A/C cleaner -VAS 6189A- in the passenger's footwell.
–  Start up the ultrasonic A/C cleaner -VAS 6189A- (in accordance with the appropriate operating instructions) and position the outlet hose such that the vapour emerging is drawn in by the fresh air blower -V2- via the air recirculation opening of the air conditioning unit (in the passenger's footwell behind the glove compartment).
–  Close the vehicle doors.
  Note
The cleaning process takes roughly 15 to 20 minutes and is completed when no further vapour emerges from the outlet hose of the ultrasonic A/C cleaner -VAS 6189A-.
–  Switch off the ultrasonic A/C cleaner -VAS 6189A-.
–  Open the vehicle doors and vent the vehicle for at least 10 minutes.
–  Remove the ultrasonic A/C cleaner -VAS 6189A- from the vehicle and clean it.
–  Switch off the ignition.
–  Install the dust and pollen filter → Chapter.
  A87-10557

Checking condensation drain hose > < Possible cause of odour formation at the air conditioner