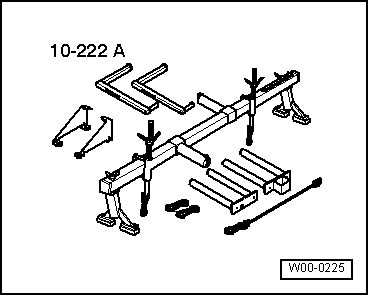
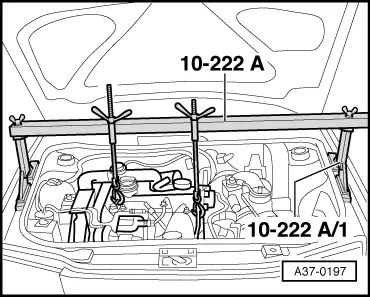
audi Workshop Repair Guides

Audi Workshop Service and Repair Manuals

Removing and installing pendulum support > < Removing and installing gearbox mounting
Removing and installing gearbox bracket
Special tools and workshop equipment required
   
t  Support bracket -10-222 A-
Removing gearbox bracket
–  Remove engine cover panel.
–  Obtain radio code on vehicles with coded radio.
–  With the ignition switched off, disconnect battery earth strap.
  W00-0225
–  Detach air hose -1- and connector -2- at air mass meter -G70-.
–  Remove bolts -3- and -4- and detach air cleaner housing → Repair group 24.
–  If there are hoses and cable connections in area of engine lifting eyes for support bracket -10 - 222 A-, remove these now.
  A10-1491
–  Assemble support bracket -10 - 222 A- together with racks -10 - 222 A /1-.
–  Attach spindles of support bracket to engine lifting eyes.
–  Take up weight of engine/gearbox assembly via the spindles, but do not raise.
–  Remove centre noise insulation (below engine/gearbox) and left noise insulation → Rep. Gr.50.
  A37-0197
–  Disconnect exhaust system at clamp -arrows-.
  Note
The flexible pipe connection (de-coupling element) in the front exhaust pipe must not be bent more than 10 ° - otherwise it can be damaged.
–  Tie up the front exhaust pipe.
  V26-0733
–  Unbolt pendulum support -arrows-.
  A37-0200
–  Remove bolts -arrows A- at left mounting from gearbox mounting/gearbox bracket.
–  Detach retainer for power steering pipe from rear bolt for gearbox bracket.
  Note
On some vehicles the retainer for the power steering pipe is fitted to the gearbox bracket.
–  Remove bolts -arrows B-.
–  Lower engine/gearbox assembly via the spindles until gearbox bracket can be detached from gearbox.
Installing gearbox bracket
Installation is carried out in reverse sequence; note the following:
  N34-0711
–  Renew bolts -arrows A- and -arrows B-.
–  Initially hand-tighten new bolts -arrows B-.
–  Then tighten bolts -arrows B- to specified torque.
  N34-0711
Bolts -arrows B-50 Nm + 90° 1)2)
l  1) Renew bolts
l  2) 90° is equivalent to a quarter turn

–  Pull gearbox up to gearbox mounting via spindle on support bracket -10-222 A- in order to fit new bolts -arrows A- in gearbox bracket.
  Caution
Before tightening bolts between gearbox mounting and gearbox bracket, the mounting and bracket must be aligned in an absolutely parallel position, otherwise the threads will be damaged.
–  Bolt gearbox bracket onto support arm of gearbox mounting using new bolts -arrows A-.
  Note
When installing gearbox ensure engine/gearbox mountings are installed stress-free → Rep. Gr.10.
   
Bolts -arrows B-60 Nm + 90° 1)2)
l  1) Renew bolts
l  2) 90° is equivalent to a quarter turn

  WARNING
Do not remove support bracket -10 - 222 A- until all bolts securing the engine/gearbox mountings (left and right) have been tightened to the specified torque.
–  Install pendulum support → Chapter.
–  Assemble exhaust system and align so it is free of stress → Rep. Gr.26.
–  Install complete air cleaner housing → Repair group 24.
–  Install engine cover panel.
–  Connect the battery.
  Note
When the battery is reconnected, please remember to check and activate the vehicle equipment (radio, clock, convenience electrical systems etc.).
–  Install centre noise insulation (below engine/gearbox) and left noise insulation → Rep. Gr.50.
   

Removing and installing pendulum support > < Removing and installing gearbox mounting