Audi Workshop Service and Repair Manuals
HOME
FEATURES
MENU
INDEX
ABOUT US
Removing and installing oil pan >
< Removing and installing parts of the lubrication system|Part I
A3 Mk1
Power unit
4-cyl TDI®-Engine, Mechanical Components
Engine lubrication / Removing and installing parts of the lubrication system
Part II
4-cyl TDI®-Engine, Mechanical Components
Removing and installing parts of the lubrication system
Part II
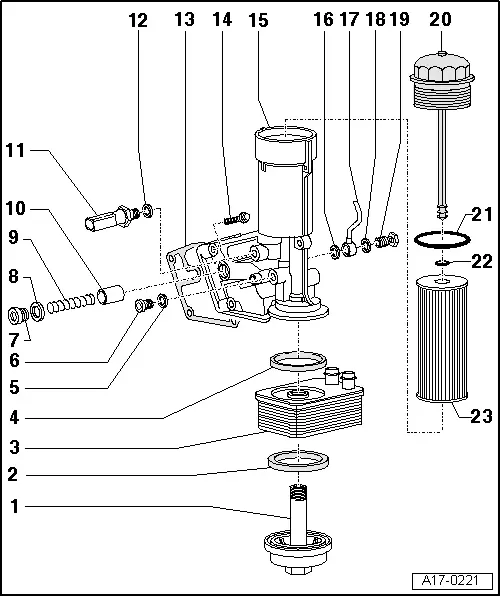
Screw plug - 25 Nm
Seal
◆
Replacing
Fluid cooler
◆
Different versions
◆
See note
=>Page 17-1
◆
Coolant hose connection diagram => Page 19-4
Seal
◆
Replacing
Sealing ring
◆
Replacing
Screw plug - 10 Nm
Screw plug - 40 Nm
Sealing ring
◆
Replacing
Spring
◆
For pressure relief valve approx. 5 bar
Piston
◆
For pressure relief valve approx. 5 bar
Oil pressure switch -F1 - 20 Nm
◆
0.7 bar - brown
◆
Checking => Page 17-19
Sealing ring
◆
Replacing
Seal
◆
Replacing
14 Nm + 90° (1/4 turn) further
◆
Replacing
◆
First attach bolt top left and right, then tighten all four bolts diagonally
Oil filter bracket
Sealing ring
◆
Replacing
Oil supply pipe
◆
To turbocharger
◆
Note installation sequence:
‒
First screw in both wiring ends loosely.
‒
Then tighten wiring ends to final torque.
‒
Lastly attach bracket.
Sealing ring
◆
Replacing
Banjo bolt - 25 Nm
Sealing cap - 25 Nm
◆
Loosen and tighten with oil filter wrench 3417
O-ring
◆
Replacing
O-ring
◆
Replacing
Oil filter element
◆
Remove from sealing cap -Item 20-.
◆
When changing filter, replace O-rings
-Item 21- and -Item 22-
◆
Note correct installation position: Top
◆
Observe change intervals
=> Maintenance Manual
Power unit
4-cyl TDI®-Engine, Mechanical Components
Engine lubrication / Removing and installing parts of the lubrication system
Part II
Removing and installing oil pan >
< Removing and installing parts of the lubrication system|Part I