audi Workshop Repair Guides

Audi Workshop Service and Repair Manuals

Removing and installing upper section of intake manifold - vehicles with engine code APF > < Removing and installing cylinder head
4-cylinder Engine (2-valve), Mechanical Components
Removing and installing cylinder head
Removing and installing upper section of intake manifold - vehicles with engine codes AEH, AKL
 
W00-0079

Special tools, workshop equipment, and other items required

  • ◆ Hose clamps 3094
  • ◆ Adhesive sealant

=> Parts List

 
A10-1490

Removing

  • ‒ → Remove the front engine cover -arrows-.
 
A10-1491
  • ‒ → Disconnect the air duct hose -1- from the air mass meter.
  • ‒ Unplug connector -2- at air mass meter.
  • ‒ Unscrew bolts -3- and -4-.
  • ‒ Remove air cleaner housing.

 
A10-1492
  • ‒ → Disconnect hoses -1- and -3-.
  • ‒ Remove the air duct, release spring clamp -2- for this purpose.
 
A15-0847
  • ‒ → Detach the throttle cable -arrows-.
  • ‒ Disconnect hose -1- to ACF.
  • ‒ Unplug connectors:
  •     2 -    Intake air temperature sender -G42
  •     3 -    Throttle valve control part -J338
  • ‒ Lay wiring aside.

 
A15-0848
  • ‒ → Clamp off coolant hoses with hose clamps 3094.
  • ‒ Disconnect the coolant hoses at the throttle valve connection.
 
A10-1494
  • ‒ → Detach the vacuum hose -arrow- to the brake servo at the intake manifold.
  • ‒ Turn the breather housing clockwise and detach from the cylinder head.
  • ‒ Close off the openings in the cylinder head cover with a clean cloth.

 
A15-0849
  • ‒ → Unplug connector -1- at intake manifold changeover valve -N156.
  • ‒ Disconnect vacuum hose -2-.
 
A15-0155
  • ‒ Detach earth strap at bracket for upper section of intake manifold.
  • ‒ → Remove the two bolts arrow on the rear intake manifold mounting (one on the left, one on the right) -arrow-.

 
A15-0850
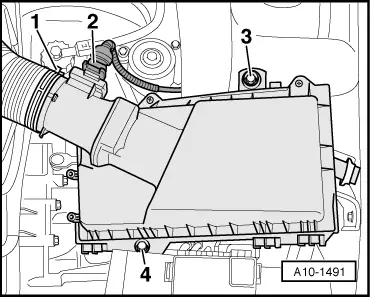
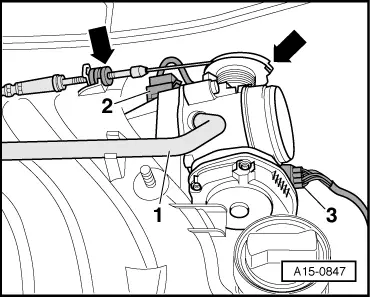
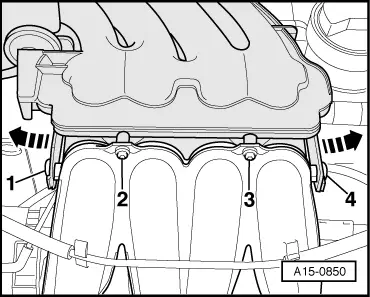
  • ‒ → Remove bolts -1- and -2-.
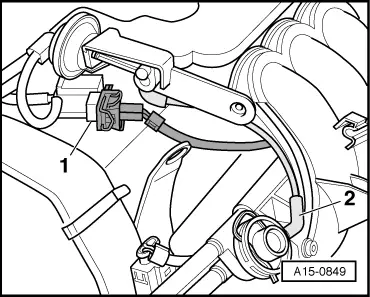
  • ‒ Where fitted, lever off the clips -1- and -4-.
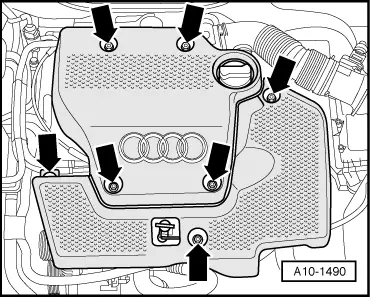
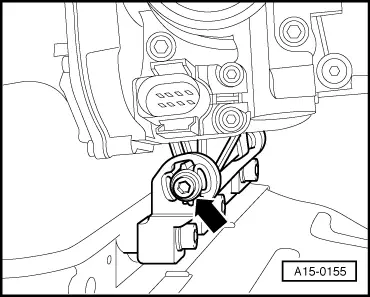
  • ‒ Pull the retaining lugs slightly to the side to release -arrows-.
  • ‒ Press off the upper section of the intake manifold from the lower section rearwards.

Note:

Plug the intake ports of the intake manifold (lower section) with clean cloths.

Installing

Installation is carried out in the reverse order; note the following:

Note:

Replace seals and gaskets.

  • ‒ Bond the sealing rings onto the lower section of the intake manifold, between the upper and lower sections of the manifold, with adhesive sealant.
    • ‒ Adhesive sealant

=> Parts List

  • ‒ Push the upper section onto the bottom section of the intake manifold and bolt into place.
  • ‒ Allow the retaining lugs on the left and right to engage and secure each with a clip.
  • ‒ Coat the collar of the bolts for the rear intake manifold mounting with silicone-free lubricant and tighten.
    • ‒ Lubricant

=> Parts List

  • ‒ Adjust throttle cable:

=> Fuel Supply System - Petrol Engines; Repair group 20; Servicing throttle mechanism - Vehicles with mechanical throttle mechanism

  • ‒ Top up coolant .

Tightening torques

Component

Nm

Upper section of intake manifold to lower section

3

Upper section of intake manifold to support

10

Earth wire to support for upper section of intake manifold

10

Removing and installing upper section of intake manifold - vehicles with engine code APF > < Removing and installing cylinder head