audi Workshop Repair Guides

Audi Workshop Service and Repair Manuals

Intake manifold - exploded view > < Removing and installing cylinder head cover (right-side)
Removing and installing cylinder head
Special tools and workshop equipment required
   
t  Special wrench, long reach -T10070-
Removing
  Note
t  All cable ties which are released or cut open when removing must be fitted in the same position when installing.
t  The following description shows the removal and installation of the cylinder head (left-side). The procedure for the right-side cylinder head is the same.
–  Remove engine → Chapter.
–  Leave engine on scissor-type assembly platform -VAS 6131- with gearbox attached.
–  Remove secondary air pump → Chapter.
–  Remove intake manifold → Chapter.
  W00-1172
–  Take electrical connector -2- for Lambda probe 2 -G108- out of bracket (left-side) and unplug it.
–  Remove heat insulation sleeve at wiring harness and move wiring clear.
  Note
Illustration shows electrical connectors when installed.
  A10-0299
–  Slacken clip -1-.
–  Unscrew bolts -2- and -3- and remove heat shield from front exhaust pipe (left-side).
  A26-10253
–  Unscrew exhaust gas temperature sender 1 for cylinder bank 2 -G236--arrow- from exhaust manifold flange.
  A21-10103
–  Remove bolts -1 ... 3-.
  A21-10105
–  Unplug electrical connector -5- at Hall sender 2 -G163-.
–  Detach vacuum hose -1- from combination valve for secondary air system.
–  Remove coolant hose -3-, if fitted.
–  Unscrew bolts -2-, -6- and -7-.
  Note
t  The rear coolant pipe remains installed.
t  Disregard -item 4-.
–  Remove toothed belt → Chapter.
–  Take off camshaft sprocket.
  A19-10253
–  Unscrew toothed belt cover (rear left) -arrows-.
–  Unplug electrical connector at inlet camshaft control valve 2 -N208-.
  A15-0089
–  Unbolt front coolant pipe from cylinder head -arrows-.
  A15-0061
–  Unscrew bolts -arrows- and remove bracket for air pipe.
  A15-10272
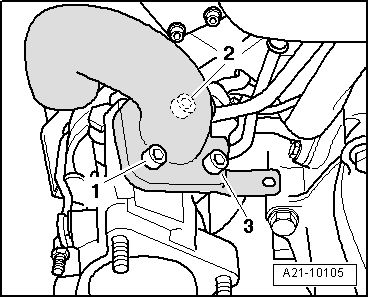
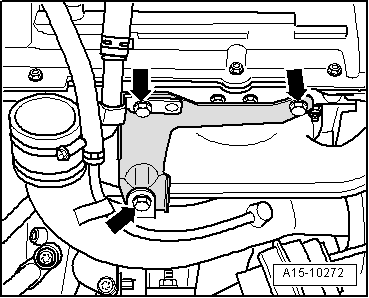
–  Remove cylinder head cover (left-side) → Chapter.
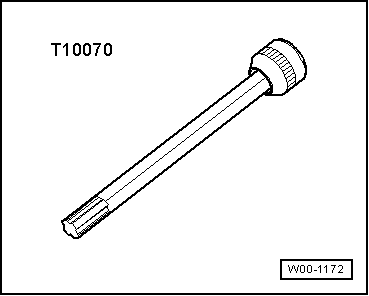
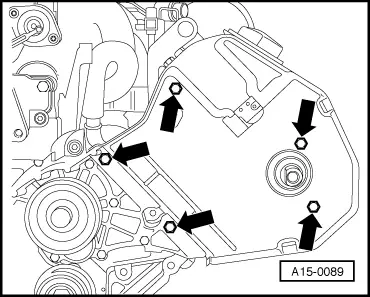
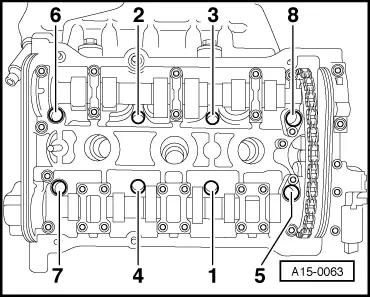
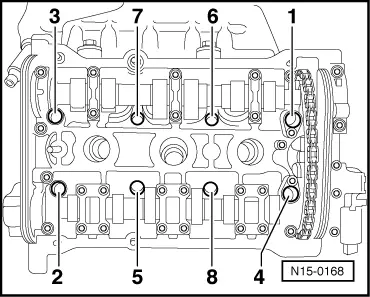
–  Loosen cylinder head bolts in the sequence: -1 ... 8- using special wrench, long reach -T10070-
–  Remove cylinder head bolts and carefully detach cylinder head.
Installing
  Note
t  Renew the cylinder head bolts.
t  Renew self-locking nuts and bolts when performing assembly work.
t  Renew bolts which are tightened to a specified angle as well as oil seals, gaskets and O-rings.
t  If repairing, carefully remove any remaining gasket material from the cylinder head and cylinder block. Ensure that no long scores or scratches are made on the surfaces.
t  Carefully remove any remaining emery and abrasive material.
t  No oil or coolant must be allowed to remain in the blind holes for the cylinder head bolts in the cylinder block.
t  Do not remove new cylinder head gasket from packaging until it is ready to be fitted.
t  Handle gasket very carefully. Damage to the silicone coating or the indented area will lead to leaks.
t  Cylinder heads which have cracks between the valve seats or between a valve seat insert and the spark plug thread can be re-installed without reducing service life, provided the cracks are only slight and do not exceed a maximum of 0.3 mm in width, and no more than the first 4 turns of the spark plug threads are cracked.
t  When installing an exchange cylinder head with fitted camshafts, the contact surfaces between the bucket tappets and cams must be oiled after installing the cylinder head.
t  The plastic protectors fitted to protect the open valves should not be removed until the cylinder head is ready to be fitted.
t  
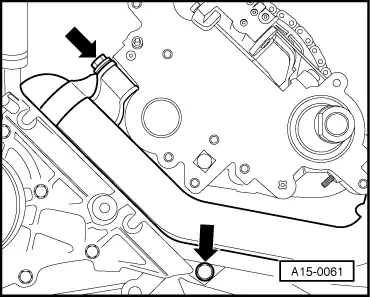
When installing a replacement cylinder head supplied without fitted camshafts, a sealing cap must be driven into the front of the respective cylinder head → Fig..
t  
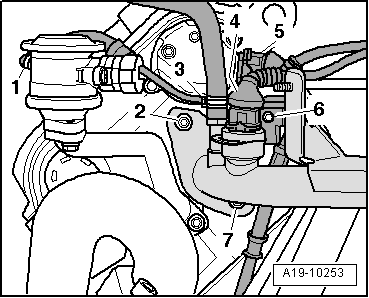
Secure all hose connections with the correct type of hose clips (same as original equipment) → Parts catalogue.
t  Fit all cable ties in the original positions when installing.
t  After working on the valve gear, turn the engine carefully at least 2 rotations by hand to ensure that none of the valves make contact when the starter is operated.
t  When fitting a new cylinder head or cylinder head gasket, drain off all the old coolant and refill with new coolant.
  N15-0168
Installation is carried out in the reverse order; note the following:
–  Before installing cylinder head, set crankshaft and camshafts to TDC:
l  Large holes -arrows- in locating plates at camshaft sprockets must be opposite one another on inside.
  A13-0541
l  The locking pin -3242- must be screwed in.
  V13-0831
–  Fit cylinder head gasket.
l  Note position of centering pins -arrows- in cylinder block.
l  Check installation position of cylinder head gasket: the word “oben” (top) or the Part No. should face towards the cylinder head.
–  Fit the cylinder head.
–  Insert new cylinder head bolts and tighten finger-tight.
  A15-0324
–  Tighten cylinder head bolts in 3 stages in the sequence indicated:
1.  Tighten with torque wrench to 60 Nm.
2.  Turn 90° (1/4 turn) further using a rigid wrench.
3.  Turn 90° (1/4 turn) further using a rigid wrench.
  Note
Cylinder head bolts do not have to be torqued down again later after repair work.
–  Connect vacuum hoses → Chapter.
–  Install cylinder head cover: left-side → Chapter, right-side → Chapter.
–  Install toothed belt (adjust valve timing) → Anchor.
–  Install vibration damper → Chapter.
–  Install poly V-belt → Chapter.
–  Install viscous fan → Chapter.
–  Install intake manifold → Chapter.
–  Install secondary air pump → Chapter.
–  Install engine → Chapter.
Tightening torques
  A15-0063
ComponentNm
Bracket for air pipe to:Cylinder head22
Air pipe22
Front coolant pipe to cylinder headM610
M822
Rear toothed belt cover to cylinder head10 1)
Coolant pipe (rear) to cylinder head10
Turbocharger to exhaust manifold60 2)3)
Exhaust gas temperature sender 1, bank 2 -G236- to exhaust manifold27
l  1) Install bolts using locking fluid; locking fluid → Parts catalogue.
l  2) Renew bolts.
l  3) Coat threads and contact surface of bolt heads with high-temperature paste; for high-temperature paste refer to → Parts catalogue.


Intake manifold - exploded view > < Removing and installing cylinder head cover (right-side)