| Removal and Installation Special Tool(s) | | Separator, quick-fit coupling 1/2" (blue) 412-027 (34-001) | | | Separator, quick-fit coupling 5/8" (black) 412-038 (34-003) | Materials Name Specification O-rings (green) Removal | | -
Standard preparatory measures - Make a note of the radio keycode.
- Make a note of the preset radio stations.
| | | -
CAUTION:Disconnect the battery negative lead. NOTE:"Safety Precautions" and "General Requirements and Safety Measures for Maintenance and Repair Work". For additional information, refer to Section 100-00 General Information. | | | -
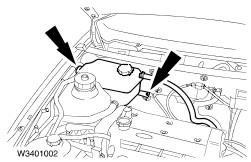
Detach the coolant expansion tank. - Unhook the coolant expansion tank from its bracket.
| | | -
Remove the bulkhead extension. - Unclip the cover of the central junction box (CJB).
| | | -
Remove the bulkhead extension (continued). - Remove the bolts.
- Unclip the connector.
| | | -
Remove the bulkhead extension (continued). | | | -
NOTE:Plug the refrigerant line and the evaporator. Disconnect the refrigerant line at the evaporator. | | | -
NOTE:Plug the refrigerant line and the condenser. Disconnect the refrigerant line at the condenser. | Installation | | -
NOTE:Fit new O-rings on the refrigerant pipes before connecting them. Coat the new O-rings with refrigerant oil before fitting them. Refit the components in reverse order. | | | -
Connect the battery negative lead. - Reprogramme the preset radio stations.
- Road test the vehicle to collect data for the PCM.
| | | -
Check the operation of the air conditioning system. | | |