Drain the engine oil by the drain plug and remove the oil pan bolts.
CAUTION:In order to avoid damaging the mating face, only use the specified special tools to detach the oil pan. Do not use a chisel or a screwdriver for removal.
Detach the oil pan.
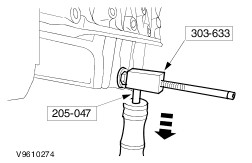
Attach the special tools and tighten the lock nut against the oil pan. Use several blows to loosen the oil pan from the intermediate housing.
Once the oil pan is loosened, turn it through 90° and take it off.
Installation
Preparatory operations
NOTE:Do not damage the mating faces.
Clean the mating faces.
NOTE:The mating faces must be free of oil and sealer residue.
Clean off any oil residue or sludge from the oil pan.
CAUTION:Use studs. If any sealer gets into the blind holes this can cause damage to the lower crankcase.
Screw 10 studs (M6 x 20) into the indicated blind holes.
NOTE:Attach the oil pan within 10 minutes of applying the sealer.
Apply a 3 mm thick bead of sealerto the oil pan flange.
NOTE:Once the oil pan has made contact with the lower crankcase it must not be removed.
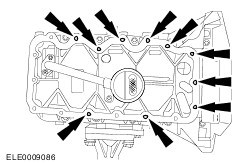
NOTE:Tightening sequence
Attach the oil pan and tighten the bolts in two stages. Screw in the drain plug with a new seal (shown on an engine removed from the vehicle).
Stage 1: 6 Nm
Stage 2: 10 Nm
Lower the vehicle.
Fill up with engine oil.
Refer to the General Specifications for the correct amount of engine oil .